> ## Documentation Index
> Fetch the complete documentation index at: https://support.bolt.new/llms.txt
> Use this file to discover all available pages before exploring further.
# Manage your projects
> Understand how to view, organize, and maintain your projects throughout their lifecycle in Bolt.
After you create a project in Bolt, you can view, rename, duplicate, download, or delete it at any time.
## View a list of your projects
When you're logged in to Bolt, you can access your project list from the homepage or from inside an existing project.
### From the homepage menu
 1. Log in to Bolt.
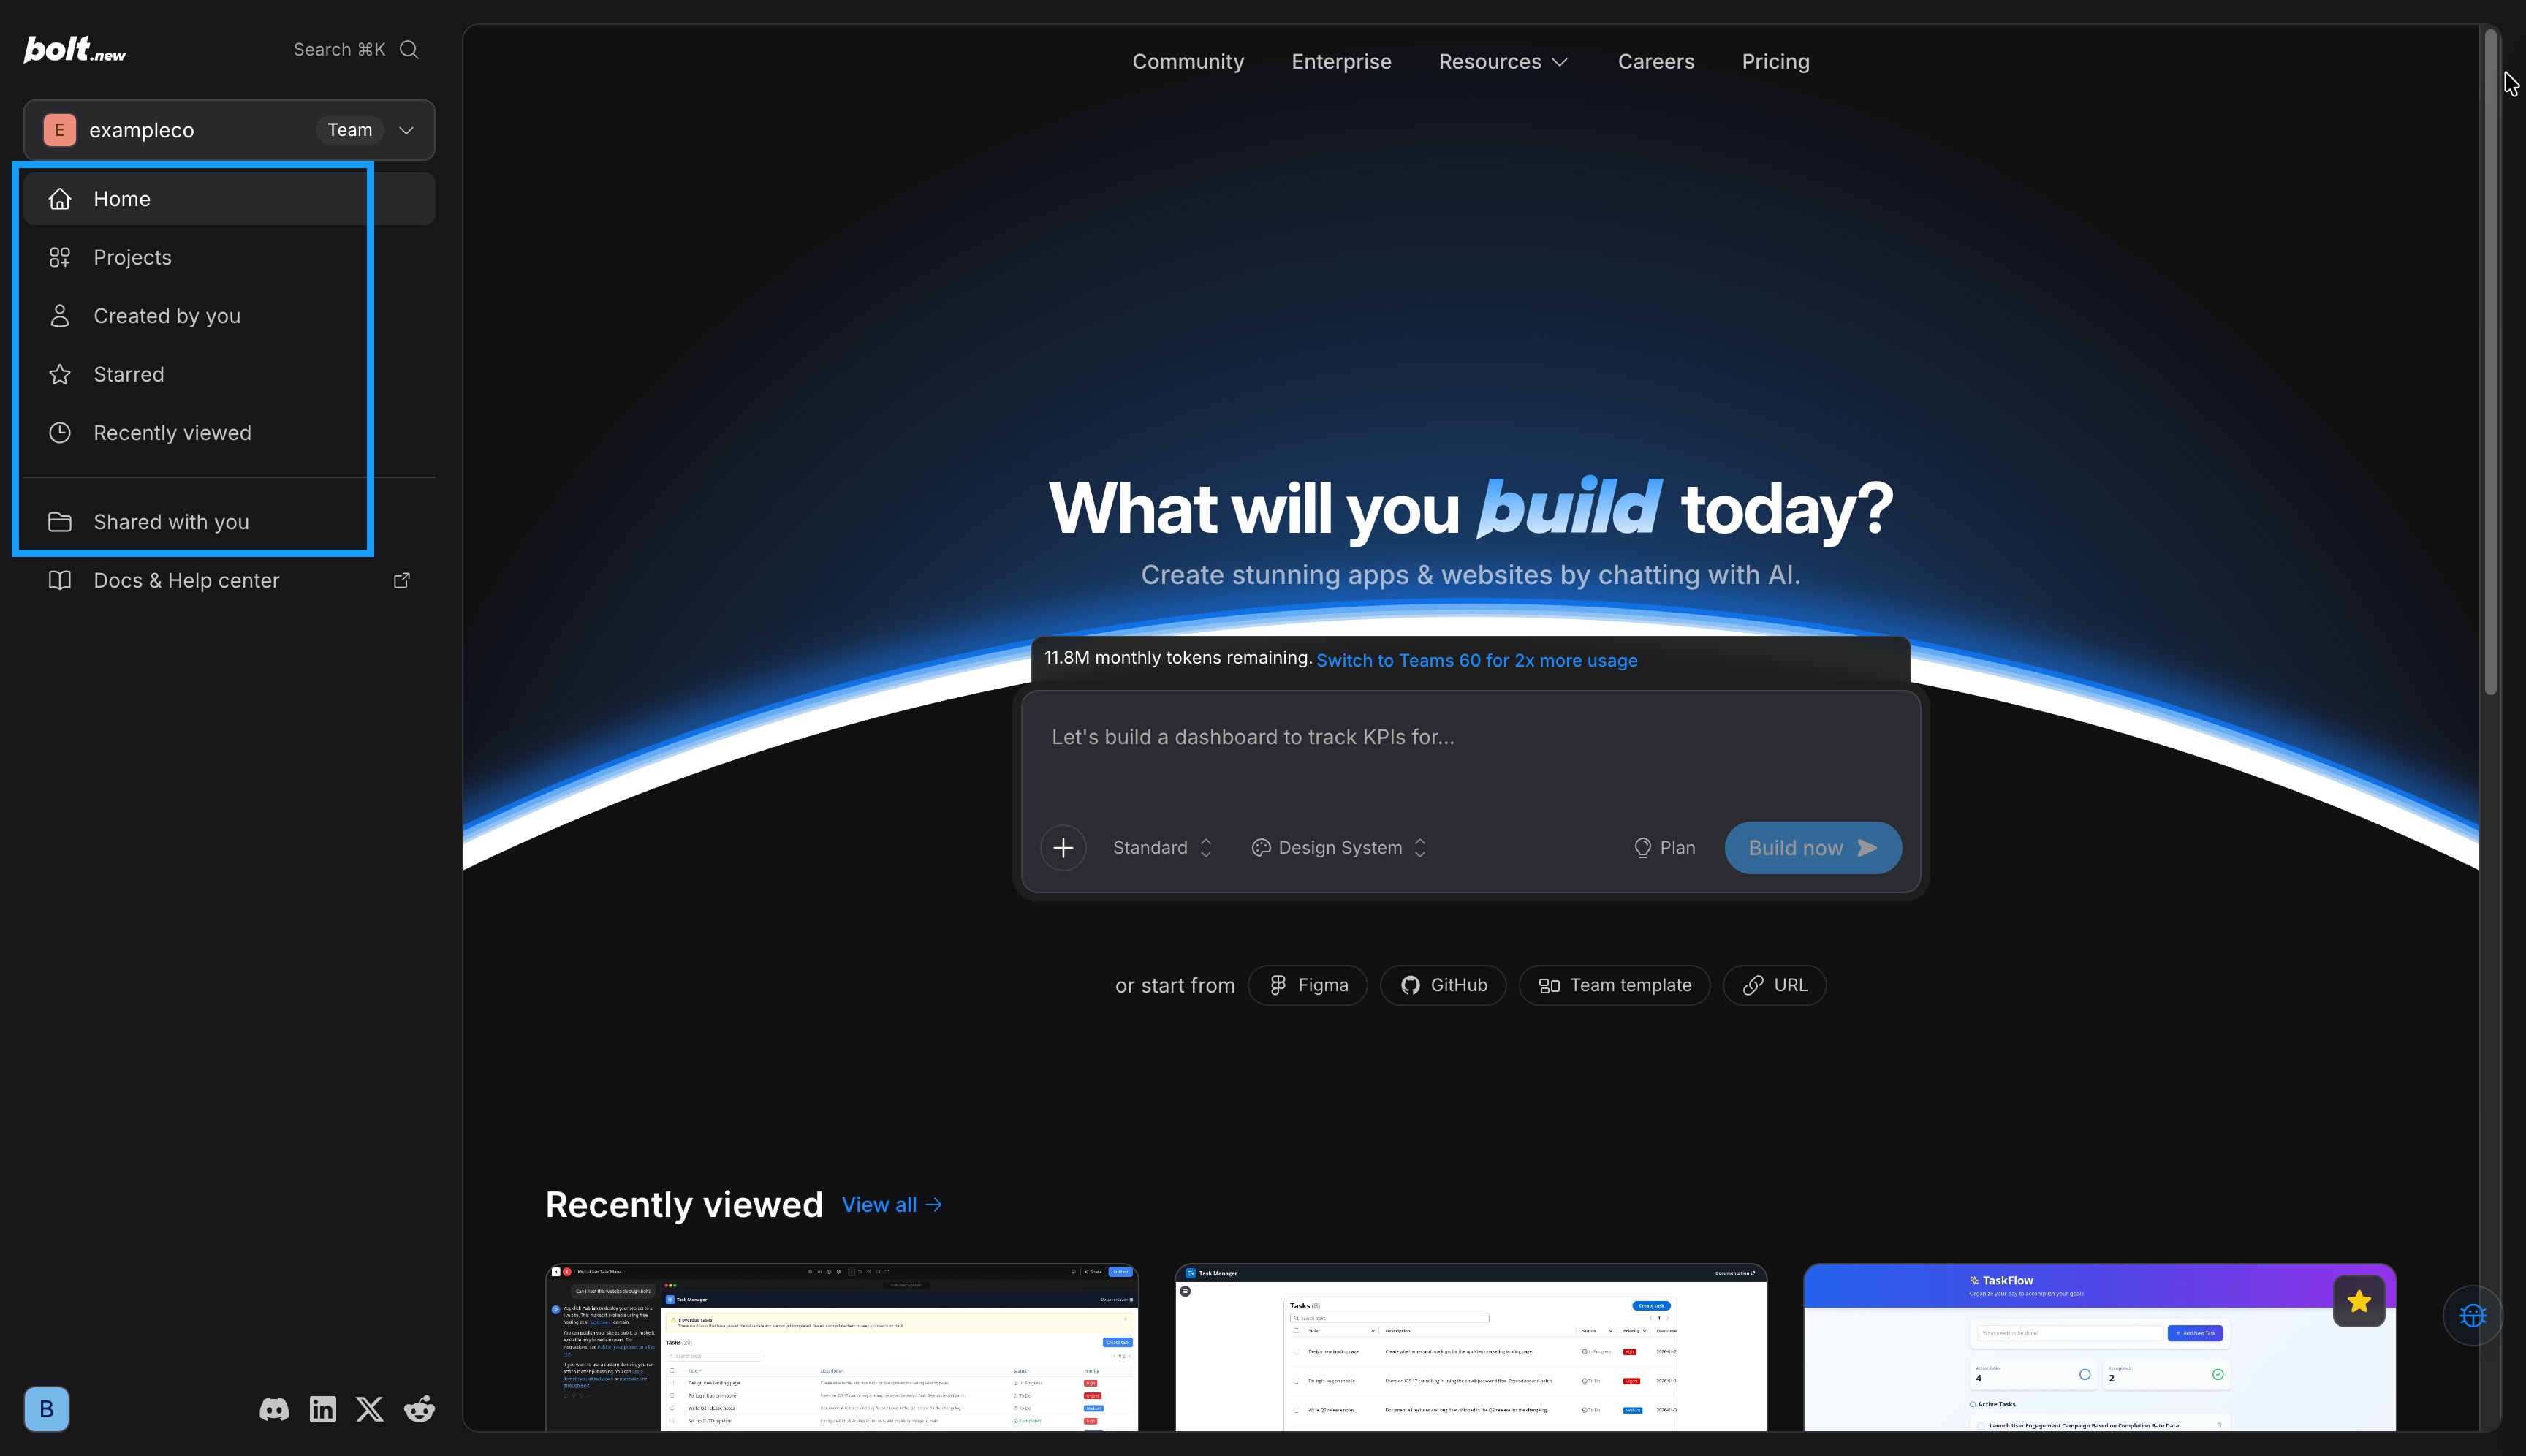
2. On the Bolt homepage, in the sidebar, click how you want to view your projects:
* **Projects**: View all projects, including your own projects and projects others shared with you.
* **Created by you**: View only projects you created.
* **Starred**: View only projects you starred.
* **Recently viewed**: View projects you opened recently. These include your own projects and those shared with you.
* **Shared with you**: View projects others have shared with you. What you can do in shared projects depends on the role the project owner assigned you.
3. Click a project name to open that project in Bolt.
### From the projects dashboard
1. Log in to Bolt.
2. On the Bolt homepage, in the sidebar, click how you want to view your projects:
* **Projects**: View all projects, including your own projects and projects others shared with you.
* **Created by you**: View only projects you created.
* **Starred**: View only projects you starred.
* **Recently viewed**: View projects you opened recently. These include your own projects and those shared with you.
* **Shared with you**: View projects others have shared with you. What you can do in shared projects depends on the role the project owner assigned you.
3. Click a project name to open that project in Bolt.
### From the projects dashboard
 1. Log in to Bolt.
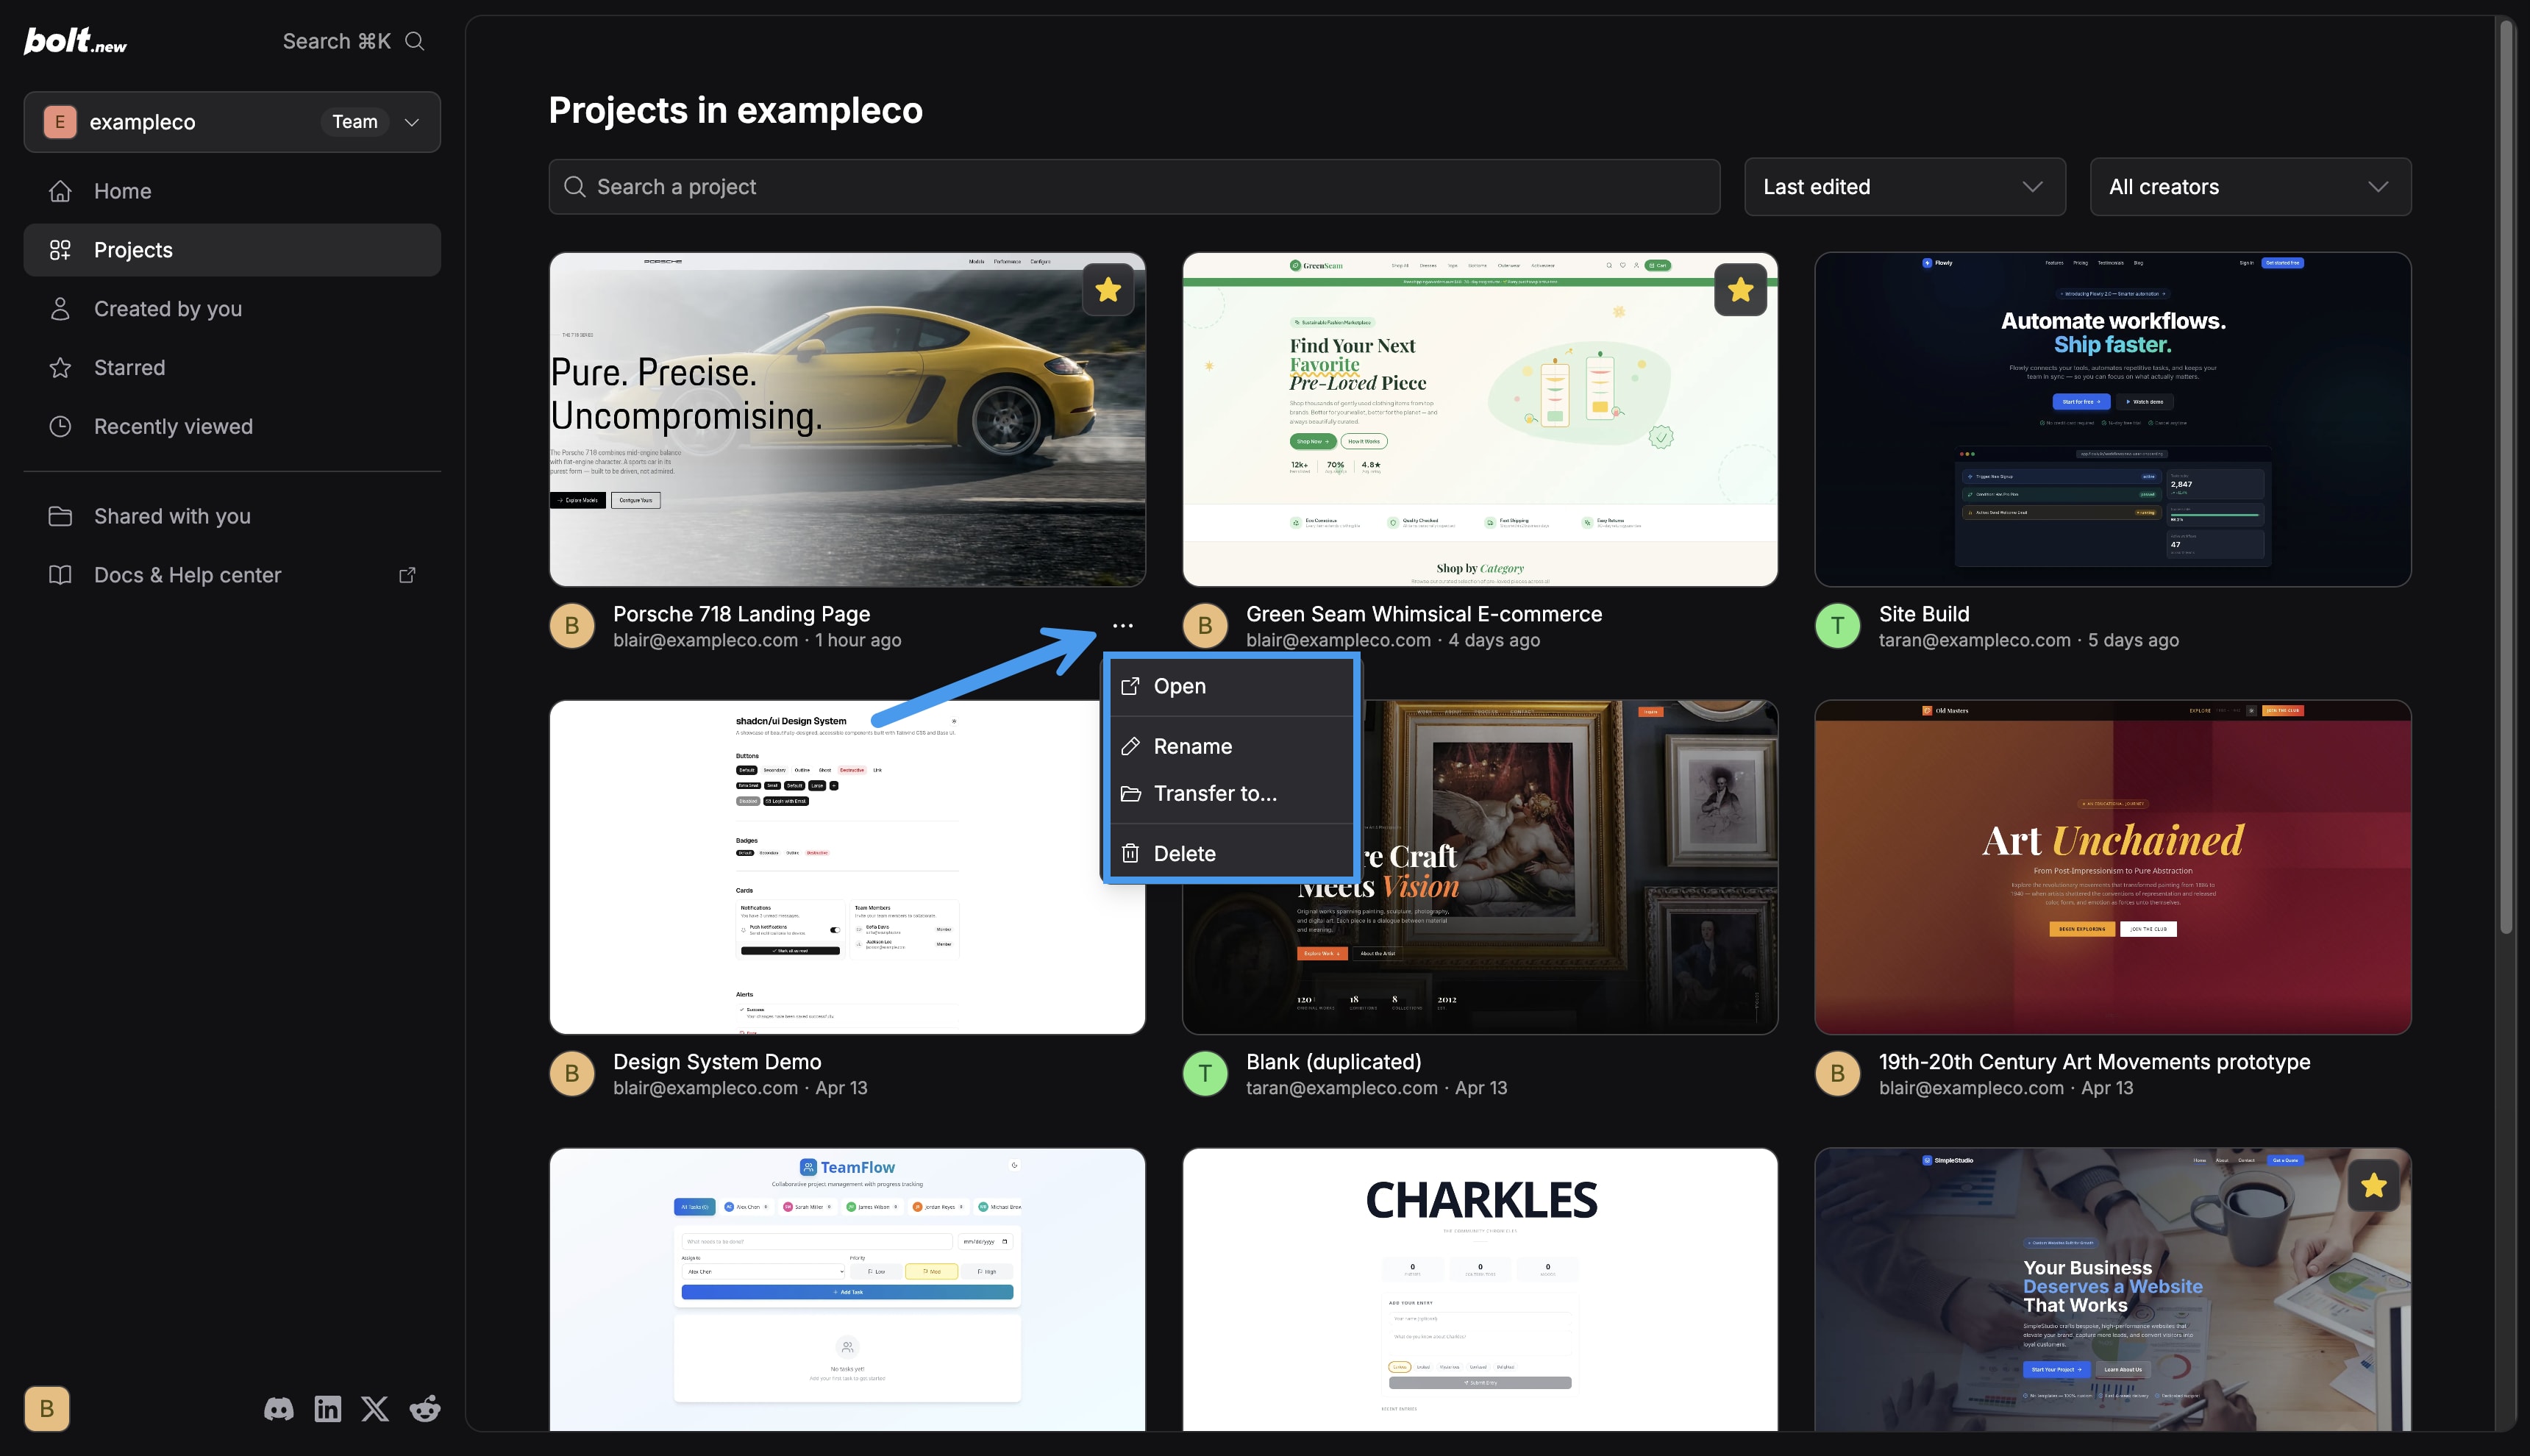
2. On the Bolt homepage, in the sidebar, click **Projects**.
You can see a list of your projects and those that other team members or collaborators have shared with you.
Use the search bar at the top to find a specific project.
### From inside a project
Inside a Bolt project, you can switch to another recent project. Projects are sorted with the newest first.
1. Log in to Bolt.
2. On the Bolt homepage, in the sidebar, click **Projects**.
You can see a list of your projects and those that other team members or collaborators have shared with you.
Use the search bar at the top to find a specific project.
### From inside a project
Inside a Bolt project, you can switch to another recent project. Projects are sorted with the newest first.
 1. Open a project in Bolt.
2. Click the project title.
3. Hover over **Open recent project**.
4. Click the project you want to switch to.
## Create a new project
To create a new Bolt project, submit a new prompt on the Bolt homepage. Bolt automatically adds it to your project list and generates a title for it.
## Rename a project
1. Open a project in Bolt.
2. Click the project title.
3. Hover over **Open recent project**.
4. Click the project you want to switch to.
## Create a new project
To create a new Bolt project, submit a new prompt on the Bolt homepage. Bolt automatically adds it to your project list and generates a title for it.
## Rename a project
 1. On the Bolt homepage, click **Projects**.
2. On the projects dashboard, click the three dots menu under the project.
3. Click **Rename**.
4. Type a new name for your project, then click **Rename** again.
## Download a project
You can download your project as a zip file to work on it outside of Bolt, using your own code editor.
To run the project on your computer, you'll need [Node.js](https://nodejs.org/en) installed first. Node.js is a free tool that lets you run web applications locally.
1. On the Bolt homepage, click **Projects**.
2. On the projects dashboard, click the three dots menu under the project.
3. Click **Rename**.
4. Type a new name for your project, then click **Rename** again.
## Download a project
You can download your project as a zip file to work on it outside of Bolt, using your own code editor.
To run the project on your computer, you'll need [Node.js](https://nodejs.org/en) installed first. Node.js is a free tool that lets you run web applications locally.
 1. In Bolt, open your project.
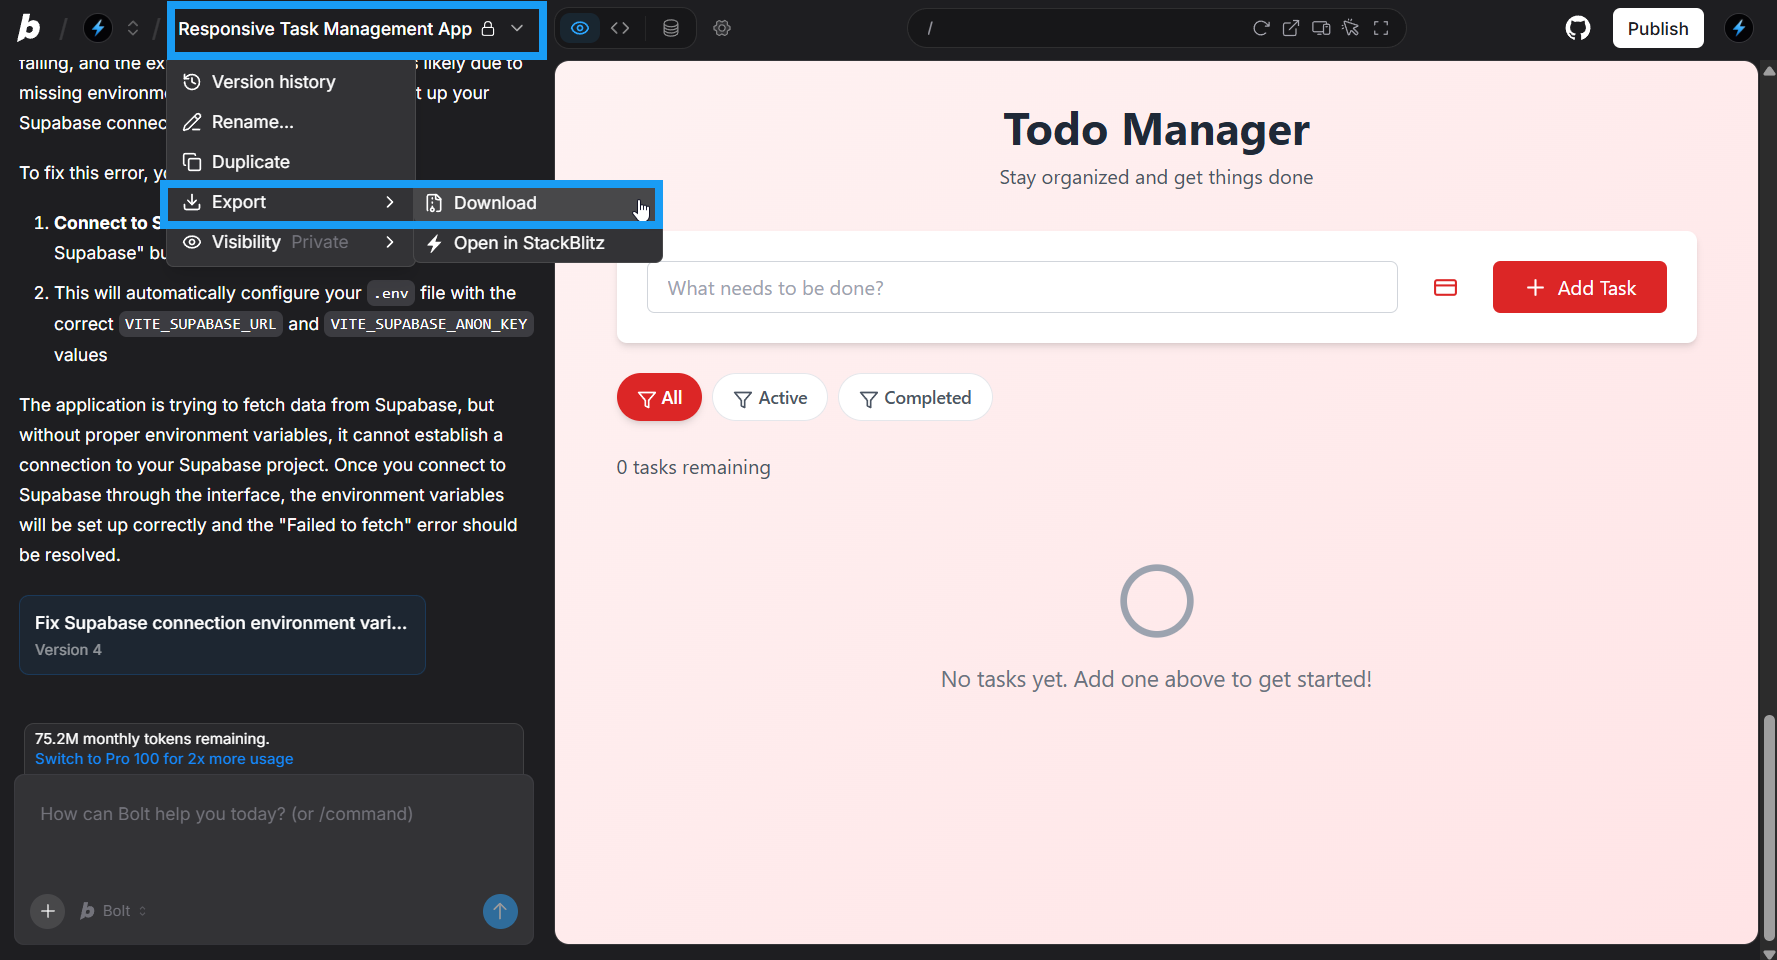
2. In the top left of your screen, click the **project title**, then click **Export** > **Download**.
3. Unzip the downloaded file.
4. Open your terminal, navigate to the project folder, and run the following command to install dependencies and start the app:
```shell theme={"system"}
npm install && npm run dev
```
## Transfer a project
You can transfer a project to another workspace you belong to or to a different user entirely. Unlike duplicating, transferring moves the project out of the original account, so you won't have access to it in both places.
How integrations behave during a transfer depends on the type of integration and whether you're transferring to one of your own workspaces or to another user:
* Bolt databases always transfer automatically.
* GitHub and Supabase integrations transfer automatically to a workspace. You can transfer these integrations to a user with a few extra steps to get them working again after the transfer. For instructions, see [Transfer to a user](#transfer-to-a-user).
* Custom domains don't transfer. You have to remove the domain first.
If your site uses a custom domain you purchased through Bolt, you can't reconnect the custom domain until after it expires. We don't recommend transferring a project that uses a Bolt-purchased domain.
### Transfer to a workspace
Use this option to move a project between your own workspaces or team workspaces you belong to.
Your Bolt database, Supabase integration, or GitHub integration remains connected when you move a project between your own workspaces.
1. In your project, in the top menu, click the project name.
2. Click **Transfer to**.
3. In the **Transfer project** dialog, select the **To a workspace** tab.
4. From the **Workspace** dropdown, select the workspace where you want to transfer the project.
5. Click **Continue**, then click **Confirm transfer**.
### Transfer to a user
Use this option to transfer ownership of a project to another Bolt user. After the recipient accepts the transfer, you won't be able to access the project or make any further edits.
Here's how Bolt handles integrations when you transfer to another user:
* **Bolt database**: The database remains connected after the transfer.
* **Supabase**: The Supabase settings transfer with the project, but Bolt can't transfer the account itself.
To make sure the new owner can use the database, we recommend transferring the Supabase project to a new owner first using [Supabase's project transfer instructions](https://supabase.com/docs/guides/platform/project-transfer), then transferring your Bolt project.
* **GitHub**: Bolt removes the GitHub integration when the new owner accepts the transfer. The new owner can then connect their own GitHub account and [create a new repository from the project](/integrations/git#create-a-new-repository-from-a-bolt-project).
* **Custom domains**: You have to remove the custom domain before transferring.
To transfer a project to another user:
1. In your project, in the top menu, click the project name.
2. Click **Transfer to**.
3. In the **Transfer project** dialog, select the **To a user** tab.
4. Enter the recipient's email address.
5. Click **Continue**, then click **Confirm transfer**.
The recipient receives an email invitation. After they accept, ownership transfers to their account.
## Duplicate a project
Duplicating a project creates a fresh copy in Bolt with all of your code and settings intact, except for GitHub and Netlify integration settings.
### Database duplication
If your project uses a Bolt database, the duplicated project copies the database structure (the tables and columns you've set up) but not the data itself.
If your project uses a Supabase database, you can either create a new Bolt database (which copies the structure only) or connect the duplicated project to the same Supabase project as the original.
Deselect **Use Bolt database** if you want to maintain your existing Supabase connection.
1. In Bolt, open your project.
2. In the top left of your screen, click the **project title**, then click **Export** > **Download**.
3. Unzip the downloaded file.
4. Open your terminal, navigate to the project folder, and run the following command to install dependencies and start the app:
```shell theme={"system"}
npm install && npm run dev
```
## Transfer a project
You can transfer a project to another workspace you belong to or to a different user entirely. Unlike duplicating, transferring moves the project out of the original account, so you won't have access to it in both places.
How integrations behave during a transfer depends on the type of integration and whether you're transferring to one of your own workspaces or to another user:
* Bolt databases always transfer automatically.
* GitHub and Supabase integrations transfer automatically to a workspace. You can transfer these integrations to a user with a few extra steps to get them working again after the transfer. For instructions, see [Transfer to a user](#transfer-to-a-user).
* Custom domains don't transfer. You have to remove the domain first.
If your site uses a custom domain you purchased through Bolt, you can't reconnect the custom domain until after it expires. We don't recommend transferring a project that uses a Bolt-purchased domain.
### Transfer to a workspace
Use this option to move a project between your own workspaces or team workspaces you belong to.
Your Bolt database, Supabase integration, or GitHub integration remains connected when you move a project between your own workspaces.
1. In your project, in the top menu, click the project name.
2. Click **Transfer to**.
3. In the **Transfer project** dialog, select the **To a workspace** tab.
4. From the **Workspace** dropdown, select the workspace where you want to transfer the project.
5. Click **Continue**, then click **Confirm transfer**.
### Transfer to a user
Use this option to transfer ownership of a project to another Bolt user. After the recipient accepts the transfer, you won't be able to access the project or make any further edits.
Here's how Bolt handles integrations when you transfer to another user:
* **Bolt database**: The database remains connected after the transfer.
* **Supabase**: The Supabase settings transfer with the project, but Bolt can't transfer the account itself.
To make sure the new owner can use the database, we recommend transferring the Supabase project to a new owner first using [Supabase's project transfer instructions](https://supabase.com/docs/guides/platform/project-transfer), then transferring your Bolt project.
* **GitHub**: Bolt removes the GitHub integration when the new owner accepts the transfer. The new owner can then connect their own GitHub account and [create a new repository from the project](/integrations/git#create-a-new-repository-from-a-bolt-project).
* **Custom domains**: You have to remove the custom domain before transferring.
To transfer a project to another user:
1. In your project, in the top menu, click the project name.
2. Click **Transfer to**.
3. In the **Transfer project** dialog, select the **To a user** tab.
4. Enter the recipient's email address.
5. Click **Continue**, then click **Confirm transfer**.
The recipient receives an email invitation. After they accept, ownership transfers to their account.
## Duplicate a project
Duplicating a project creates a fresh copy in Bolt with all of your code and settings intact, except for GitHub and Netlify integration settings.
### Database duplication
If your project uses a Bolt database, the duplicated project copies the database structure (the tables and columns you've set up) but not the data itself.
If your project uses a Supabase database, you can either create a new Bolt database (which copies the structure only) or connect the duplicated project to the same Supabase project as the original.
Deselect **Use Bolt database** if you want to maintain your existing Supabase connection.
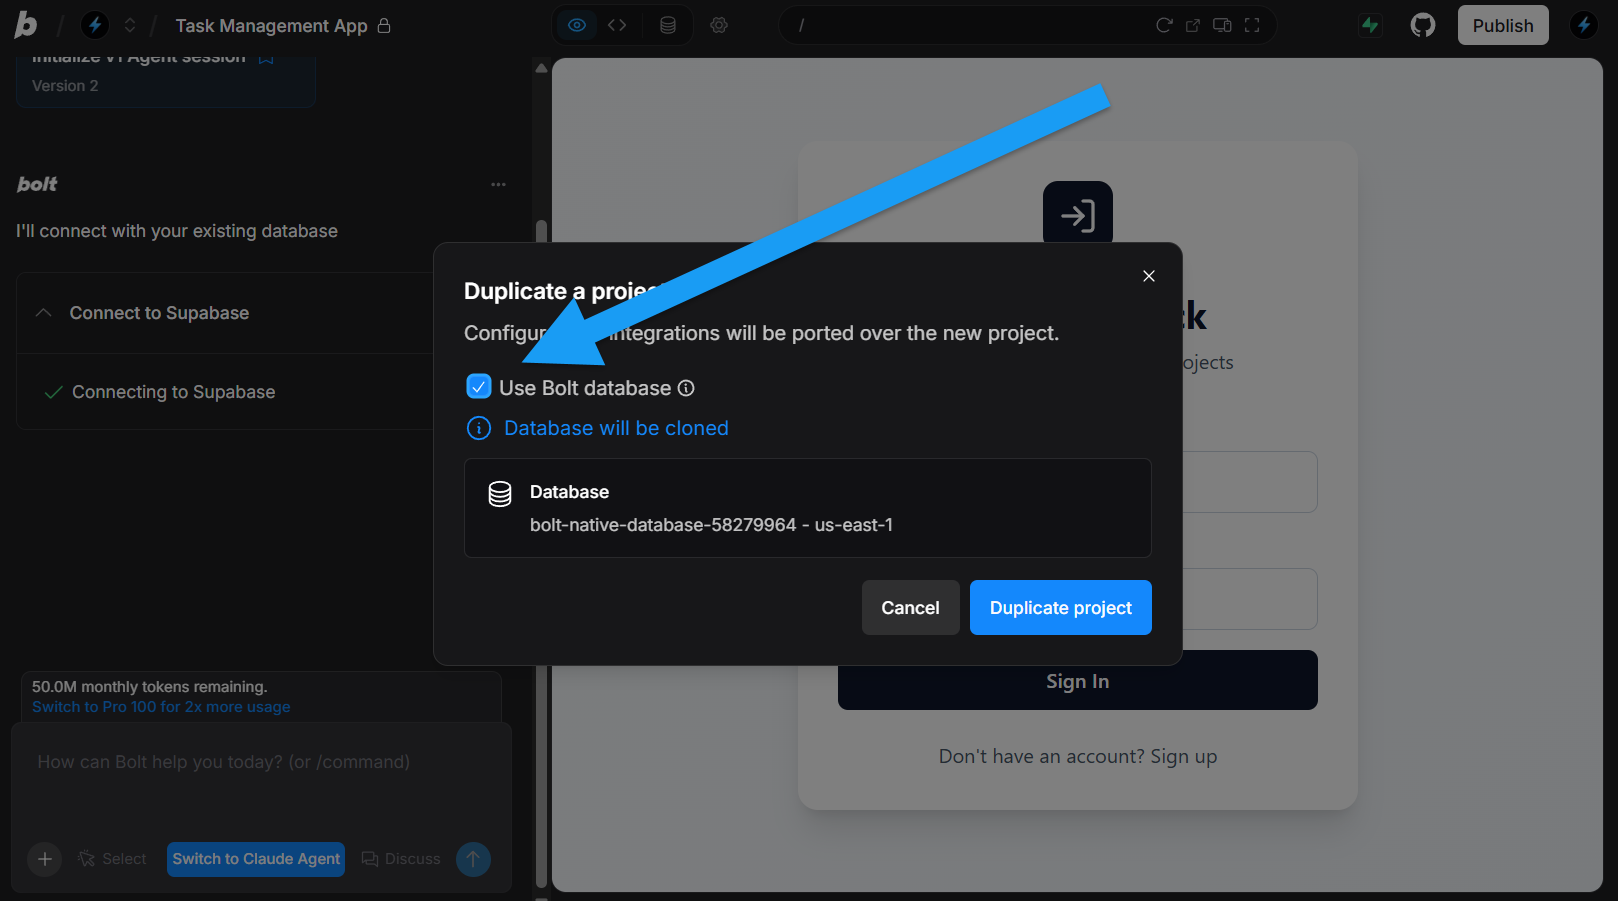 If you want to keep your data in the duplicated project, stay connected to your Supabase database. Avoid making changes to the same database from both projects — after duplicating, manage database changes from one project only.
### Duplicate your own project
Duplicating a project clears your chat history.
If you want to keep your data in the duplicated project, stay connected to your Supabase database. Avoid making changes to the same database from both projects — after duplicating, manage database changes from one project only.
### Duplicate your own project
Duplicating a project clears your chat history.
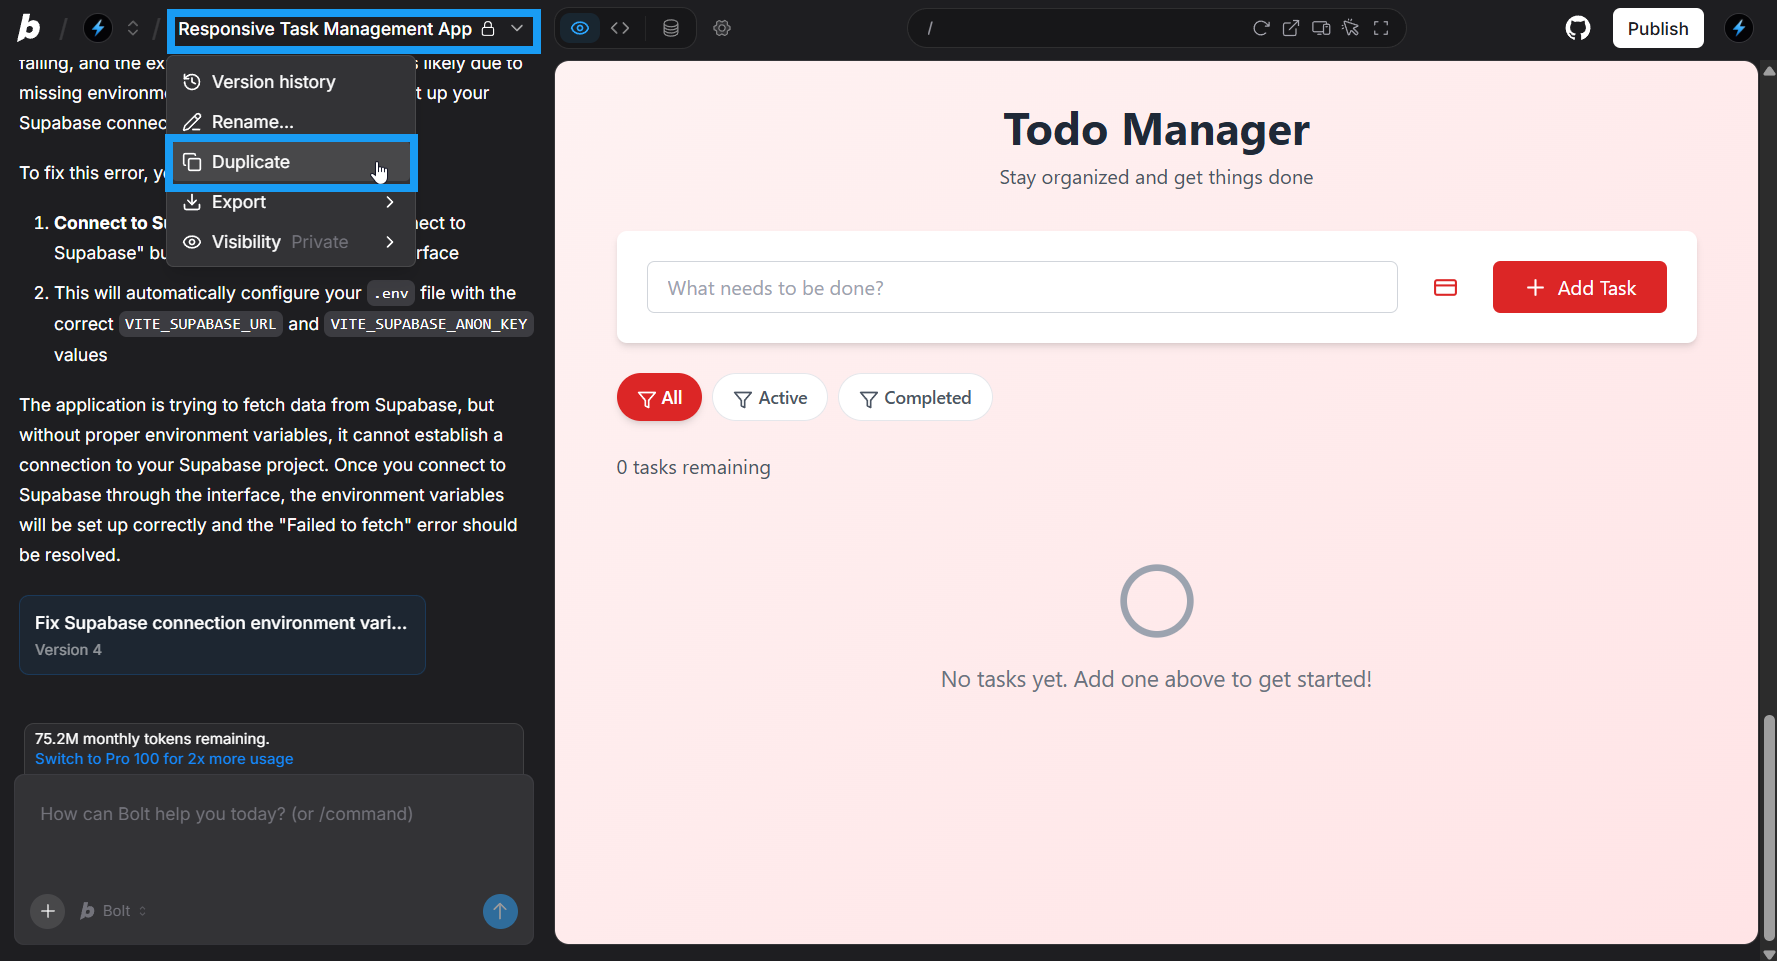 1. Log in to your project.
2. In the top left of your screen, click the **project title**, then click **Duplicate**.
3. If you have integrations active in the project, Bolt displays a dialog that confirms which integration settings it will copy. Click **Duplicate** in the dialog to continue.
4. Bolt creates a new copy of the project, with an empty chat history.
If you want information from your chat history available in the new project, generate a summary before duplicating and upload it afterward.
Generate a summary in your original project:
1. In the chatbox, click **Plan**.
2. Enter the following prompt: `Generate a short summary of our conversation so far`.
3. Check that the AI response is accurate and contains everything you need.
4. Copy the response out of Bolt and save it as a `.txt` or `.md` file.
Upload the summary in your new project:
1. In the chatbox, click **Plan**.
2. Click the **plus icon**, then click **Attach file**.
3. Provide a prompt such as:
```txt theme={"system"}
The attached file is a summary of previous discussion about this project.
Please use it when working on future changes.
```
4. Press `Enter` to upload the file and your prompt.
### Duplicate a shared project to your account
You can duplicate a project, then transfer the duplicate to your own account. The original project remains in the shared account, and the duplicate is moved to your personal account.
Keep in mind that database information is not copied over. If the original project used a Bolt database, you can [create a new one](/cloud/database#creating-and-using-databases) when duplicating, but it won't include the previous schema or data. If your project was connected to a Supabase database, you can [reconnect to it](/integrations/supabase#connect-a-supabase-database) from the new account.
Similarly, if the original project used a custom domain, it stays attached to that project. To use it with the duplicated project, you have to [disconnect the domain](/cloud/domains/connect#disconnect-a-domain) from the original project, then [connect it](/cloud/domains/connect) to the duplicate after transferring it.
To duplicate a project between accounts:
1. Log in to your project.
2. In the top left of your screen, click the project name, then click **Duplicate**.
If you have integrations active in the project, Bolt displays a dialog that confirms which integration settings it will copy.
3. Click **Duplicate** in the dialog to continue.
4. Bolt creates a new copy of the project, with an empty chat history.
5. Click the project name again, then click **Transfer to**.
6. Select the user or workspace you want to own the duplicated project.
7. Click **Continue**, then click **Confirm transfer**.
8. If needed, reconnect your database or custom domain:
* [Create a new database](/cloud/database#creating-and-using-databases) or [connect to your Supabase project](/integrations/supabase#connect-a-supabase-database).
* [Disconnect the domain](/cloud/domains/connect#disconnect-a-domain) from the original project, then [connect it](/cloud/domains/connect) to the duplicate.
## Duplicate a project from your personal account to a team workspace
Duplicating creates a copy of the project files. It doesn't retain chat history or context.
1. Log in to your Teams account on Bolt.
2. Go to StackBlitz and open your Bolt collection page: `https://stackblitz.com/@USERNAME/collections/bolt`.
3. Click the project you want to edit.
4. Click **Open in bolt.new | AI**. When you send a new prompt, Bolt automatically duplicates the project to your team.
You can also manually duplicate it to your team on StackBlitz, where the action is called forking. Open the **Fork** dropdown menu, select your team, then click **Open in bolt.new | AI**.
## Share team projects
By default, only you can edit a project you create. Other team members have view-only access unless you grant them edit access.
You can share your project and manage access separately for:
* Your entire team (options are No access, Viewer, Editor, or Co-owner)
* Individual members of your team (options are Viewer, Editor, or Co-owner)
* Invited collaborators who aren't members of your team (options are Viewer or Editor)
* Anyone else with the link (options are No access, Viewer, or Editor)
To learn more about team project sharing and the permissions associated with different levels of access, see [Share your project](/building/using-bolt/sharing).
## Find your Bolt projects
Both your personal and team projects are under your Bolt collection: `https://stackblitz.com/@USERNAME/collections/bolt`
## Open a project in StackBlitz
If you prefer to edit code directly rather than use Bolt's chat interface, you can open your project in StackBlitz's IDE. StackBlitz is Bolt's parent company, and your accounts are automatically linked.
As of April 2026, we're updating how Bolt stores project code. When a project moves to the new format, the **Open in StackBlitz** option is no longer available.
You can still use [Code View](https://support.bolt.new/building/using-bolt/code-view) if you want to edit your project's code directly.
1. In Bolt, open your project.
2. In the top left of your screen, click the **project title**, then click **Export** > **Open in StackBlitz**.
## Open a StackBlitz project in Bolt
To open a StackBlitz project in Bolt, do one of the following:
* Click **Open in Bolt** in the upper-left corner of any StackBlitz project.
* Enter the following URL in your browser, replacing `STACKBLITZ_PROJECT_SLUG_HERE` with your project's ID (visible in the StackBlitz URL): `https://bolt.new/~/STACKBLITZ_PROJECT_SLUG_HERE`
## Open a public GitHub repository in Bolt
You can open any public GitHub repository in Bolt by adding `bolt.new` to the front of the GitHub URL.
For example: `bolt.new/~/github.com/mantinedev/remix-template`.
To connect your GitHub account to Bolt and sync projects, see [GitHub for version control](/integrations/git).
## Delete a project
To fully delete a project, you need to delete both the chat in Bolt and the associated project in StackBlitz (the platform that runs Bolt in the background).
### Delete a project chat
1. Log in to your project.
2. In the top left of your screen, click the **project title**, then click **Duplicate**.
3. If you have integrations active in the project, Bolt displays a dialog that confirms which integration settings it will copy. Click **Duplicate** in the dialog to continue.
4. Bolt creates a new copy of the project, with an empty chat history.
If you want information from your chat history available in the new project, generate a summary before duplicating and upload it afterward.
Generate a summary in your original project:
1. In the chatbox, click **Plan**.
2. Enter the following prompt: `Generate a short summary of our conversation so far`.
3. Check that the AI response is accurate and contains everything you need.
4. Copy the response out of Bolt and save it as a `.txt` or `.md` file.
Upload the summary in your new project:
1. In the chatbox, click **Plan**.
2. Click the **plus icon**, then click **Attach file**.
3. Provide a prompt such as:
```txt theme={"system"}
The attached file is a summary of previous discussion about this project.
Please use it when working on future changes.
```
4. Press `Enter` to upload the file and your prompt.
### Duplicate a shared project to your account
You can duplicate a project, then transfer the duplicate to your own account. The original project remains in the shared account, and the duplicate is moved to your personal account.
Keep in mind that database information is not copied over. If the original project used a Bolt database, you can [create a new one](/cloud/database#creating-and-using-databases) when duplicating, but it won't include the previous schema or data. If your project was connected to a Supabase database, you can [reconnect to it](/integrations/supabase#connect-a-supabase-database) from the new account.
Similarly, if the original project used a custom domain, it stays attached to that project. To use it with the duplicated project, you have to [disconnect the domain](/cloud/domains/connect#disconnect-a-domain) from the original project, then [connect it](/cloud/domains/connect) to the duplicate after transferring it.
To duplicate a project between accounts:
1. Log in to your project.
2. In the top left of your screen, click the project name, then click **Duplicate**.
If you have integrations active in the project, Bolt displays a dialog that confirms which integration settings it will copy.
3. Click **Duplicate** in the dialog to continue.
4. Bolt creates a new copy of the project, with an empty chat history.
5. Click the project name again, then click **Transfer to**.
6. Select the user or workspace you want to own the duplicated project.
7. Click **Continue**, then click **Confirm transfer**.
8. If needed, reconnect your database or custom domain:
* [Create a new database](/cloud/database#creating-and-using-databases) or [connect to your Supabase project](/integrations/supabase#connect-a-supabase-database).
* [Disconnect the domain](/cloud/domains/connect#disconnect-a-domain) from the original project, then [connect it](/cloud/domains/connect) to the duplicate.
## Duplicate a project from your personal account to a team workspace
Duplicating creates a copy of the project files. It doesn't retain chat history or context.
1. Log in to your Teams account on Bolt.
2. Go to StackBlitz and open your Bolt collection page: `https://stackblitz.com/@USERNAME/collections/bolt`.
3. Click the project you want to edit.
4. Click **Open in bolt.new | AI**. When you send a new prompt, Bolt automatically duplicates the project to your team.
You can also manually duplicate it to your team on StackBlitz, where the action is called forking. Open the **Fork** dropdown menu, select your team, then click **Open in bolt.new | AI**.
## Share team projects
By default, only you can edit a project you create. Other team members have view-only access unless you grant them edit access.
You can share your project and manage access separately for:
* Your entire team (options are No access, Viewer, Editor, or Co-owner)
* Individual members of your team (options are Viewer, Editor, or Co-owner)
* Invited collaborators who aren't members of your team (options are Viewer or Editor)
* Anyone else with the link (options are No access, Viewer, or Editor)
To learn more about team project sharing and the permissions associated with different levels of access, see [Share your project](/building/using-bolt/sharing).
## Find your Bolt projects
Both your personal and team projects are under your Bolt collection: `https://stackblitz.com/@USERNAME/collections/bolt`
## Open a project in StackBlitz
If you prefer to edit code directly rather than use Bolt's chat interface, you can open your project in StackBlitz's IDE. StackBlitz is Bolt's parent company, and your accounts are automatically linked.
As of April 2026, we're updating how Bolt stores project code. When a project moves to the new format, the **Open in StackBlitz** option is no longer available.
You can still use [Code View](https://support.bolt.new/building/using-bolt/code-view) if you want to edit your project's code directly.
1. In Bolt, open your project.
2. In the top left of your screen, click the **project title**, then click **Export** > **Open in StackBlitz**.
## Open a StackBlitz project in Bolt
To open a StackBlitz project in Bolt, do one of the following:
* Click **Open in Bolt** in the upper-left corner of any StackBlitz project.
* Enter the following URL in your browser, replacing `STACKBLITZ_PROJECT_SLUG_HERE` with your project's ID (visible in the StackBlitz URL): `https://bolt.new/~/STACKBLITZ_PROJECT_SLUG_HERE`
## Open a public GitHub repository in Bolt
You can open any public GitHub repository in Bolt by adding `bolt.new` to the front of the GitHub URL.
For example: `bolt.new/~/github.com/mantinedev/remix-template`.
To connect your GitHub account to Bolt and sync projects, see [GitHub for version control](/integrations/git).
## Delete a project
To fully delete a project, you need to delete both the chat in Bolt and the associated project in StackBlitz (the platform that runs Bolt in the background).
### Delete a project chat
 1. On the Bolt homepage, click **Projects**.
2. On the projects dashboard, click the three dots menu under the project.
3. Click **Delete**, then click **Delete** again to confirm.
### Delete a project in StackBlitz
1. Log in to your [StackBlitz](https://stackblitz.com) account.
2. Click **Collections**.
3. Click **Bolt collection**.
4. Click the menu icon for the project you want to delete.
5. Click **Delete project**.
1. On the Bolt homepage, click **Projects**.
2. On the projects dashboard, click the three dots menu under the project.
3. Click **Delete**, then click **Delete** again to confirm.
### Delete a project in StackBlitz
1. Log in to your [StackBlitz](https://stackblitz.com) account.
2. Click **Collections**.
3. Click **Bolt collection**.
4. Click the menu icon for the project you want to delete.
5. Click **Delete project**.