> ## Documentation Index
> Fetch the complete documentation index at: https://support.bolt.new/llms.txt
> Use this file to discover all available pages before exploring further.
# Make visual edits
> Use the Select tool to make visual edits directly in your project's preview and see how they look before you save them to your project.
Visual edits let you change how your project looks directly in the preview. Using the **Select** tool in the chatbox, you can edit text, change colors, and adjust styles like font size, formatting, and alignment. Each change shows in the preview right away.
Making a visual edit doesn't automatically update your project's code. Each edit you add goes into a batch above the chatbox. When you've made all the edits you want, click **Save changes**. Bolt then processes the whole batch and updates your code to match.
Making visual edits in the preview is free. Bolt uses tokens only when you save your changes.
To edit a single element, you can also select the element and [describe what you want in a prompt](#describe-changes-using-a-prompt) instead.
Visual edits are available on all plans.
## Visual edits workflow
The following screenshot shows how you see the visual edits workflow on your screen.
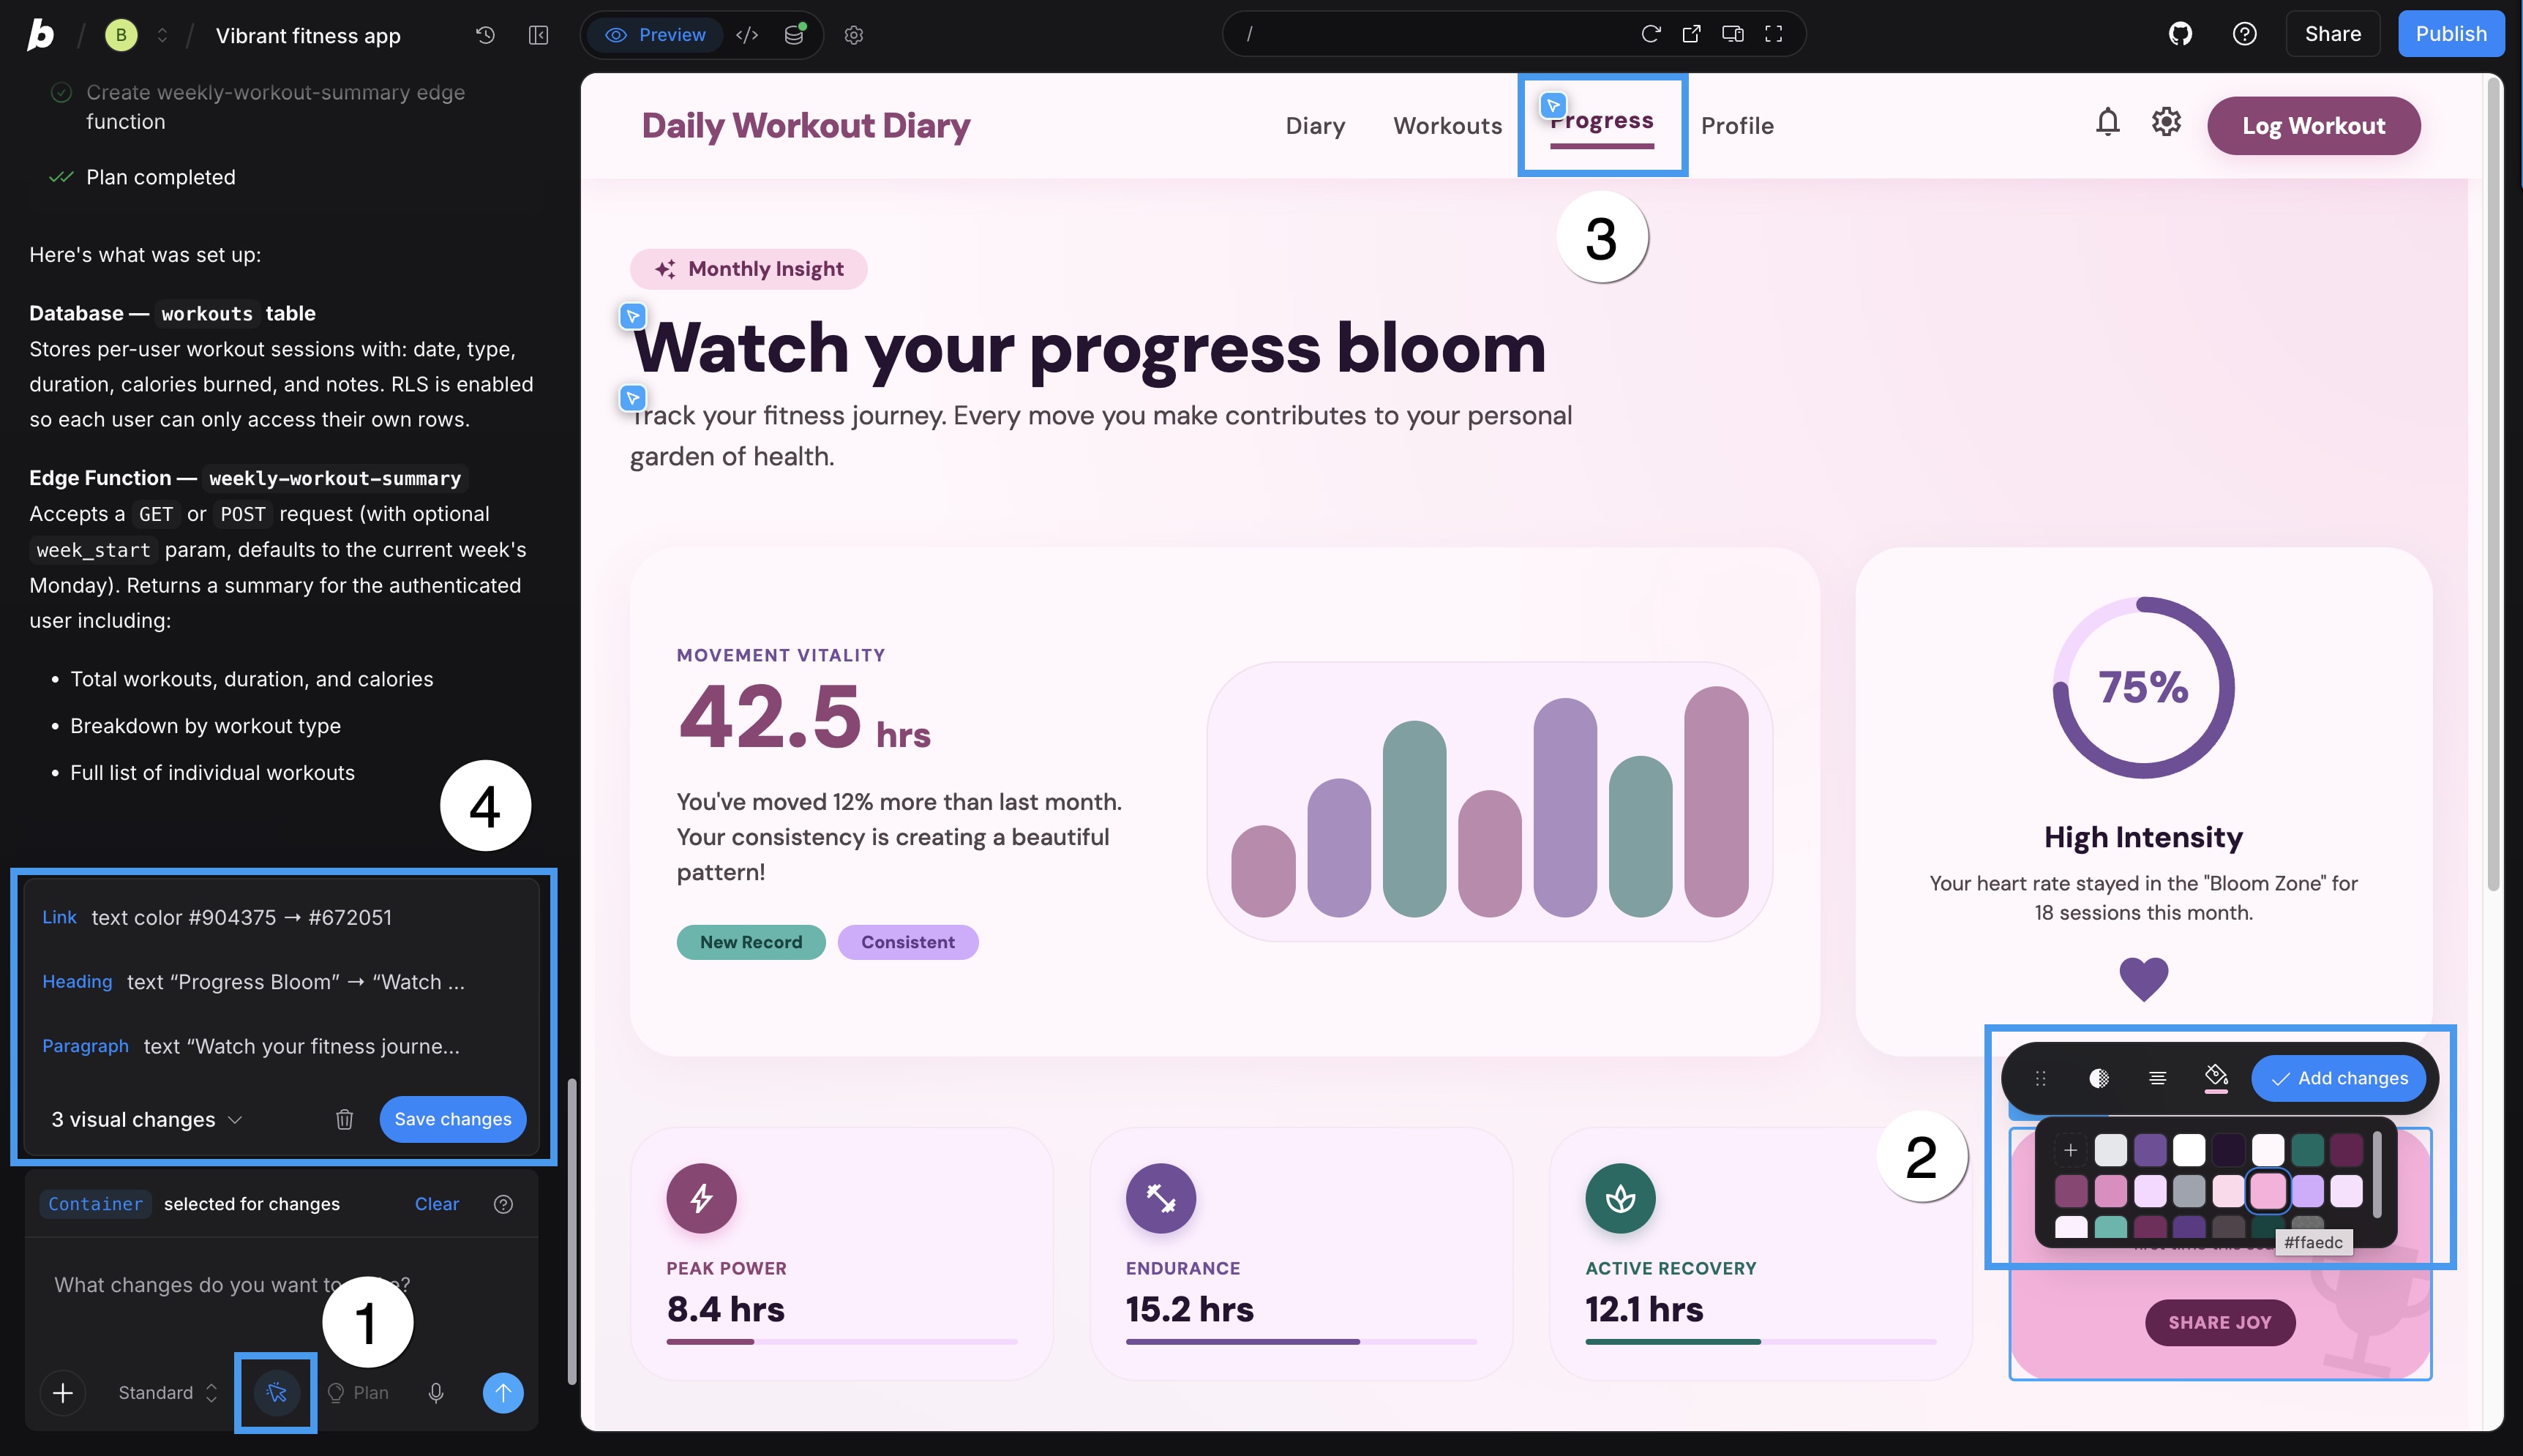 * **1**: Click the **Select** tool to turn it on.
* **2**: Click an element in the preview and make your edits. For example, choosing a new color from the toolbar. Click **Add changes** when you're done.
* **3**: A marker appears on each element you've added changes to.
* **4**: Your edits also collect in a batch above the chatbox. When you're ready, click **Save changes** to have Bolt save them to your project code.
## Select an element
1. Open your Bolt project.
2. In the chatbox, click **Select**.
3. In the preview, point to the element you want to target. Bolt highlights each element as you hover.
You can also use the arrow keys while hovering to move between elements. The up arrow moves to the element containing the one you're pointing at, and the down arrow moves back.
4. Click the element.
Your selection appears above the chatbox, and the toolbar appears.
5. (Optional) Adjust your selection:
* To change which element is selected, press `ESC`, then click something else.
* To select an element inside your selection, use `CMD`+click (on Mac) or `CTRL`+click (on Windows).
6. After selecting an element, you can do any of the following:
* [Double-click text and edit it directly in the preview](#edit-text-directly).
* [Adjust the style or formatting of the element](#adjust-style-and-formatting-using-the-toolbar). The [toolbar](#toolbar-options) shows only properties you can edit on that specific element.
* [Describe the edits you want in a prompt](#describe-changes-using-a-prompt).
## Edit text directly
1. [Select an element](#select-an-element) that contains text.
2. Double-click the text to edit it.
3. Type your changes.
While editing, you can apply formatting using common keyboard shortcuts, like `CMD`+`B` (on Mac) or `CTRL`+`B` (on Windows) for bold.
4. In the toolbar, click **Add changes** (blue checkmark) to add your edits to the batch.
## Adjust style and formatting using the toolbar
1. [Select an element](#select-an-element).
The toolbar appears under the element you selected.
2. (Optional) To move the toolbar, grab it (using the grip icon) and drag it to a new location.
3. Adjust any of the available properties, like font size, alignment, or color. See [Toolbar options](#toolbar-options) for the full list of properties and which elements they apply to.
4. Click **Add changes** (blue checkmark) to add your edits to the batch.
### Toolbar options
The properties in the toolbar show what you can edit for the selected element. For example, a text element has properties like font size and text alignment, and an image has properties like opacity and object fit.
Toolbar properties don't cover every possible edit you could make to an element, and in some cases, editing a property doesn't make any visible change. For example, setting a background color on an icon changes the area behind the icon rather than the icon itself.
If you want to adjust something that isn't in the toolbar, or if an edit doesn't do what you expected, [describe what you want in a prompt](#describe-changes-using-a-prompt) instead. For example, `Add a 1px border around this card` or `Change the icon color to blue`.
The following table lists each property and what it does. The **Available for** column uses these groups:
* **All elements**: Every element you can select.
* **Media**: Images, videos, and icons.
* **Text**: Text elements, including links and buttons that contain text.
* **Containers**: Elements that hold and organize other elements.
| Property | Description | Available for |
| ---------------- | --------------------------------------------------------------------------------------------------------------------------------------------------- | ------------------------ |
| Alt text | Describes the image for screen readers and search engines. Enter a description of what the image shows. | Media (images and icons) |
| Background color | Sets the element's background color. Choose a [preset or custom color](#color-options). | All elements |
| Font size | Sets the text size. Choose a preset size, from 8 to 96 pixels, or type a specific size. | Text |
| Link | Adds or edits a link, including whether it opens in a new tab. | Text |
| List | Turns the text into a bulleted or numbered list, or removes list formatting. | Text |
| Object fit | Sets how the image fills its space: [cover, contain, fill, or none](#object-fit-options). | Media |
| Opacity | Sets the element's transparency, from 0 to 100%. | All elements |
| Poster | Sets the still image shown before a video plays. Enter a path to an image in your project or a URL to an external image. | Media (videos) |
| Text alignment | Sets how text lines up: left, center, right, or justified. For a container, this only affects text inside it, not the position of other containers. | Text, Containers |
| Text style | Applies formatting to text: bold, italic, underline, or strikethrough. | Text |
| Type color | Sets the text color. Choose a [preset or custom color](#color-options). | Text |
#### Color options
**Type color** and **Background color** open the same color picker. The preset swatches show colors already used in your project. To use a different color, click the **plus icon** to open the `Custom color` menu. There, you can:
* Use the gradient area and hue slider to find the exact color you want.
* Click the eyedropper to sample a color from anywhere on your screen.
* Type an exact value in HEX or RGB. Use the dropdown to switch between the two formats.
#### Object fit options
* **Cover**: Fills the space and crops the image's edges if needed.
* **Contain**: Fits the whole image without cropping, which can leave empty space.
* **Fill**: Stretches the image to fit exactly, which can distort it.
* **None**: Shows the image at its original size.
## Batch and save multiple edits
When you add a visual edit in the preview, the details appear above the chatbox and start a batch. The batch collects your edits so Bolt can process them all at once when you click **Save changes**. We recommend saving edits in a batch, since it uses fewer tokens than sending each edit separately.
A batch is a group of edits Bolt makes at the same time. This is different from the [prompt queue](/building/chat-tools#queue-prompts), which is a series of individual prompts Bolt processes one after another.
You can create and save one batch of edits for each page in your project.
Because you can't navigate through your project while you're using the Select tool, you need to save the edits from one page and then turn off the Select tool before navigating to the next page.
To create a batch of edits:
1. [Select an element](#select-an-element), make your edits, then click **Add changes** (blue checkmark).
The edit is added to the batch and appears above the chatbox. A marker also appears on the element in the preview.
2. Keep selecting elements and adding edits to the batch.
The batch shows how many edits it contains, with a label like `3 visual changes`.
3. (Optional) Before saving, review the list of edits. If there are any you no longer need, you can delete them individually or delete the batch.
4. Click **Save changes** to send your batch to Bolt.
Bolt applies the edits and saves them to the project code.
### Add a note to the batch
You can add a note to a batch of edits to give Bolt additional instructions.
For example, a note can tell Bolt to apply changes across different pages in your project. If you change the size and color of a section heading and want the headings on your other pages to match, you can add a note like: `Apply these changes to the section headings on the other pages too.`
To add a note:
1. After [creating a batch of edits](#batch-and-save-multiple-edits), type the note in the chatbox.
2. To save the batch with a note, click **Save changes** next to the batch, or click the blue arrow in the chatbox.
## Describe changes using a prompt
Sending a prompt for a selected element works the same as any other prompt. Describe the change you want, and Bolt builds it.
Unlike with visual edits, your prompt goes straight to Bolt instead of into a batch, so you don't see changes in the preview until Bolt finishes.
1. [Select an element](#select-an-element).
2. In the chatbox, describe the change you want.
3. Send your prompt.
To select an image and edit it with AI, see [Edit images with AI](/building/images#edit-images-with-ai).
## Undo or remove visual edits
There are a few ways to undo an edit:
* If you haven't yet added the edit to the batch, click outside the element or press `ESC`. The element reverts to how it looked before you made any changes.
* If you added the edit to the batch but haven't saved it yet, click **Delete** (trash can icon) next to the edit to remove it.
* If you already sent your batch and Bolt saved the edit, there's currently no way to undo that edit alone. However, you can use your project's [version history](/building/using-bolt/rollback-backup#restore-using-version-history) to roll back a batch of edits.
* **1**: Click the **Select** tool to turn it on.
* **2**: Click an element in the preview and make your edits. For example, choosing a new color from the toolbar. Click **Add changes** when you're done.
* **3**: A marker appears on each element you've added changes to.
* **4**: Your edits also collect in a batch above the chatbox. When you're ready, click **Save changes** to have Bolt save them to your project code.
## Select an element
1. Open your Bolt project.
2. In the chatbox, click **Select**.
3. In the preview, point to the element you want to target. Bolt highlights each element as you hover.
You can also use the arrow keys while hovering to move between elements. The up arrow moves to the element containing the one you're pointing at, and the down arrow moves back.
4. Click the element.
Your selection appears above the chatbox, and the toolbar appears.
5. (Optional) Adjust your selection:
* To change which element is selected, press `ESC`, then click something else.
* To select an element inside your selection, use `CMD`+click (on Mac) or `CTRL`+click (on Windows).
6. After selecting an element, you can do any of the following:
* [Double-click text and edit it directly in the preview](#edit-text-directly).
* [Adjust the style or formatting of the element](#adjust-style-and-formatting-using-the-toolbar). The [toolbar](#toolbar-options) shows only properties you can edit on that specific element.
* [Describe the edits you want in a prompt](#describe-changes-using-a-prompt).
## Edit text directly
1. [Select an element](#select-an-element) that contains text.
2. Double-click the text to edit it.
3. Type your changes.
While editing, you can apply formatting using common keyboard shortcuts, like `CMD`+`B` (on Mac) or `CTRL`+`B` (on Windows) for bold.
4. In the toolbar, click **Add changes** (blue checkmark) to add your edits to the batch.
## Adjust style and formatting using the toolbar
1. [Select an element](#select-an-element).
The toolbar appears under the element you selected.
2. (Optional) To move the toolbar, grab it (using the grip icon) and drag it to a new location.
3. Adjust any of the available properties, like font size, alignment, or color. See [Toolbar options](#toolbar-options) for the full list of properties and which elements they apply to.
4. Click **Add changes** (blue checkmark) to add your edits to the batch.
### Toolbar options
The properties in the toolbar show what you can edit for the selected element. For example, a text element has properties like font size and text alignment, and an image has properties like opacity and object fit.
Toolbar properties don't cover every possible edit you could make to an element, and in some cases, editing a property doesn't make any visible change. For example, setting a background color on an icon changes the area behind the icon rather than the icon itself.
If you want to adjust something that isn't in the toolbar, or if an edit doesn't do what you expected, [describe what you want in a prompt](#describe-changes-using-a-prompt) instead. For example, `Add a 1px border around this card` or `Change the icon color to blue`.
The following table lists each property and what it does. The **Available for** column uses these groups:
* **All elements**: Every element you can select.
* **Media**: Images, videos, and icons.
* **Text**: Text elements, including links and buttons that contain text.
* **Containers**: Elements that hold and organize other elements.
| Property | Description | Available for |
| ---------------- | --------------------------------------------------------------------------------------------------------------------------------------------------- | ------------------------ |
| Alt text | Describes the image for screen readers and search engines. Enter a description of what the image shows. | Media (images and icons) |
| Background color | Sets the element's background color. Choose a [preset or custom color](#color-options). | All elements |
| Font size | Sets the text size. Choose a preset size, from 8 to 96 pixels, or type a specific size. | Text |
| Link | Adds or edits a link, including whether it opens in a new tab. | Text |
| List | Turns the text into a bulleted or numbered list, or removes list formatting. | Text |
| Object fit | Sets how the image fills its space: [cover, contain, fill, or none](#object-fit-options). | Media |
| Opacity | Sets the element's transparency, from 0 to 100%. | All elements |
| Poster | Sets the still image shown before a video plays. Enter a path to an image in your project or a URL to an external image. | Media (videos) |
| Text alignment | Sets how text lines up: left, center, right, or justified. For a container, this only affects text inside it, not the position of other containers. | Text, Containers |
| Text style | Applies formatting to text: bold, italic, underline, or strikethrough. | Text |
| Type color | Sets the text color. Choose a [preset or custom color](#color-options). | Text |
#### Color options
**Type color** and **Background color** open the same color picker. The preset swatches show colors already used in your project. To use a different color, click the **plus icon** to open the `Custom color` menu. There, you can:
* Use the gradient area and hue slider to find the exact color you want.
* Click the eyedropper to sample a color from anywhere on your screen.
* Type an exact value in HEX or RGB. Use the dropdown to switch between the two formats.
#### Object fit options
* **Cover**: Fills the space and crops the image's edges if needed.
* **Contain**: Fits the whole image without cropping, which can leave empty space.
* **Fill**: Stretches the image to fit exactly, which can distort it.
* **None**: Shows the image at its original size.
## Batch and save multiple edits
When you add a visual edit in the preview, the details appear above the chatbox and start a batch. The batch collects your edits so Bolt can process them all at once when you click **Save changes**. We recommend saving edits in a batch, since it uses fewer tokens than sending each edit separately.
A batch is a group of edits Bolt makes at the same time. This is different from the [prompt queue](/building/chat-tools#queue-prompts), which is a series of individual prompts Bolt processes one after another.
You can create and save one batch of edits for each page in your project.
Because you can't navigate through your project while you're using the Select tool, you need to save the edits from one page and then turn off the Select tool before navigating to the next page.
To create a batch of edits:
1. [Select an element](#select-an-element), make your edits, then click **Add changes** (blue checkmark).
The edit is added to the batch and appears above the chatbox. A marker also appears on the element in the preview.
2. Keep selecting elements and adding edits to the batch.
The batch shows how many edits it contains, with a label like `3 visual changes`.
3. (Optional) Before saving, review the list of edits. If there are any you no longer need, you can delete them individually or delete the batch.
4. Click **Save changes** to send your batch to Bolt.
Bolt applies the edits and saves them to the project code.
### Add a note to the batch
You can add a note to a batch of edits to give Bolt additional instructions.
For example, a note can tell Bolt to apply changes across different pages in your project. If you change the size and color of a section heading and want the headings on your other pages to match, you can add a note like: `Apply these changes to the section headings on the other pages too.`
To add a note:
1. After [creating a batch of edits](#batch-and-save-multiple-edits), type the note in the chatbox.
2. To save the batch with a note, click **Save changes** next to the batch, or click the blue arrow in the chatbox.
## Describe changes using a prompt
Sending a prompt for a selected element works the same as any other prompt. Describe the change you want, and Bolt builds it.
Unlike with visual edits, your prompt goes straight to Bolt instead of into a batch, so you don't see changes in the preview until Bolt finishes.
1. [Select an element](#select-an-element).
2. In the chatbox, describe the change you want.
3. Send your prompt.
To select an image and edit it with AI, see [Edit images with AI](/building/images#edit-images-with-ai).
## Undo or remove visual edits
There are a few ways to undo an edit:
* If you haven't yet added the edit to the batch, click outside the element or press `ESC`. The element reverts to how it looked before you made any changes.
* If you added the edit to the batch but haven't saved it yet, click **Delete** (trash can icon) next to the edit to remove it.
* If you already sent your batch and Bolt saved the edit, there's currently no way to undo that edit alone. However, you can use your project's [version history](/building/using-bolt/rollback-backup#restore-using-version-history) to roll back a batch of edits.