> ## Documentation Index
> Fetch the complete documentation index at: https://support.bolt.new/llms.txt
> Use this file to discover all available pages before exploring further.
# Google SSO for authentication
> Bolt integrates directly with Google to handle user authentication.
Google SSO (Single Sign-On) lets users sign in to your website using their Google account instead of creating a new account with an email and password. It provides a simple and secure way to log in, reducing the number of passwords people need to remember.
You need a Google account to set up Google SSO for your website.
## How it works
Using your Google account, you'll create an OAuth 2.0 app in the Google Cloud Console, which generates a Client ID and Client Secret that identify your website to Google.
Then, you'll enter those values into Bolt's Authentication settings. After that, your visitors can sign in to your website securely using their Google account.
## Part 1: Enable Google SSO on your project
Before creating your Google credentials, complete the initial setup for Google SSO in Bolt.
1. Log in to Bolt and open your project.
2. Prompt Bolt to create a user authentication database to use with Google SSO. For example, as part of your prompt, include the following: `Add Sign-In with Google to my application.`
You can't view Authentication settings in your project until you've created a Bolt database or connected to a Supabase project.
3. After Bolt creates your database, click the **gear icon** in the top center of your screen.
4. Click **All project settings**.
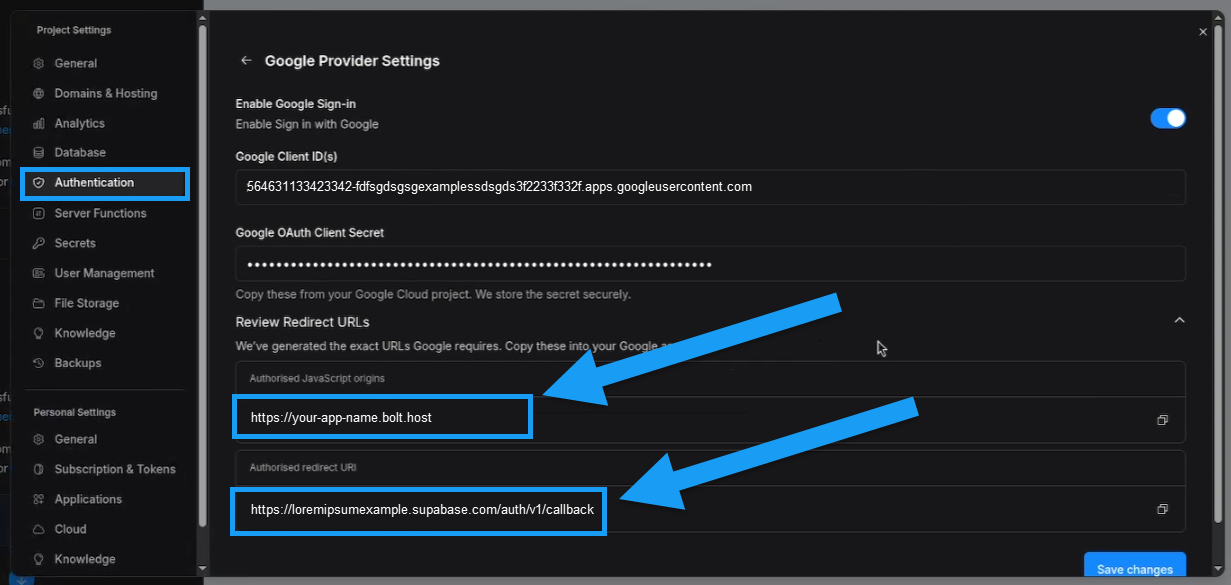
5. Click **Authentication**.
6. Click **Continue with Google**.
7. Turn on **Enable Google Sign In**.
After you enable Google sign-in, make note of the following information, as you'll need it in the Google Cloud Console:
* Your authorized JavaScript origin
* Your authorized redirect URI
 ## Part 2: Create your Google credentials
Google Cloud Console may look different depending on your account and setup. This guide shows a personal Google account without an organizational connection. For complete technical details, see Google's official guide on [Creating Access Credentials](https://developers.google.com/workspace/guides/create-credentials#choose_the_access_credential_that_is_right_for_you).
Visit [https://console.cloud.google.com/](https://console.cloud.google.com/) and sign in with the Google account you want to use. If you're new to the console, you may need to agree to their terms first.
1. Click **Select a project** in the top-left of your screen.
2. Click **New project** in the top-right corner of the window (or select an existing one).
3. Enter a project name or use the default.
4. Select your organization.
5. Click **Create**.
6. Click **Select project** when your new project shows up as a notification.
1. Click **Go to APIs overview**.
2. Click **OAuth consent screen**.
3. Click **Get started**.
4. Enter your app name and select a user support email, then click **Next**. (The email must be connected to your Google account; you cannot manually enter one.)
5. Select **External**.
6. Enter a contact email. (This does not have to be connected to your Google account.)
7. If you agree to the terms, select the checkbox, then click **Create**.
1. Click **Create OAuth client**.
2. Select **Web application**.
3. Enter a name for your credentials (not shown to end users).
4. Click **Add URI** under Authorized JavaScript origins.
5. Enter your origin URI found in your **Authentication > Google** settings from Part 1 of this guide, for example `https://your-app-name.bolt.host`.
6. Click **Add URI** under Authorized redirect URIs.
You may need to add multiple origin or redirect URIs depending on your project domain configurations.
7. Enter the redirect URL found in your **Authentication > Google** settings from Part 1 of this guide, for example, `https://loremipsumexample.supabase.com/auth/v1/callback`.
8. Click **Create**.
## Part 3: Enter your Google credentials in Bolt
After creating your Google SSO credentials, enter your Client ID and Client Secret into your project's Authentication settings.
1. Under the Client ID column, click the **copy icon** next to your Client ID and save it.
2. Click your project name to open it.
3. Under Client secrets, click the **copy icon** next to your Client secret and save it.
1. Log in to Bolt and open your project.
2. Click the **gear icon** in the top center of your screen.
3. Click **All project settings**.
4. Click **Authentication**.
5. Click **Continue with Google**.
6. Paste in your **Google Client ID** and **Client Secret** in the appropriate fields.
## Part 4: Test your OAuth app
Google's OAuth flow blocks iframes, so you need to test using your published site rather than in the Bolt Preview window.
1. In Bolt, [publish your project](/cloud/hosting/publish) to make the latest version live.
2. Open your published site in a new tab.
3. Sign in with a Google account to confirm everything is working.
## Next steps
Your Google credentials are now set up, which means your Bolt site can authenticate users via Google SSO. By default, Google sets your OAuth app's publishing status to Testing, which limits sign-in to up to 100 users.
There are a few additional steps to take in the Google Cloud Console before your sign-in flow is ready for real users.
### Add OAuth app branding
When your Google OAuth app is in Testing mode, only your domain appears on the sign-in screen. To show your app name and logo, you need to complete your branding and get it verified by Google.
To add, verify, and publish your branding, sign in to Google Cloud Console, then go to **Google Auth Platform** > **[Branding](https://console.cloud.google.com/auth/branding)**.
For instructions, see [Manage OAuth app branding](https://support.google.com/cloud/answer/15549049?sjid=16117075869637690768-NC) in Google's support documentation.
Your app name and logo won't appear until you publish your branding, even after verification is complete.
### Publish your OAuth app
To let any Google account holder sign in to your app using Google, you need to publish your Google OAuth app.
To publish your Google OAuth app, sign in to Google Cloud Console, then go to **Google Auth Platform** > **[Audience](https://console.cloud.google.com/auth/audience)**.
For instructions, see [Manage App Audience](https://support.google.com/cloud/answer/15549945?sjid=16117075869637690768-NC) in Google's support documentation.
### Request scope verification (if needed)
If your site only uses Google sign-in, you don't need to do anything here. If your site needs to access Google data (like Drive, Gmail, or Calendar), you'll need to request scope verification in the Google Cloud Console.
To add scopes, sign in to Google Cloud Console, then go to **Google Auth Platform** > **[Data access](https://console.cloud.google.com/auth/scopes)**.
For instructions, see [Manage App Data Access](https://support.google.com/cloud/answer/15549135) in Google's support documentation.
## Part 2: Create your Google credentials
Google Cloud Console may look different depending on your account and setup. This guide shows a personal Google account without an organizational connection. For complete technical details, see Google's official guide on [Creating Access Credentials](https://developers.google.com/workspace/guides/create-credentials#choose_the_access_credential_that_is_right_for_you).
Visit [https://console.cloud.google.com/](https://console.cloud.google.com/) and sign in with the Google account you want to use. If you're new to the console, you may need to agree to their terms first.
1. Click **Select a project** in the top-left of your screen.
2. Click **New project** in the top-right corner of the window (or select an existing one).
3. Enter a project name or use the default.
4. Select your organization.
5. Click **Create**.
6. Click **Select project** when your new project shows up as a notification.
1. Click **Go to APIs overview**.
2. Click **OAuth consent screen**.
3. Click **Get started**.
4. Enter your app name and select a user support email, then click **Next**. (The email must be connected to your Google account; you cannot manually enter one.)
5. Select **External**.
6. Enter a contact email. (This does not have to be connected to your Google account.)
7. If you agree to the terms, select the checkbox, then click **Create**.
1. Click **Create OAuth client**.
2. Select **Web application**.
3. Enter a name for your credentials (not shown to end users).
4. Click **Add URI** under Authorized JavaScript origins.
5. Enter your origin URI found in your **Authentication > Google** settings from Part 1 of this guide, for example `https://your-app-name.bolt.host`.
6. Click **Add URI** under Authorized redirect URIs.
You may need to add multiple origin or redirect URIs depending on your project domain configurations.
7. Enter the redirect URL found in your **Authentication > Google** settings from Part 1 of this guide, for example, `https://loremipsumexample.supabase.com/auth/v1/callback`.
8. Click **Create**.
## Part 3: Enter your Google credentials in Bolt
After creating your Google SSO credentials, enter your Client ID and Client Secret into your project's Authentication settings.
1. Under the Client ID column, click the **copy icon** next to your Client ID and save it.
2. Click your project name to open it.
3. Under Client secrets, click the **copy icon** next to your Client secret and save it.
1. Log in to Bolt and open your project.
2. Click the **gear icon** in the top center of your screen.
3. Click **All project settings**.
4. Click **Authentication**.
5. Click **Continue with Google**.
6. Paste in your **Google Client ID** and **Client Secret** in the appropriate fields.
## Part 4: Test your OAuth app
Google's OAuth flow blocks iframes, so you need to test using your published site rather than in the Bolt Preview window.
1. In Bolt, [publish your project](/cloud/hosting/publish) to make the latest version live.
2. Open your published site in a new tab.
3. Sign in with a Google account to confirm everything is working.
## Next steps
Your Google credentials are now set up, which means your Bolt site can authenticate users via Google SSO. By default, Google sets your OAuth app's publishing status to Testing, which limits sign-in to up to 100 users.
There are a few additional steps to take in the Google Cloud Console before your sign-in flow is ready for real users.
### Add OAuth app branding
When your Google OAuth app is in Testing mode, only your domain appears on the sign-in screen. To show your app name and logo, you need to complete your branding and get it verified by Google.
To add, verify, and publish your branding, sign in to Google Cloud Console, then go to **Google Auth Platform** > **[Branding](https://console.cloud.google.com/auth/branding)**.
For instructions, see [Manage OAuth app branding](https://support.google.com/cloud/answer/15549049?sjid=16117075869637690768-NC) in Google's support documentation.
Your app name and logo won't appear until you publish your branding, even after verification is complete.
### Publish your OAuth app
To let any Google account holder sign in to your app using Google, you need to publish your Google OAuth app.
To publish your Google OAuth app, sign in to Google Cloud Console, then go to **Google Auth Platform** > **[Audience](https://console.cloud.google.com/auth/audience)**.
For instructions, see [Manage App Audience](https://support.google.com/cloud/answer/15549945?sjid=16117075869637690768-NC) in Google's support documentation.
### Request scope verification (if needed)
If your site only uses Google sign-in, you don't need to do anything here. If your site needs to access Google data (like Drive, Gmail, or Calendar), you'll need to request scope verification in the Google Cloud Console.
To add scopes, sign in to Google Cloud Console, then go to **Google Auth Platform** > **[Data access](https://console.cloud.google.com/auth/scopes)**.
For instructions, see [Manage App Data Access](https://support.google.com/cloud/answer/15549135) in Google's support documentation.