> ## Documentation Index
> Fetch the complete documentation index at: https://support.bolt.new/llms.txt
> Use this file to discover all available pages before exploring further.
# Use Google Stitch designs in Bolt
> Export your Google Stitch designs to Bolt and build them into a fully functional app.
[Google Stitch](https://stitch.withgoogle.com) is an AI-powered design tool that generates app mockups and design systems from prompts.
You can use it to visualize your app before writing any code, then bring your designs into Bolt and build out the functionality you need, like [data storage](/cloud/database), [user sign-ins](/cloud/database/authentication), and [web hosting](/cloud/hosting).
For a guided walkthrough of turning your Stitch designs into a Bolt app, watch this tutorial.
## Create your designs in Google Stitch
Google Stitch builds your app mockups using a design system, which is a set of visual rules that defines your app's fonts, colors, and button styles.
You can choose one of Stitch's preset design systems or describe the visual style you want in your prompt to generate a custom one. Later, you can [add this design system to Bolt](#add-your-stitch-design-system-to-bolt) to make sure new pages and components you build match your original designs.
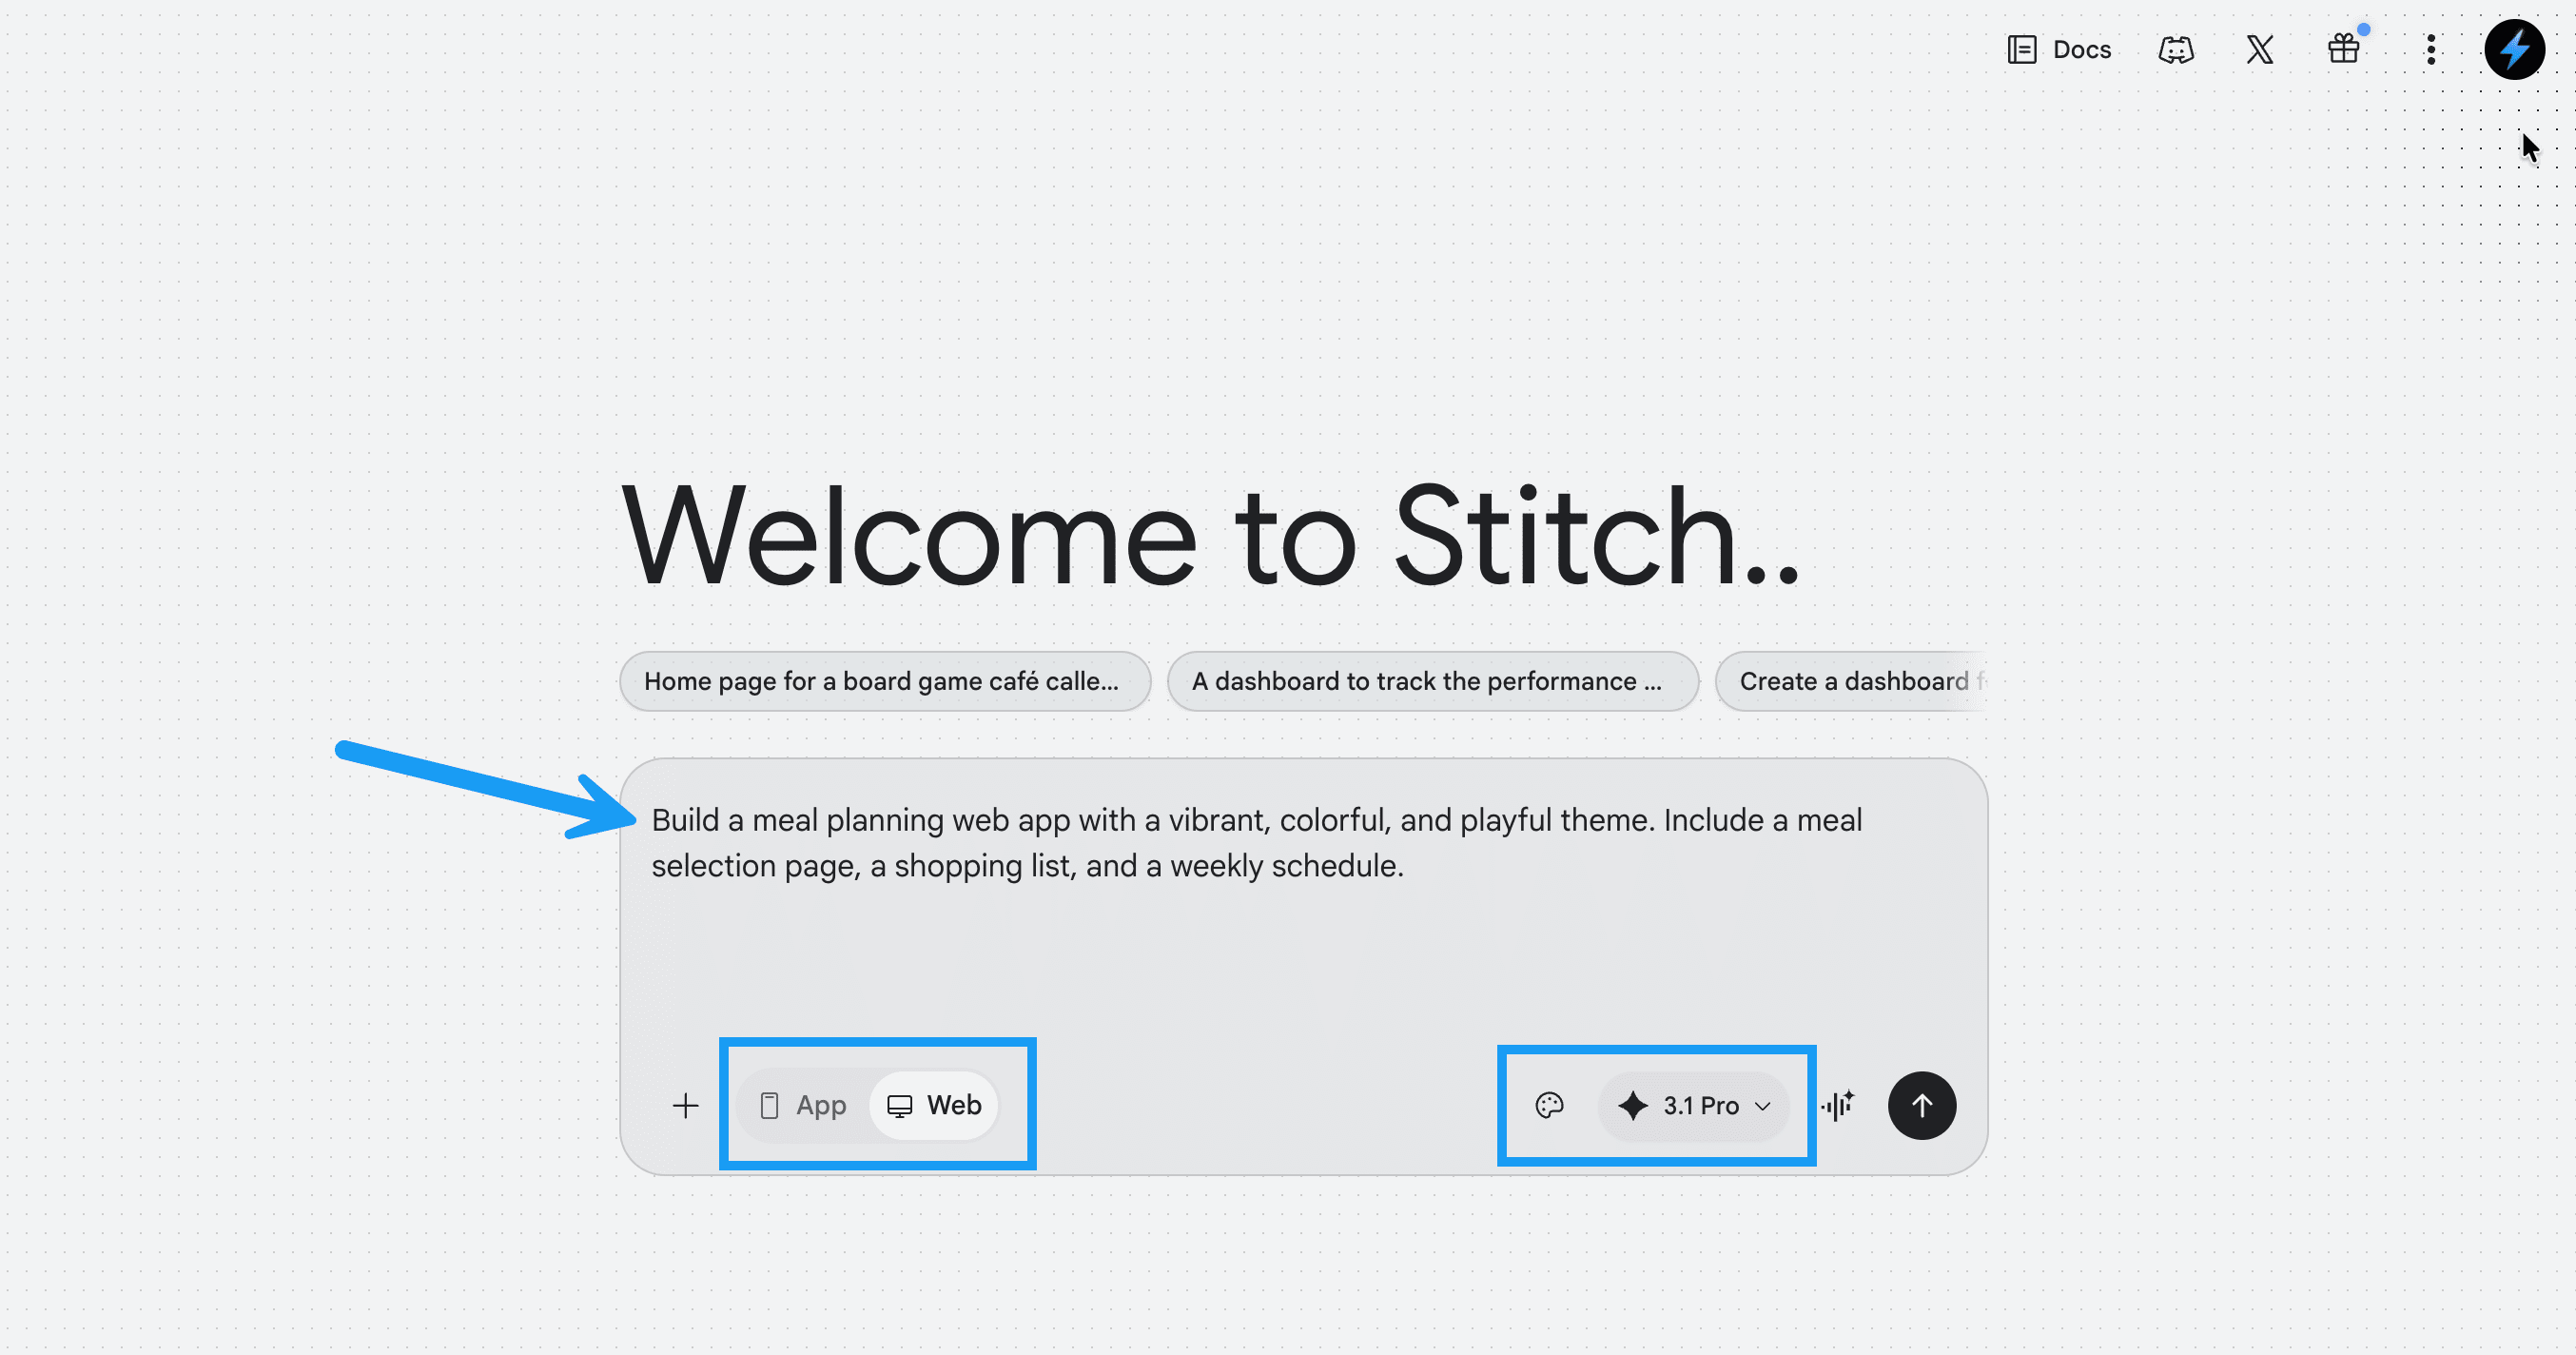
1. In Google Stitch, write a prompt that describes the app you want to build. For example: `Build a meal planning web app with a vibrant, colorful, and playful theme. Include a meal selection page, a shopping list, and a weekly schedule.`
2. Select the app type (mobile app or website).
3. Optionally, select a design system. You can also describe the visual style you want in the prompt instead.
4. Optionally, select a Gemini model. More advanced models may produce more complete designs.
5. Send your prompt and wait for Stitch to generate your pages and design system.
6. Keep working on your designs until you're satisfied with how they look. You can adjust the colors, page text and layout, and design system details like fonts and button styles.
For Stitch prompting tips and a full list of available options, see the [Stitch documentation](https://stitch.withgoogle.com/docs).
## Export your designs to Bolt
When you're ready to build, export your designs from Stitch directly into Bolt. This automatically attaches screenshots and page HTML and populates a prompt telling Bolt how to build the pages.
Before exporting from Stitch, make sure you've created a Bolt account and you're signed in.
1. In Stitch, select the pages you want to build.
2. In the upper-right corner, click **Export**.
3. Select **Bolt**, then click **Build with Bolt**. This opens Bolt, attaches your page screenshots and HTML, and fills in a prompt telling Bolt how to build the pages.
4. When your Stitch attachments finish loading, click **Build now**.
## Add a database
At this point, your app's pages are built out in Bolt, but the data is hard-coded, which means that it's written directly into the page. To support dynamic content users can add to or change, you need [a database](/concepts/intro-databases).
1. Prompt Bolt to create a database based on your app's content. For example: `Using your knowledge of how the recipes appear in the UI across all the app's pages, create a database to store the recipe and ingredient information. Include properties like names, tags, images, and any other properties needed.`
2. After Bolt generates the database, check that the tables and columns match the type of content on your pages. To learn how to view what's stored in your database, see [Tables](/cloud/database/tables).
## Add your Stitch design system to Bolt
You can download your design system from Stitch as `DESIGN.md`, an open-source file format designed for AI tools like Bolt to read. Then, add it to your Bolt project to keep building with the same visual rules as your original designs.
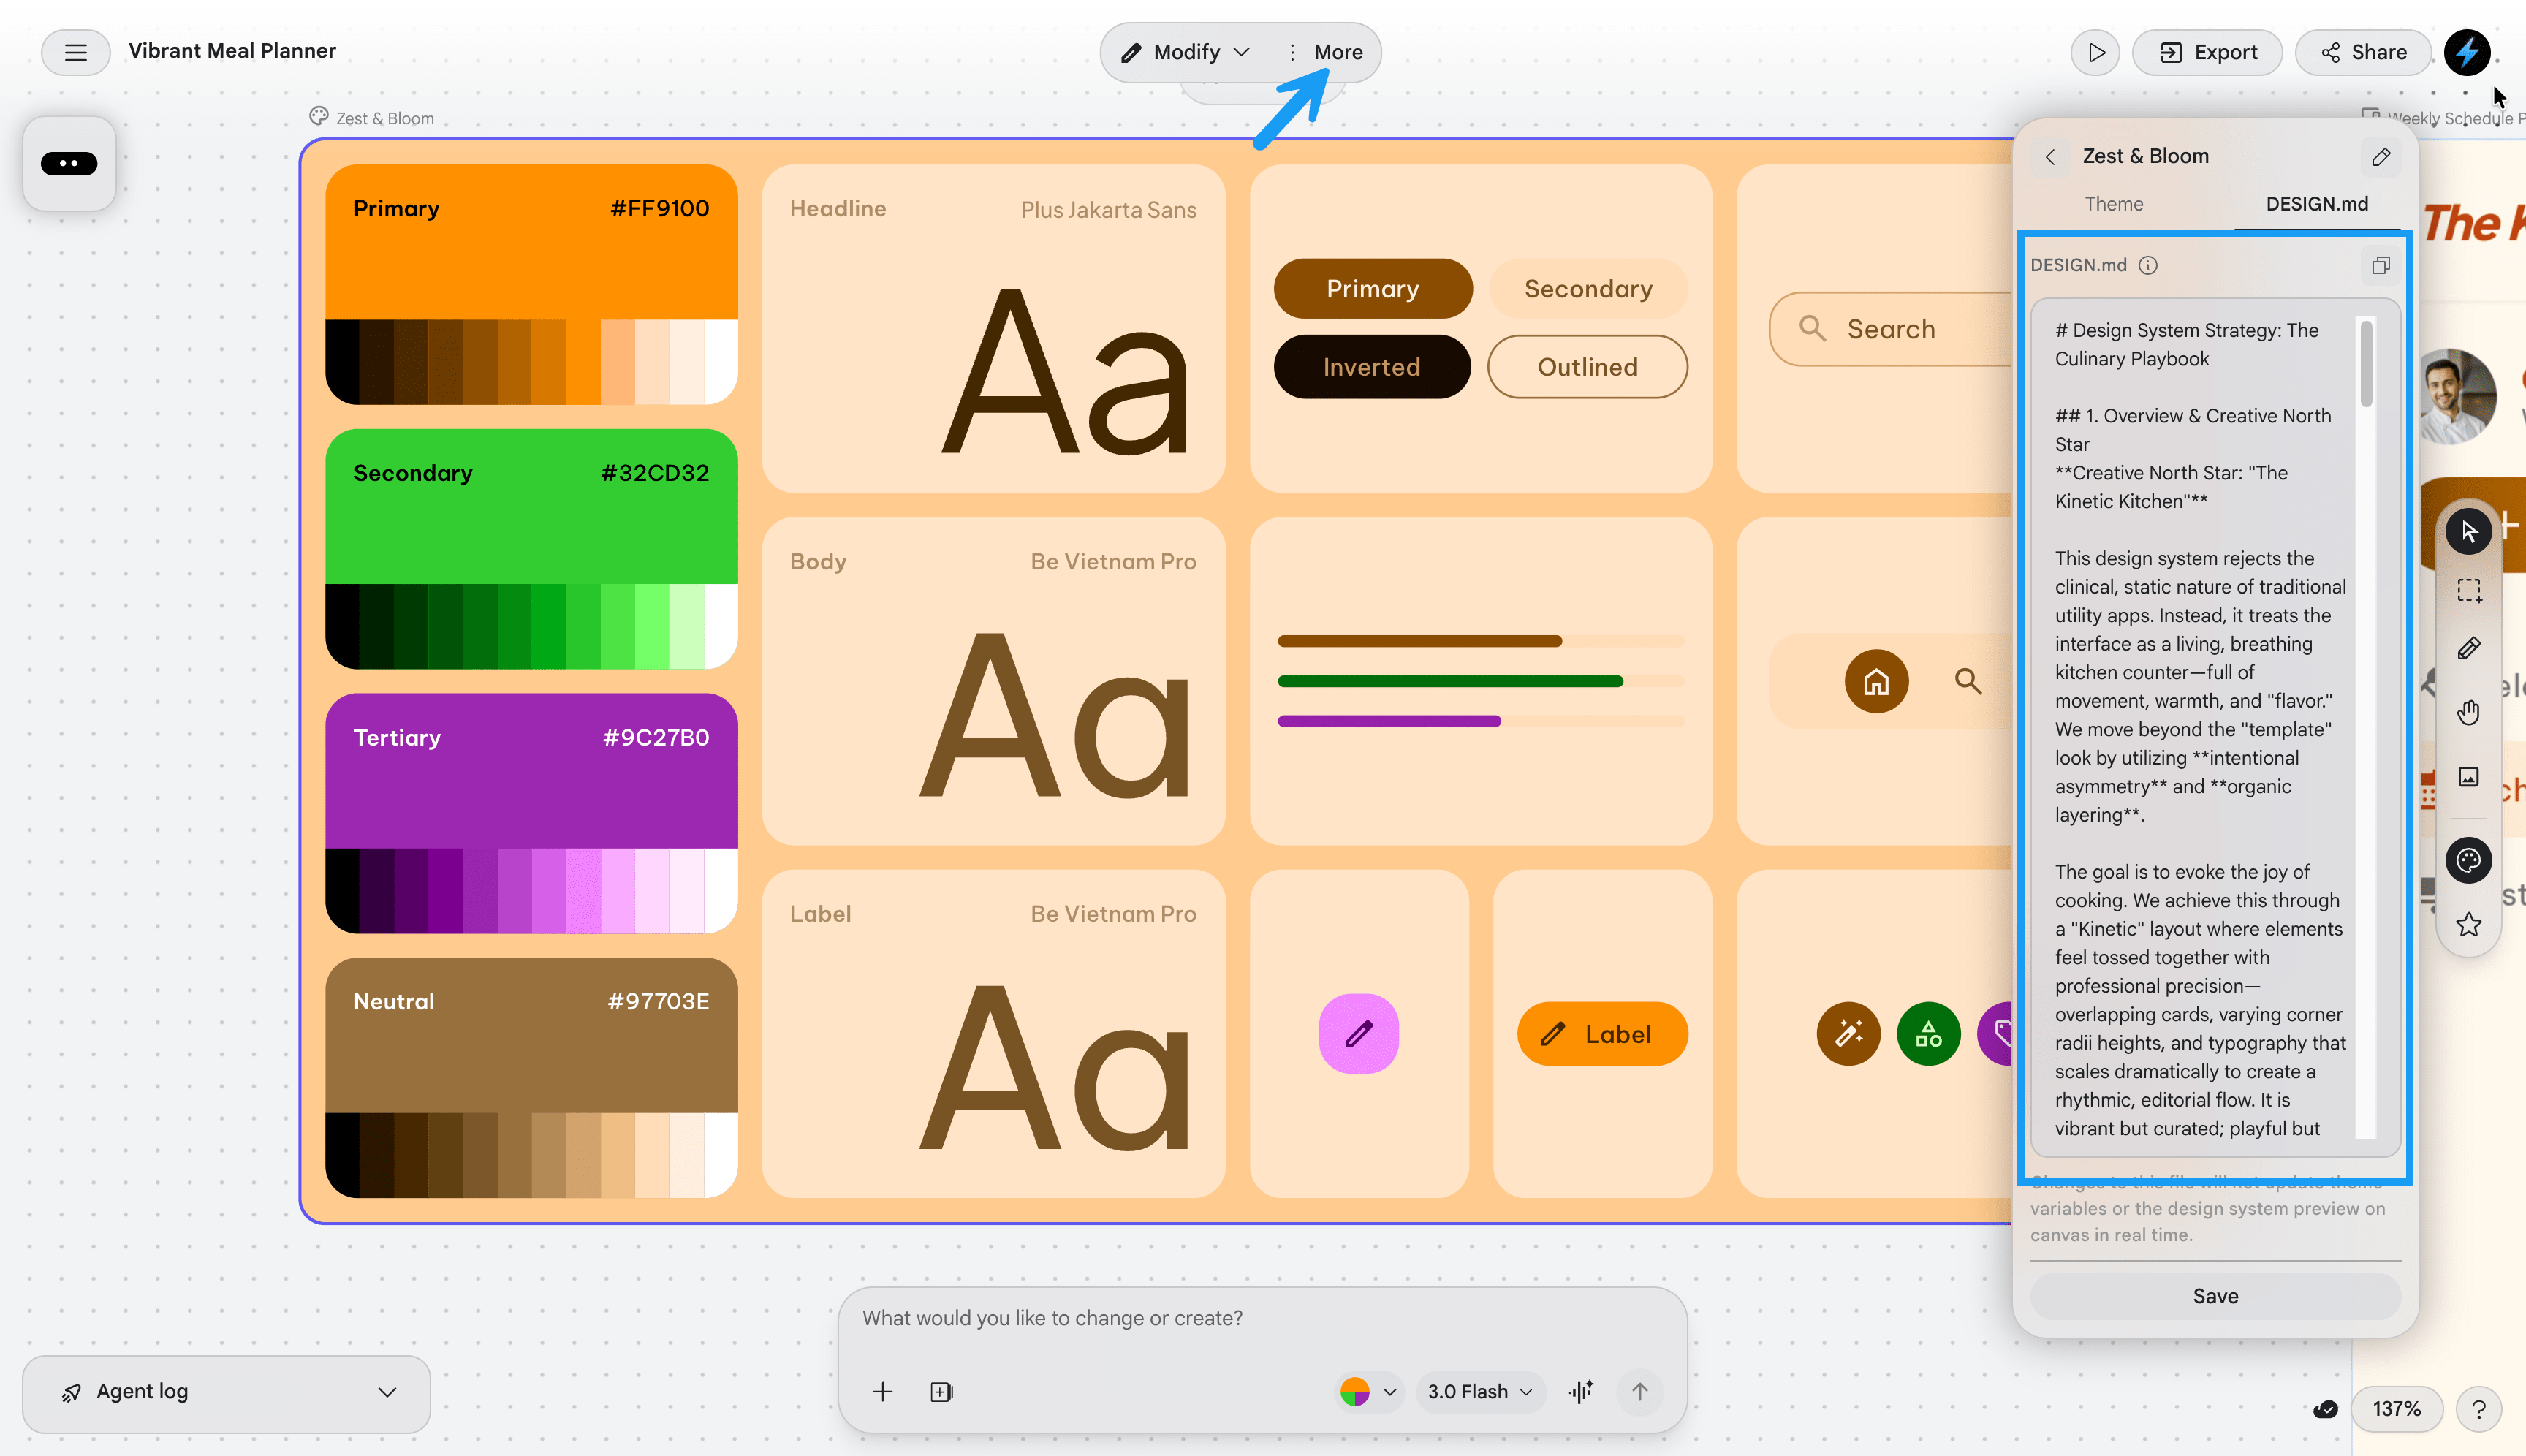
1. In Google Stitch canvas, click the card for your design system.
2. To review its contents, click **Modify** > **Edit**, then select the **DESIGN.md** tab.
3. To download your design system file, click **More**, then click **Download**.
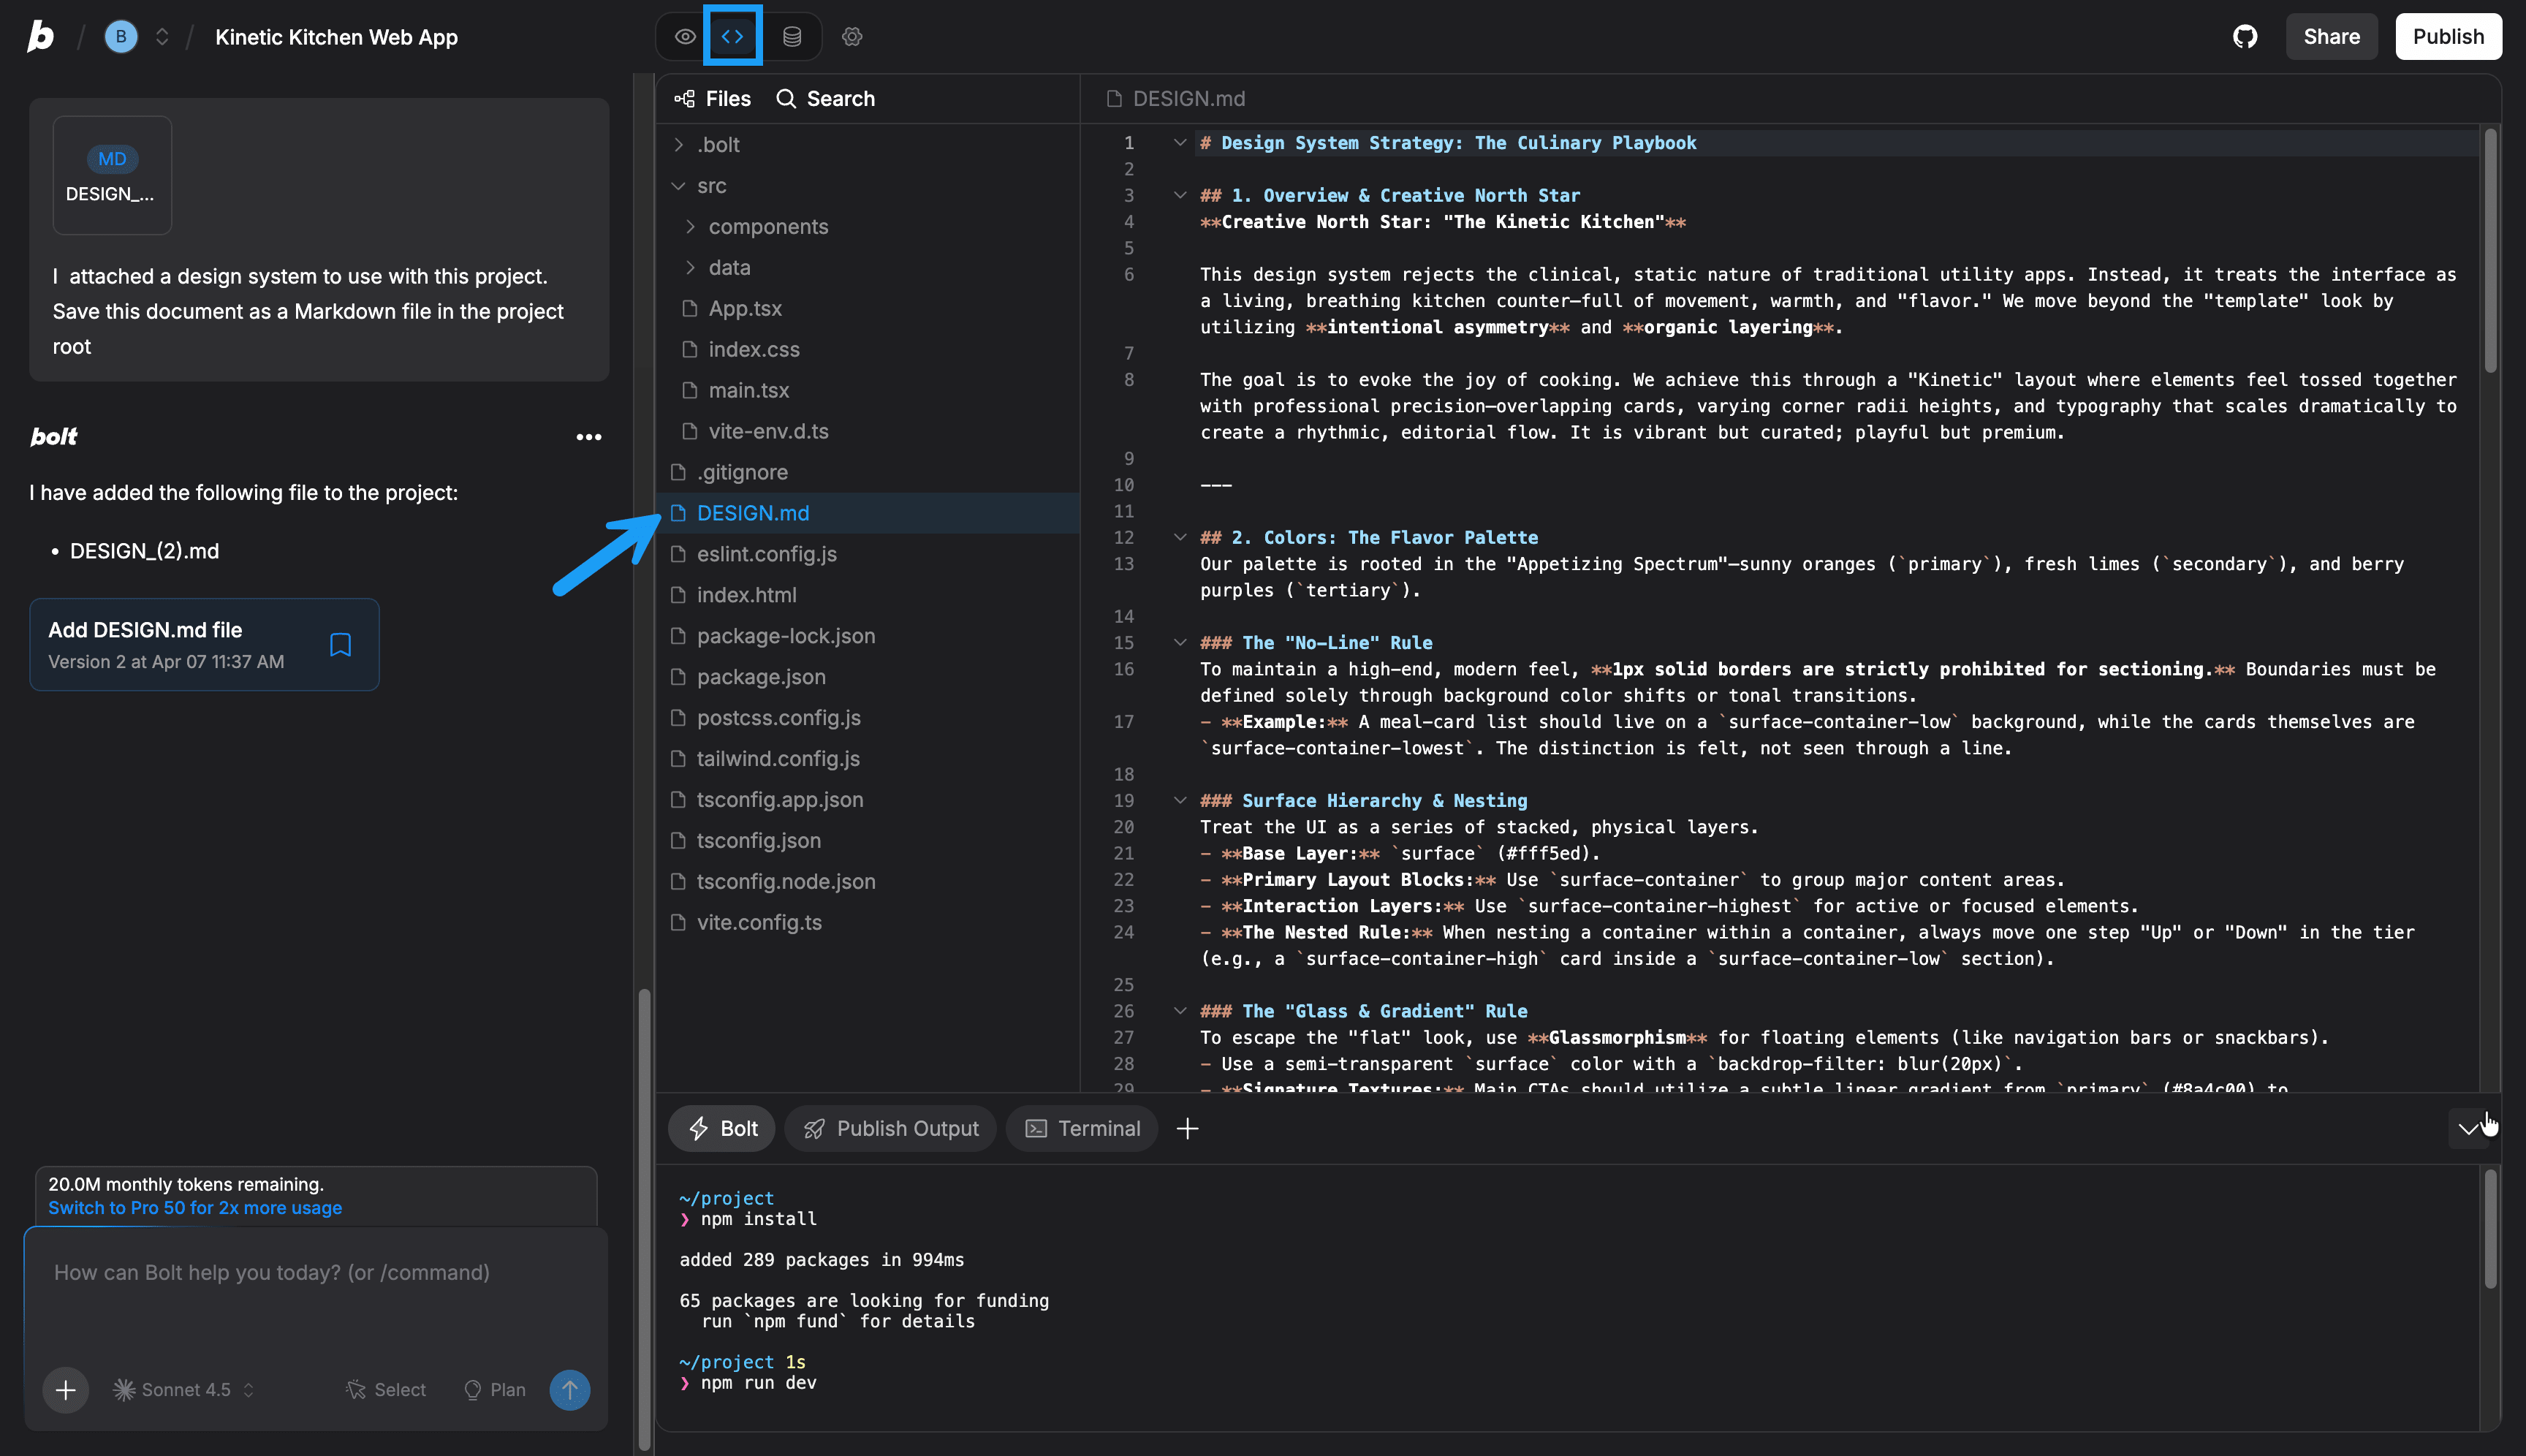
4. In your Bolt project, in the chat, [attach the document](/building/using-bolt/interacting-ai#upload-files) and prompt Bolt to save it. For example: `I attached a design system to use with this project. Save this document as a Markdown file in the project root.`
5. To see the contents of your design system in Bolt, click the **Code** icon in the top menu, then find the design system file in your file structure.
### Add a design system rule to Project Knowledge
[Project Knowledge](/settings/project-settings#project-knowledge) provides context that Bolt uses whenever you work on your project. Add a design system rule here so you don't have to remind Bolt to follow your visual guidelines in every prompt.
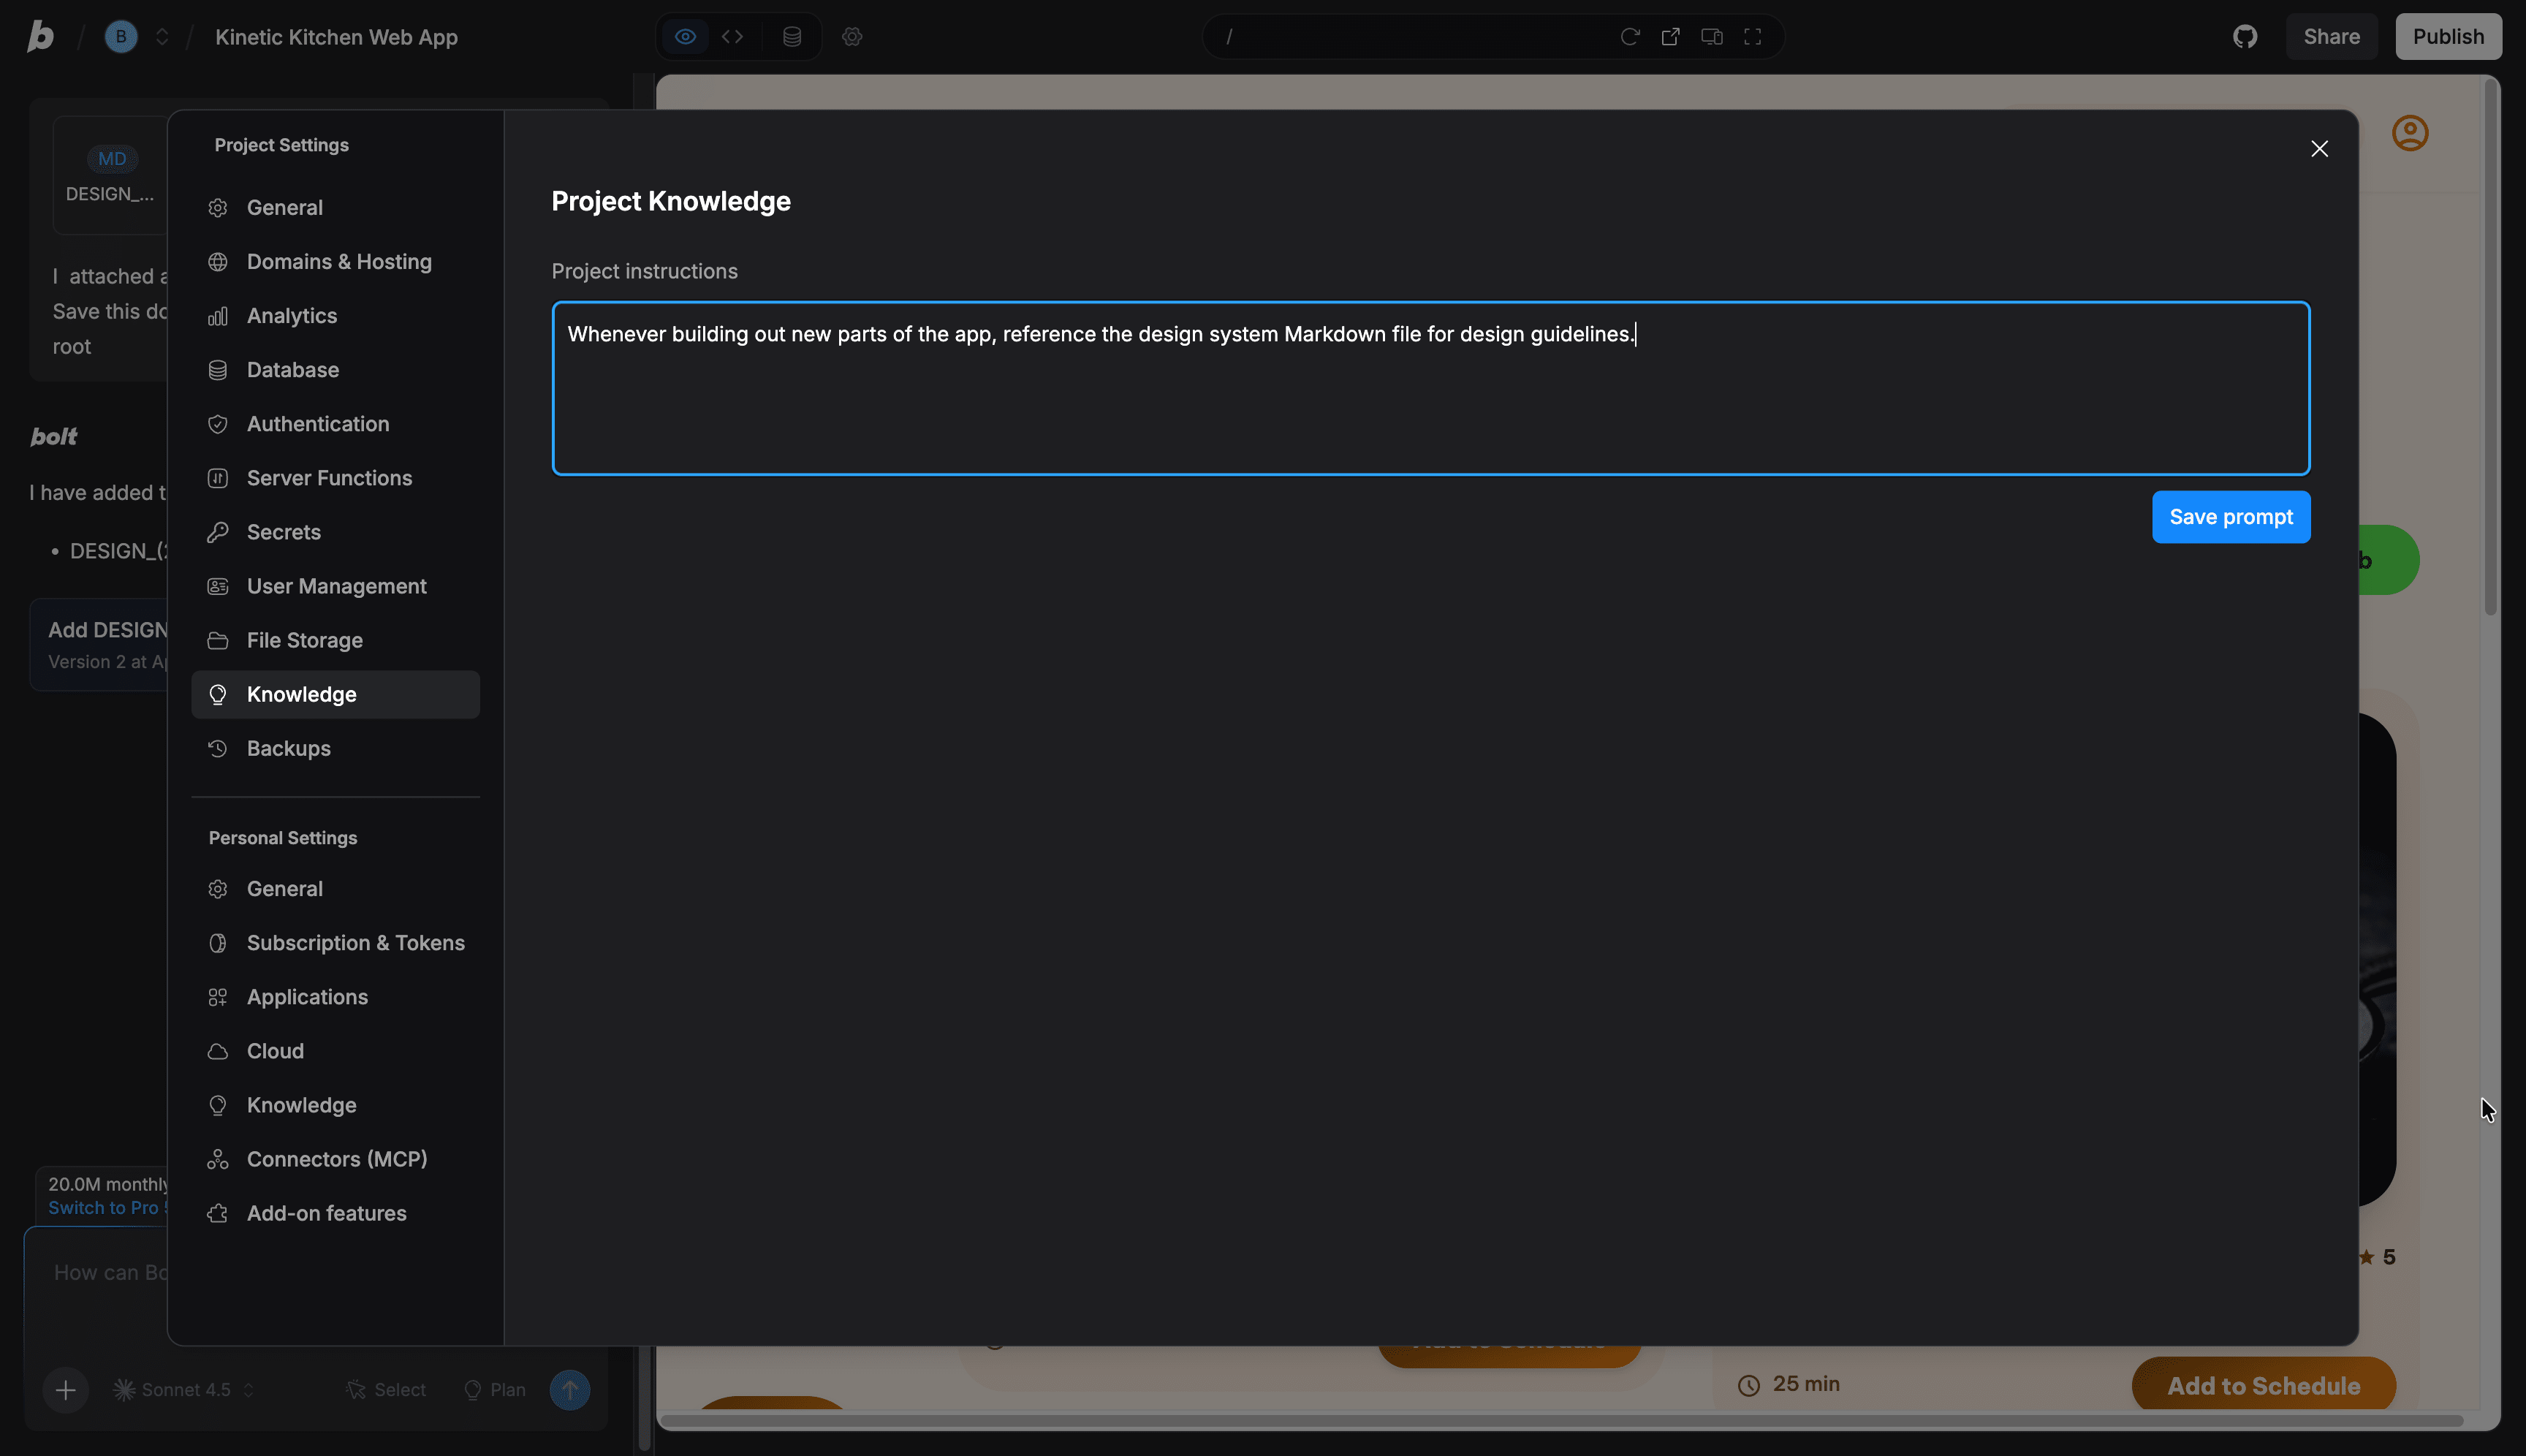
1. In your Bolt project, click the gear icon at the top of the screen, then click **Knowledge**.
2. Add a rule telling Bolt to reference your design system file when building new parts of the app. For example: `Whenever building out new parts of the app, reference the design system Markdown file for design guidelines.`
3. Click **Save Prompt**.
To test, prompt Bolt to generate a new component and verify that the output matches your design system.
## Add new Stitch designs to your project
As your app grows, you may want to design additional pages in Stitch and bring them into your existing Bolt project. You can export any page as code and paste it directly into Bolt.
For each page you want to add:
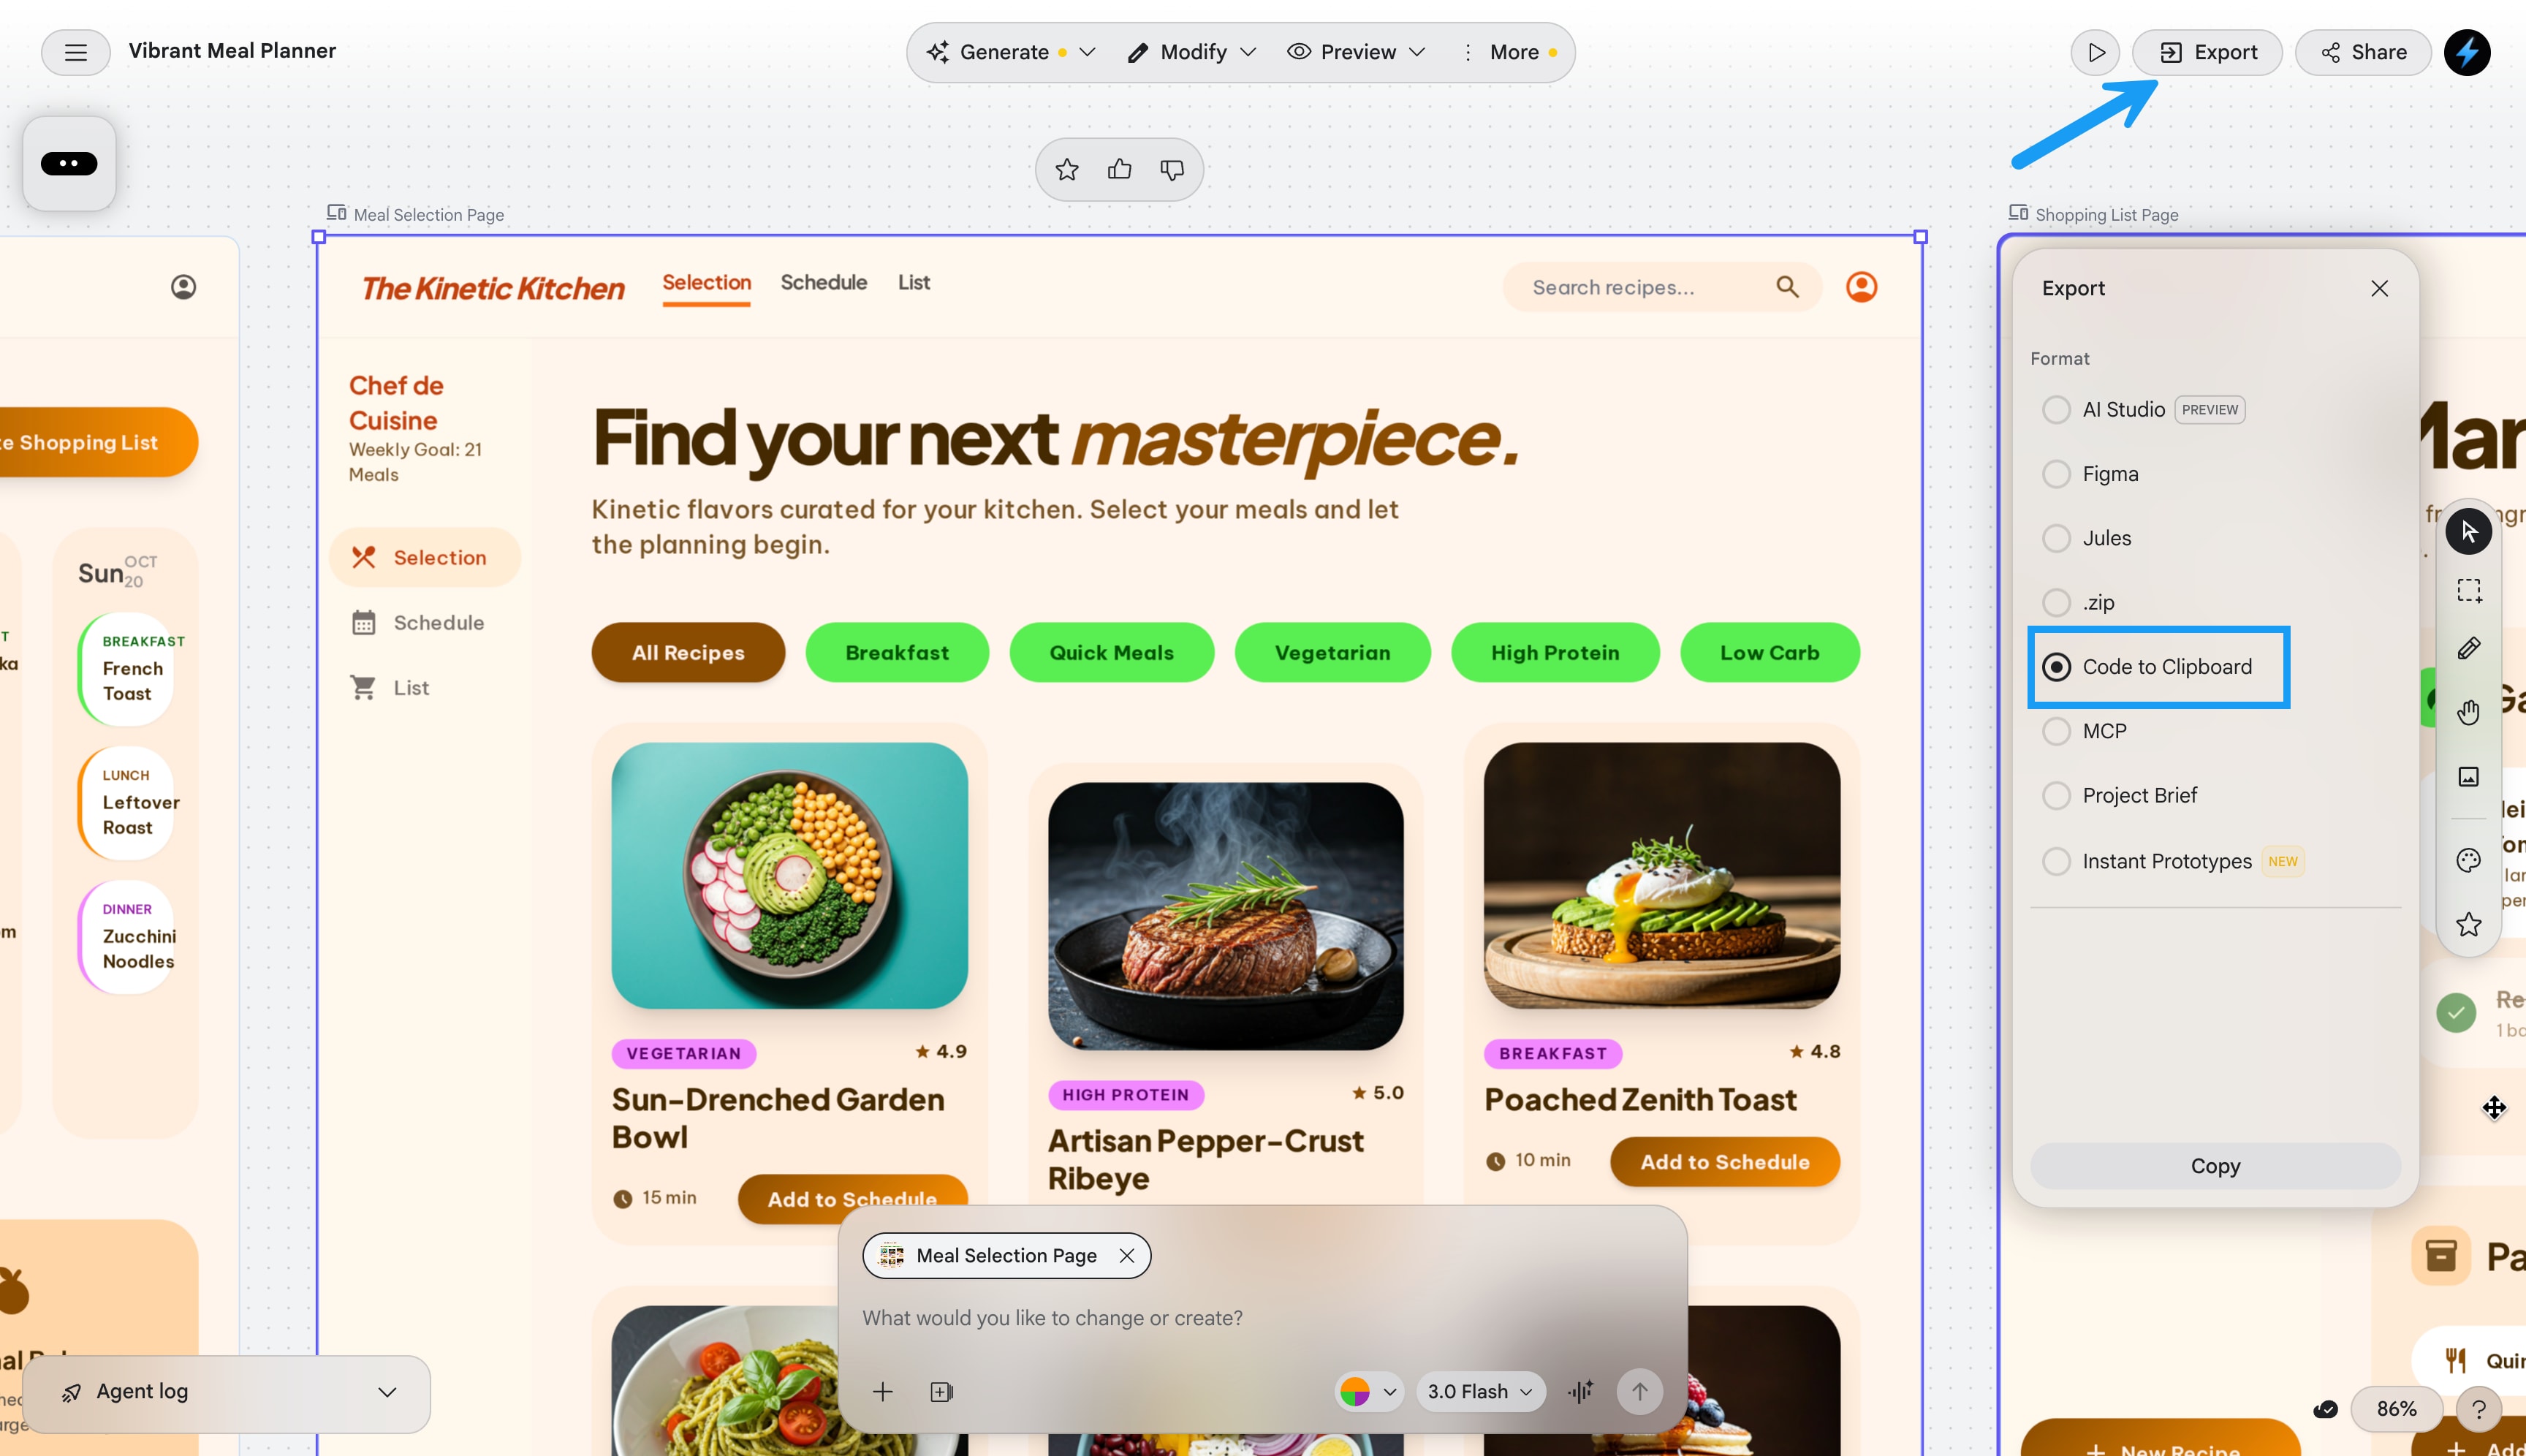
1. In Google Stitch, select the page you want to export.
2. Click **Export**, click **Code to Clipboard**, then click **Copy**.
3. In Bolt, paste the code into the chat and prompt it to build out the page. Include instructions to connect the page to the app's navigation so users can move between pages. For example: `Use the attached code to build out the page and connect the page headers to the app navigation.`
## What's next
Depending on what your app needs, here are a few things you might want to do next:
* [Connect an MCP server to bring in data from other sources](/building/using-bolt/connect-mcp)
* [Connect a custom domain](/cloud/domains/connect)
* [Publish your project to a live site](/cloud/hosting/publish)
 1. In Google Stitch, write a prompt that describes the app you want to build. For example: `Build a meal planning web app with a vibrant, colorful, and playful theme. Include a meal selection page, a shopping list, and a weekly schedule.`
2. Select the app type (mobile app or website).
3. Optionally, select a design system. You can also describe the visual style you want in the prompt instead.
4. Optionally, select a Gemini model. More advanced models may produce more complete designs.
5. Send your prompt and wait for Stitch to generate your pages and design system.
6. Keep working on your designs until you're satisfied with how they look. You can adjust the colors, page text and layout, and design system details like fonts and button styles.
For Stitch prompting tips and a full list of available options, see the [Stitch documentation](https://stitch.withgoogle.com/docs).
## Export your designs to Bolt
When you're ready to build, export your designs from Stitch directly into Bolt. This automatically attaches screenshots and page HTML and populates a prompt telling Bolt how to build the pages.
1. In Google Stitch, write a prompt that describes the app you want to build. For example: `Build a meal planning web app with a vibrant, colorful, and playful theme. Include a meal selection page, a shopping list, and a weekly schedule.`
2. Select the app type (mobile app or website).
3. Optionally, select a design system. You can also describe the visual style you want in the prompt instead.
4. Optionally, select a Gemini model. More advanced models may produce more complete designs.
5. Send your prompt and wait for Stitch to generate your pages and design system.
6. Keep working on your designs until you're satisfied with how they look. You can adjust the colors, page text and layout, and design system details like fonts and button styles.
For Stitch prompting tips and a full list of available options, see the [Stitch documentation](https://stitch.withgoogle.com/docs).
## Export your designs to Bolt
When you're ready to build, export your designs from Stitch directly into Bolt. This automatically attaches screenshots and page HTML and populates a prompt telling Bolt how to build the pages.
 3. To download your design system file, click **More**, then click **Download**.
4. In your Bolt project, in the chat, [attach the document](/building/using-bolt/interacting-ai#upload-files) and prompt Bolt to save it. For example: `I attached a design system to use with this project. Save this document as a Markdown file in the project root.`
5. To see the contents of your design system in Bolt, click the **Code** icon in the top menu, then find the design system file in your file structure.
3. To download your design system file, click **More**, then click **Download**.
4. In your Bolt project, in the chat, [attach the document](/building/using-bolt/interacting-ai#upload-files) and prompt Bolt to save it. For example: `I attached a design system to use with this project. Save this document as a Markdown file in the project root.`
5. To see the contents of your design system in Bolt, click the **Code** icon in the top menu, then find the design system file in your file structure.
 ### Add a design system rule to Project Knowledge
[Project Knowledge](/settings/project-settings#project-knowledge) provides context that Bolt uses whenever you work on your project. Add a design system rule here so you don't have to remind Bolt to follow your visual guidelines in every prompt.
1. In your Bolt project, click the gear icon at the top of the screen, then click **Knowledge**.
2. Add a rule telling Bolt to reference your design system file when building new parts of the app. For example: `Whenever building out new parts of the app, reference the design system Markdown file for design guidelines.`
### Add a design system rule to Project Knowledge
[Project Knowledge](/settings/project-settings#project-knowledge) provides context that Bolt uses whenever you work on your project. Add a design system rule here so you don't have to remind Bolt to follow your visual guidelines in every prompt.
1. In your Bolt project, click the gear icon at the top of the screen, then click **Knowledge**.
2. Add a rule telling Bolt to reference your design system file when building new parts of the app. For example: `Whenever building out new parts of the app, reference the design system Markdown file for design guidelines.`
 3. Click **Save Prompt**.
 3. In Bolt, paste the code into the chat and prompt it to build out the page. Include instructions to connect the page to the app's navigation so users can move between pages. For example: `Use the attached code to build out the page and connect the page headers to the app navigation.`
## What's next
Depending on what your app needs, here are a few things you might want to do next:
* [Connect an MCP server to bring in data from other sources](/building/using-bolt/connect-mcp)
* [Connect a custom domain](/cloud/domains/connect)
* [Publish your project to a live site](/cloud/hosting/publish)
3. In Bolt, paste the code into the chat and prompt it to build out the page. Include instructions to connect the page to the app's navigation so users can move between pages. For example: `Use the attached code to build out the page and connect the page headers to the app navigation.`
## What's next
Depending on what your app needs, here are a few things you might want to do next:
* [Connect an MCP server to bring in data from other sources](/building/using-bolt/connect-mcp)
* [Connect a custom domain](/cloud/domains/connect)
* [Publish your project to a live site](/cloud/hosting/publish)