> ## Documentation Index
> Fetch the complete documentation index at: https://support.bolt.new/llms.txt
> Use this file to discover all available pages before exploring further.
# Build a presentation with Bolt Slides
> Build, customize, and present a slide deck with Bolt Slides.
With Bolt Slides, you can build a presentation with default slide layouts, presenter mode, and annotations built in, giving you a polished deck that's ready to present or share. Customize your deck by prompting for what you want to add, like interactive charts and models or live data, and invite others to collaborate with you as you build it.
Bolt Slides is available on all plans. When you're ready to present, share your deck's published link so your audience can view it on their own devices.
## Build a presentation in Bolt
1. On the Bolt homepage, below the chatbox, click **Slides**.
2. In the chatbox, describe the presentation you want to create, then send your prompt.
Clicking **Slides** helps Bolt understand what you want to build. If you skip this step, Bolt still creates a presentation as long as your prompt describes a deck, slides, or presentation.
After Bolt generates your deck, keep prompting to adjust layout, content, style, or functionality. Your Bolt slide deck works like any other Bolt project: chat with Bolt to refine what you've built.
### Customize how your deck looks
* **Describe a look and feel**: Add a color palette, tone, or mood to explain the visual style you want.
* **Add images**: [Upload images](/building/upload-files) as inspiration or to display in your slides. On paid plans, you can also ask Bolt to [generate images](/building/images#generate-ai-images) that match a specific style.
* **Use your team's design system**: If your team has a design system set up, [select it](/building/design-system/use-design-system) before you start building so Bolt builds the deck using your components and brand styles.
### Add slide interactions
Here are a few examples you can try to add interactive elements to individual slides. Make sure to update the placeholder information in these sample prompts so they're specific to what you're building.
| Feature | What it does | Try this prompt |
| ----------------------- | ---------------------------------------------------------------------------------------------------------------------------------------------------------------------------- | ---------------------------------------------------------------------------------------------------------------------------- |
| Interactive 3D model | Lets viewers rotate and zoom a 3D object on the slide. Good for showing a product design, architectural rendering, or anatomical model from every angle. | `Add a 3D model of [object] to this slide. Let users drag to rotate it and scroll to zoom in and out.` |
| Time-lapse slider | Adds a slider that viewers drag through fixed points in time to see how something changes. Good for progress against a construction plan or fitness goal. | `Add a slider with four stops: 1 week, 4 weeks, 8 weeks, and 12 weeks. Show [image or data] at each stop.` |
| Before-and-after slider | Adds a slider that viewers drag left and right to compare two states side by side. Good for showing a photo edit, skincare result, or website redesign. | `Add a before-and-after slider comparing [image A] and [image B]. Let users drag the divider to reveal more of either side.` |
| Clickable map | Lets viewers click a region to see information about just that area. Good for showing revenue by state, a seating chart or floor plan, or a solar system map. | `Add a clickable map of [object]. When someone clicks a region, show a popup with [data] for that region.` |
| Hover-preview list | Shows a brief summary when viewers hover over an item, and the full record when they click it. Good for a restaurant menu or product inventory. | `Add a list of [items]. Hovering over one shows a summary card. Clicking it opens the full detail view.` |
| Idea board | Adds a collaborative canvas where people can add sticky notes or drawings during the presentation. Good for brainstorming marketing plans or curriculum for your department. | `Add an idea board to this slide where multiple people can add sticky notes and drawings in real time.` |
## Use the presentation controls
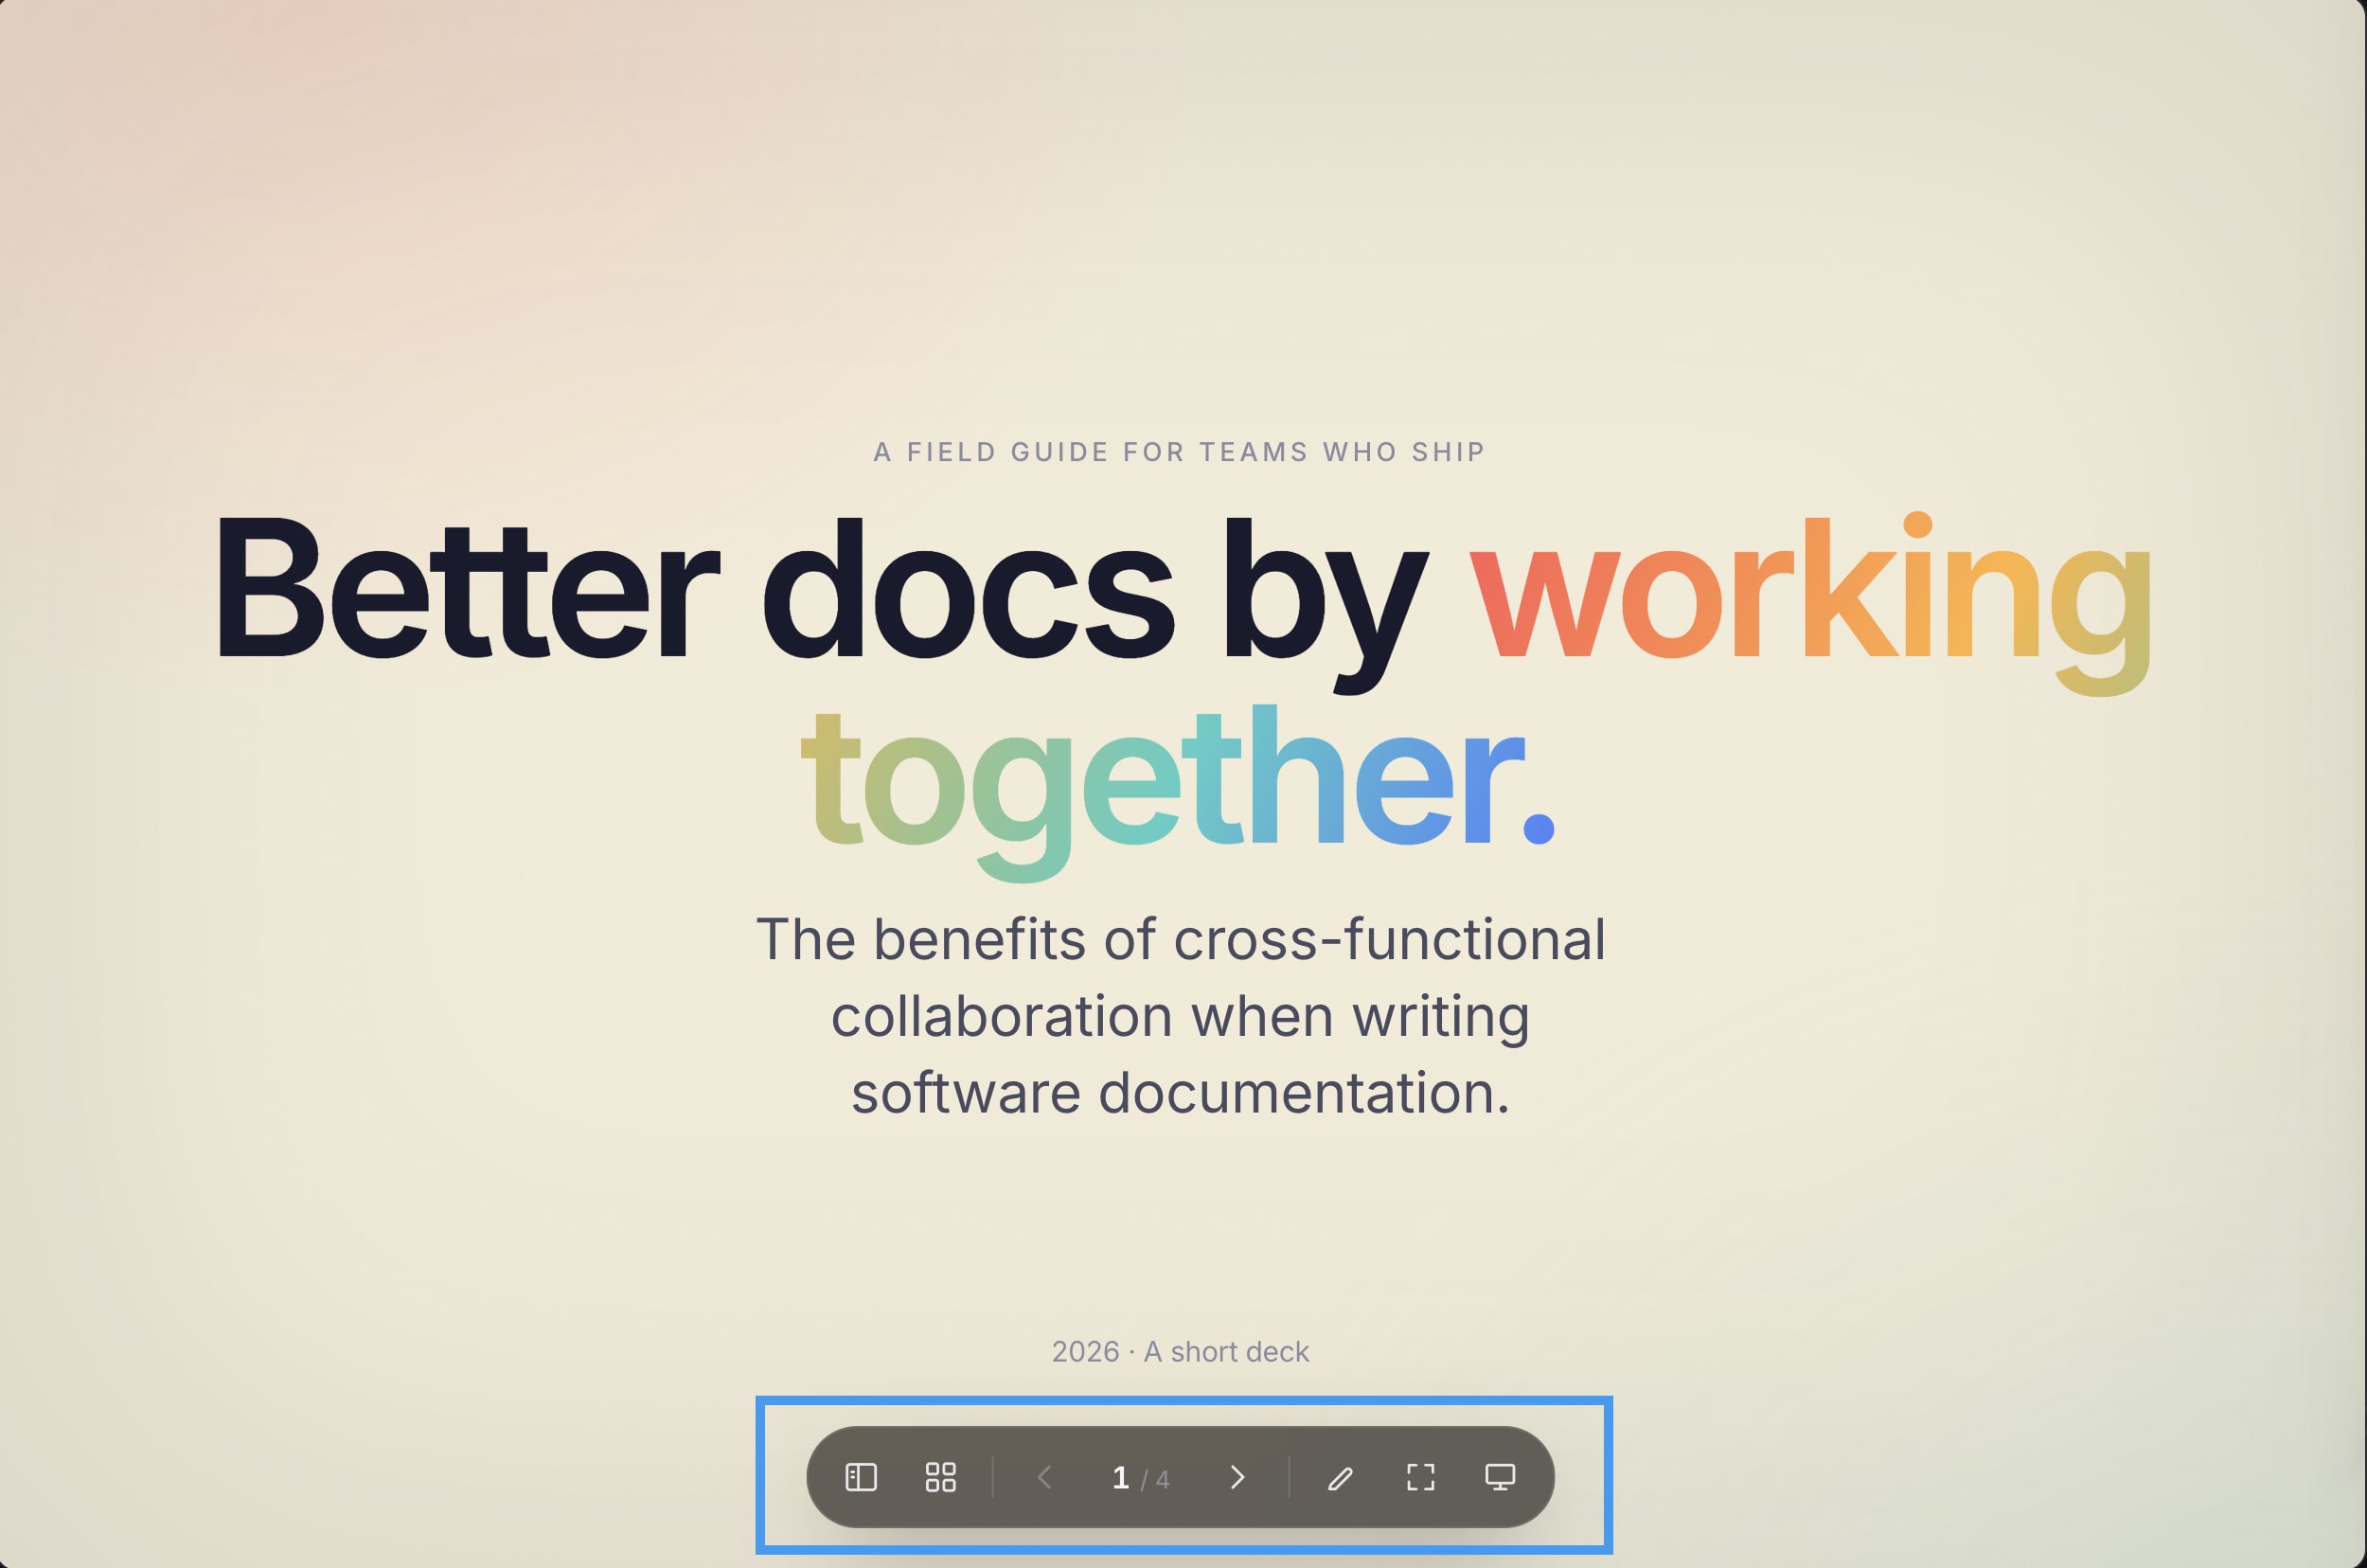 Every Bolt Slides deck includes these controls at the bottom of the screen, whether you're previewing, presenting, or viewing a published deck:
* **Sidebar**: Click the sidebar icon to open a scrollable list of slide thumbnails alongside the slide you're viewing.
* **Grid view**: Click the grid icon to open a view showing thumbnails of every slide at once.
* **Previous and Next**: Click the arrow icons to move to the previous or next slide.
* **Fullscreen**: Click the fullscreen icon to view the deck in full screen, then click it again to exit.
* **Annotate**: Click the pencil icon to draw on the current slide with a pen, highlighter, line, arrow, shape, or eraser. When you present, annotations appear on the shared screen. When viewing a deck on your own device, they're visible only to you.
* **Presenter** mode: Click the monitor icon to open presenter mode in a new tab, where you can view your notes for the current slide without affecting what's visible in your original tab. Anyone viewing the deck can open presenter mode, and any notes you type save locally to your device only.
## Share your deck with collaborators
To let others view or edit the deck while you're working on it, [share your project](/building/using-bolt/sharing). You can control the level of access each collaborator has:
* **Viewer**: Can see content to provide feedback.
* **Editor**: Can prompt and edit the deck alongside you.
* **Co-owner**: Can prompt, edit, or publish the deck.
## Edit and test your deck
* **Use the select tool for visual edits**: [Select an element](/building/chat-tools#select-a-ui-element) on a slide, then describe the change in the chat to update just that part. If the select tool doesn't pick up the element you want, like something rendered inside a canvas or chart, share a screenshot of it instead and describe the change in your prompt.
* **Restyle your whole deck at once**: Your deck's colors, fonts, and spacing are controlled from one place, so a single prompt can update all of them together. Try a prompt like this: `Update the slide theme to a dark background with blue accents.`
* **Check your deck across screen sizes**: If your audience will view the deck on a phone or tablet, preview it at a few screen sizes before sharing, especially if you've added interactive elements to your slides.
## Publish and present your deck
To share your presentation, [publish your project to a live website](/cloud/hosting/publish).
If you want to limit who can view it, add a password screen that appears before the presentation loads. Try a prompt like this:
`Add a password screen before the presentation loads. Generate a random password and show it to me in the chat so I can share it with viewers.`
After it's published, you can present it or let people view it on their own:
* **Present to a group using presenter mode**: Share your original tab with the group, and keep the presenter mode tab open on your own device to view any notes you've made.
* **Let people view it on their own**: Share the deck's published link. Anyone with the link can open your deck and move through it independently. The deck link is public, so viewers don't need a Bolt account to access it. Moving between slides doesn't affect what you or anyone else sees, and viewers can't edit the deck itself.
You can even use both methods together: Let others view the deck while you present it, so they can browse ahead or revisit previous slides at their own pace.
## Use the Bolt Slides open-source library
Bolt Slides are built on an open-source skill and component library that's available at [github.com/stackblitz/bolt-slides](https://github.com/stackblitz/bolt-slides). If you want to build with a coding agent of your choice (like Claude Code, Cursor, or Codex) instead of prompting inside Bolt, you can clone this repository to download a copy you can work from.
Cloning the repository creates a local copy of the files on your computer. Changes you or your agent make don't affect the original repository, so you're free to edit your copy however you like.
1. In the terminal, run this command to clone the repository to your computer: `git clone https://github.com/stackblitz/bolt-slides`.
2. Open the `bolt-slides` folder, then run `npm install` in that folder.
You can navigate to the folder using the terminal or find the folder wherever you cloned it (like your Desktop) and right-click to open the command line from there.
1. Open the coding agent of your choice and give it access to the `bolt-slides` folder.
2. Ask the agent to read `.bolt/skills/slides/SKILL.md` before making changes. This file explains the component library, theming conventions, and how content builds progressively within a slide.
3. Describe the deck you want to build. While building, the agent replaces the demo slides in `src/App.tsx` with your content.
1. In the terminal, run `npm run dev` in the `bolt-slides` folder.
2. Copy the `localhost` URL it provides and paste it into your browser. This opens the deck for you to preview, present, or share.
The styling conventions in the deck come from the `:root` block in the `src/styles/tokens.css` file. To apply your own brand styles, ask the agent to update this file so that the changes apply across every slide.
Every Bolt Slides deck includes these controls at the bottom of the screen, whether you're previewing, presenting, or viewing a published deck:
* **Sidebar**: Click the sidebar icon to open a scrollable list of slide thumbnails alongside the slide you're viewing.
* **Grid view**: Click the grid icon to open a view showing thumbnails of every slide at once.
* **Previous and Next**: Click the arrow icons to move to the previous or next slide.
* **Fullscreen**: Click the fullscreen icon to view the deck in full screen, then click it again to exit.
* **Annotate**: Click the pencil icon to draw on the current slide with a pen, highlighter, line, arrow, shape, or eraser. When you present, annotations appear on the shared screen. When viewing a deck on your own device, they're visible only to you.
* **Presenter** mode: Click the monitor icon to open presenter mode in a new tab, where you can view your notes for the current slide without affecting what's visible in your original tab. Anyone viewing the deck can open presenter mode, and any notes you type save locally to your device only.
## Share your deck with collaborators
To let others view or edit the deck while you're working on it, [share your project](/building/using-bolt/sharing). You can control the level of access each collaborator has:
* **Viewer**: Can see content to provide feedback.
* **Editor**: Can prompt and edit the deck alongside you.
* **Co-owner**: Can prompt, edit, or publish the deck.
## Edit and test your deck
* **Use the select tool for visual edits**: [Select an element](/building/chat-tools#select-a-ui-element) on a slide, then describe the change in the chat to update just that part. If the select tool doesn't pick up the element you want, like something rendered inside a canvas or chart, share a screenshot of it instead and describe the change in your prompt.
* **Restyle your whole deck at once**: Your deck's colors, fonts, and spacing are controlled from one place, so a single prompt can update all of them together. Try a prompt like this: `Update the slide theme to a dark background with blue accents.`
* **Check your deck across screen sizes**: If your audience will view the deck on a phone or tablet, preview it at a few screen sizes before sharing, especially if you've added interactive elements to your slides.
## Publish and present your deck
To share your presentation, [publish your project to a live website](/cloud/hosting/publish).
If you want to limit who can view it, add a password screen that appears before the presentation loads. Try a prompt like this:
`Add a password screen before the presentation loads. Generate a random password and show it to me in the chat so I can share it with viewers.`
After it's published, you can present it or let people view it on their own:
* **Present to a group using presenter mode**: Share your original tab with the group, and keep the presenter mode tab open on your own device to view any notes you've made.
* **Let people view it on their own**: Share the deck's published link. Anyone with the link can open your deck and move through it independently. The deck link is public, so viewers don't need a Bolt account to access it. Moving between slides doesn't affect what you or anyone else sees, and viewers can't edit the deck itself.
You can even use both methods together: Let others view the deck while you present it, so they can browse ahead or revisit previous slides at their own pace.
## Use the Bolt Slides open-source library
Bolt Slides are built on an open-source skill and component library that's available at [github.com/stackblitz/bolt-slides](https://github.com/stackblitz/bolt-slides). If you want to build with a coding agent of your choice (like Claude Code, Cursor, or Codex) instead of prompting inside Bolt, you can clone this repository to download a copy you can work from.
Cloning the repository creates a local copy of the files on your computer. Changes you or your agent make don't affect the original repository, so you're free to edit your copy however you like.
1. In the terminal, run this command to clone the repository to your computer: `git clone https://github.com/stackblitz/bolt-slides`.
2. Open the `bolt-slides` folder, then run `npm install` in that folder.
You can navigate to the folder using the terminal or find the folder wherever you cloned it (like your Desktop) and right-click to open the command line from there.
1. Open the coding agent of your choice and give it access to the `bolt-slides` folder.
2. Ask the agent to read `.bolt/skills/slides/SKILL.md` before making changes. This file explains the component library, theming conventions, and how content builds progressively within a slide.
3. Describe the deck you want to build. While building, the agent replaces the demo slides in `src/App.tsx` with your content.
1. In the terminal, run `npm run dev` in the `bolt-slides` folder.
2. Copy the `localhost` URL it provides and paste it into your browser. This opens the deck for you to preview, present, or share.
The styling conventions in the deck come from the `:root` block in the `src/styles/tokens.css` file. To apply your own brand styles, ask the agent to update this file so that the changes apply across every slide.