Connect Bolt to your Netlify account
A Netlify account is required to connect Bolt to Netlify. If you don’t have one, sign up for one. Follow these steps to connect your Netlify account to Bolt: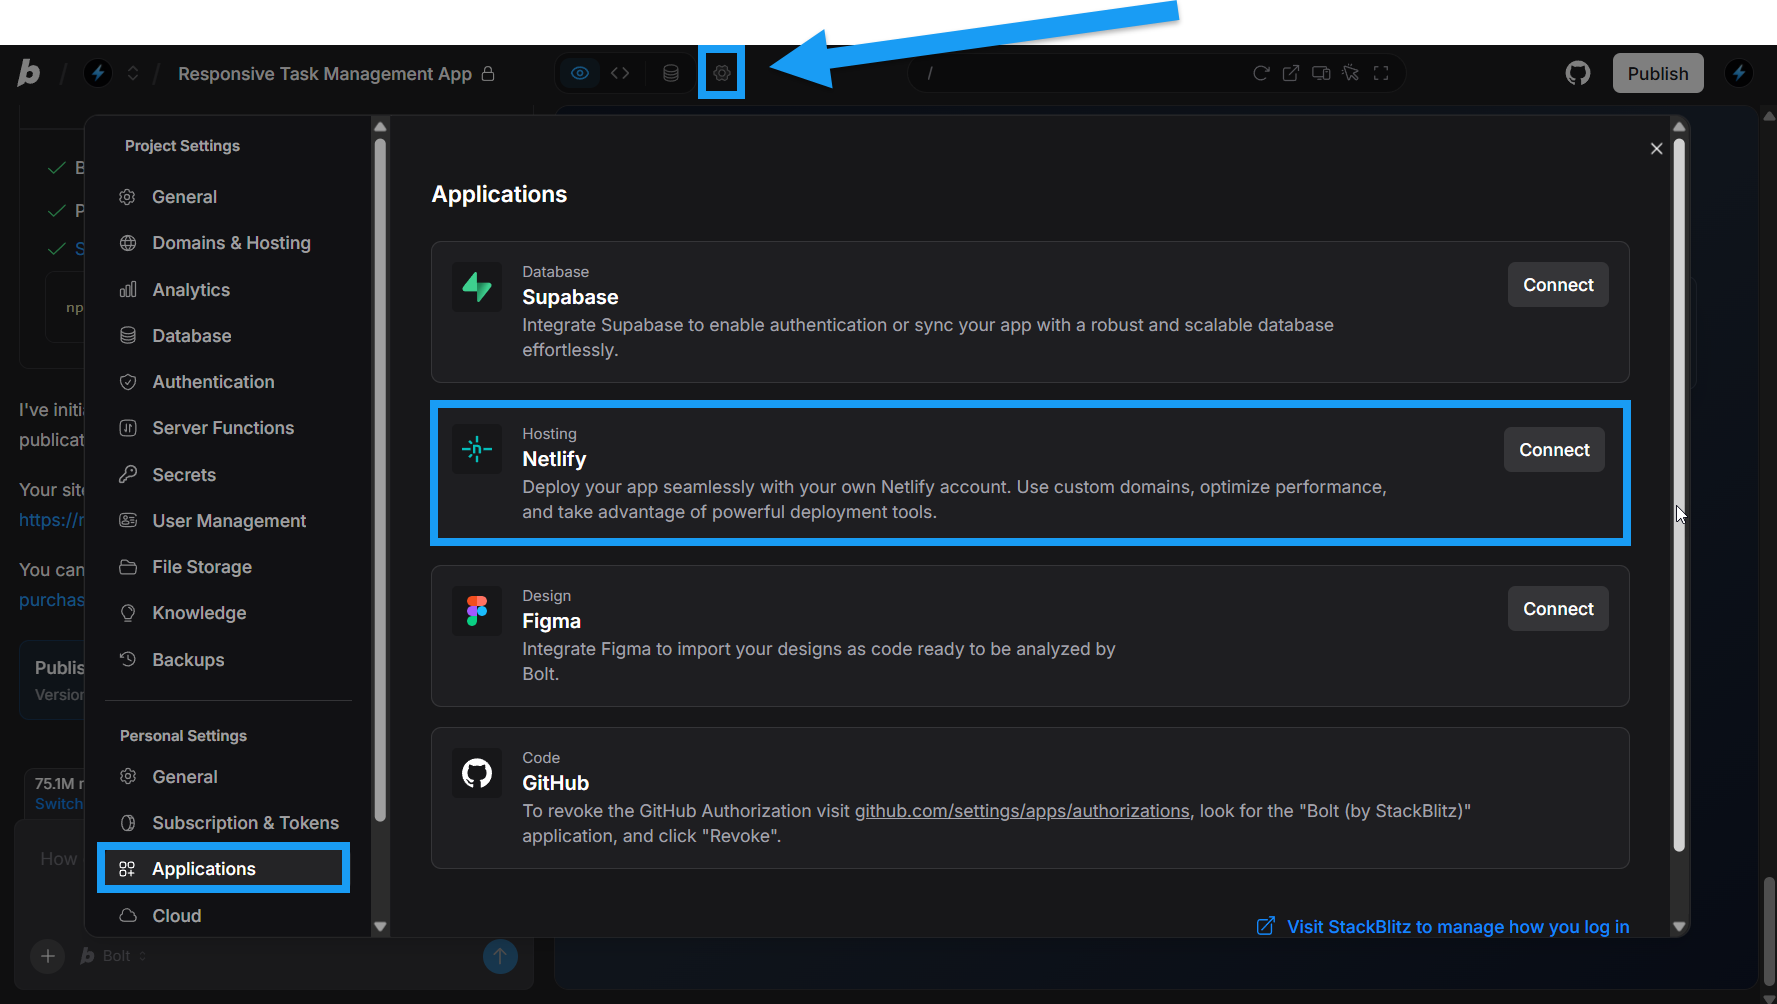
- Open any Bolt project.
- Click the gear icon in the top center of your screen, then click All project settings.
- Click Applications under Account settings.
- Click Connect in the Netlify section.
- Log in to Netlify as prompted.
- Follow Netlify’s steps to complete the process.
Publish new projects to Netlify instead of Bolt hosting
While Bolt hosting is the default hosting option provided when you choose to publish a project, you can also choose to connect a Netlify account and publish your project to Netlify hosting instead. To switch a project from Bolt to Netlify hosting, two things are required:- You must first connect Bolt to your Netlify account as described in the section above.
- You must not have already published your project to Bolt hosting. (There is no going back; you’ll have to create a new, unpublished copy of the project if you’ve already published it to Bolt hosting.)
- Click the gear icon in the top center of your screen, then click All project settings.
- Click Domains & Hosting.
- Use the drop-down to select Netlify for your hosting provider.
- Close the Settings window.
- Click Publish in the top-right corner of your screen.
- Click the second Publish button that appears.
- Wait about a minute for Bolt to deploy your site.
- Click the link that appears in the chat window to open your site (published to Netlify) in your browser.
Change your Netlify URL
When you first publish your app, Bolt automatically creates a randomnetlify.app URL name for you.
This feature is available on Teams plans only. Users on individual plans will not see the option to edit the automatically-generated URL.
- Click Publish in the top-right corner of your screen.
- Click the pencil icon next to your published domain URL.
- Make your changes in the window that appears.
- Decide whether to republish after updating using the checkbox.
- Click Save.
Unpublish a project with Netlify hosting
Want to take down a site you’ve published with Netlify hosting? No problem, just follow these steps:
- Click the gear icon in the top center of your screen, then click All project settings.
- Click Domains & Hosting.
- Click the red Unpublish text.
- Confirm by clicking Unpublish again.
Switch your project from Netlify to Bolt hosting
You cannot switch from Netlify to Bolt hosting when your project is in a published state.
- Unpublish your project if it is currently published to Netlify.
- Click the gear icon in the top center of your screen, then click All project settings.
- Click Domains & Hosting.
- Use the drop-down to select Bolt Cloud as your hosting provider.
Your project will now publish to Bolt hosting.
Limitations
If you plan to continue using Netlify, you may want to understand more about the platform and the type of software it’s designed to host. For example, Netlify can’t host your database or a traditional backend.- Read Bolt’s Supported technologies
- What is Netlify?: Netlify’s own description of their purpose and features.
- Intro to Composable Architecture: this is a big topic, but it’s worth exploring, as it helps you understand what Netlify can and can’t support, and how to build for publishing to Netlify.
Explore Netlify’s website and documentation for full details of Netlify’s features.
Publish manually
You can also publish your project to Netlify without connecting your Bolt account.- Run the project build command (usually
npm run build). - Click Download to download the project.
- Follow Netlify’s Manual deploy instructions.
Note that Bolt calls this feature Publish whereas Netlify calls it Deploy.
Disconnect your Netlify integration
If you’d like to disconnect your Netlify integration, follow the steps below:- Open any Bolt project.
- Click the gear icon in the top center of your screen, then click All project settings.
- Click Applications under Account settings.
- Click Disconnect in the Netlify row.
- Log in to your Netlify account and remove Bolt from your authorized applications:
- Click your profile > User settings > OAuth.
- Under Authorized applications, click the menu for the Bolt entry.
- Click Revoke access.
Netlify FAQs and troubleshooting
How can I unpublish a project on Netlify?
How can I unpublish a project on Netlify?
For projects published after August 14, 2025, see Unpublish a project with Netlify hosting. For projects originally published to Netlify prior to August 14, 2025, without a Netlify integration, contact Bolt customer support to request unpublishing. If your account does have a Netlify integration, you can unpublish your site through your Netlify account. See their article on Deploys, rollback, and deletion.
I published my project with Netlify before Bolt hosting was introduced on August 14, 2025, do I have to switch from Netlify to Bolt?
I published my project with Netlify before Bolt hosting was introduced on August 14, 2025, do I have to switch from Netlify to Bolt?
No, you do not have to make the switch. The choice is yours to continue publishing your existing projects to Netlify and use them to manage any custom domains, or to switch to Bolt hosting.
Can I publish new projects to Netlify?
Can I publish new projects to Netlify?
Yes, though your project needs to be in an unpublished state to make the switch. See Publish new projects to Netlify instead of Bolt hosting.