How to connect a domain to Bolt registered through a third-party
You can connect a domain only to a published site. If you don’t see the option to connect a domain under the Domains & Hosting page, you probably haven’t published your project yet.
Add your domain name in Bolt
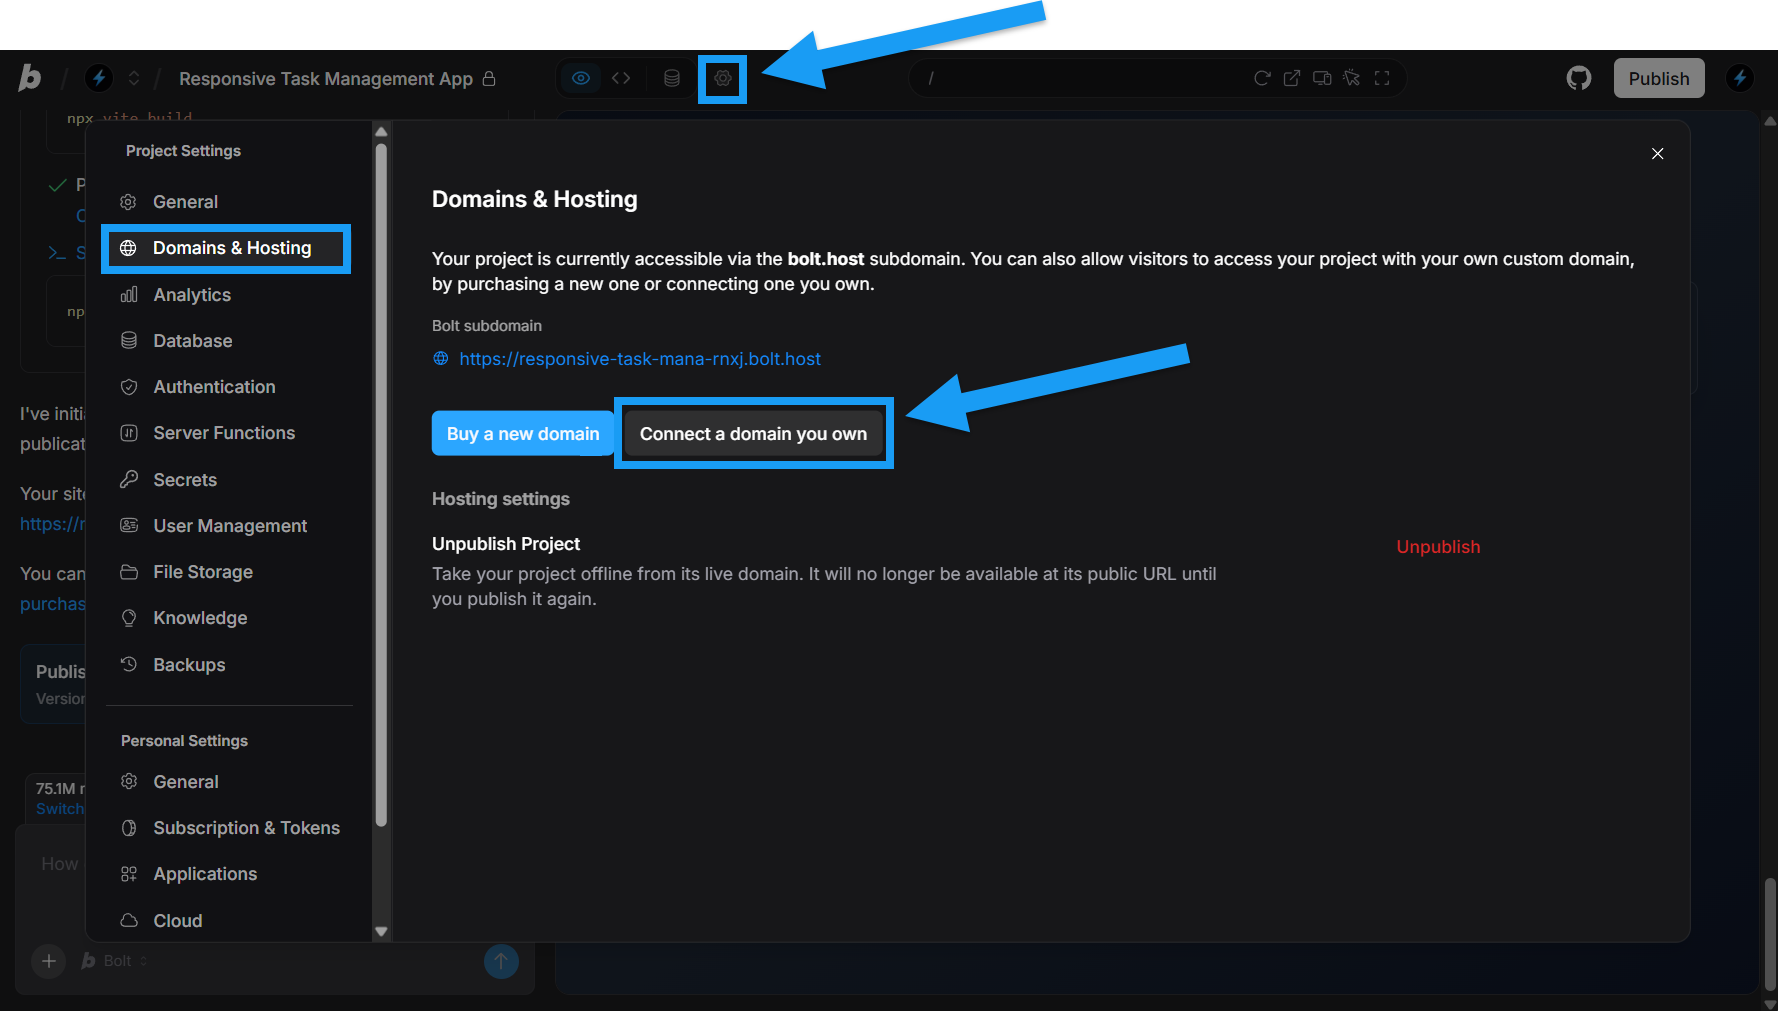
- Click the gear icon in the top center of your screen, then click All project settings.
- Click Domains & Hosting.
- Click Connect a domain you own.
-
In the Add your custom domain dialog, enter your domain name in the Custom domain field, then click Verify and add domain.
You’ll see a warning if there’s a problem with the domain, like if it’s unregistered (and needs to be purchased), already connected to another project, in use on Netlify, or owned by another user.
- Keep the DNS configuration page that appears open in your browser and follow the steps in the next sections in a new tab or window.
You’ve told Bolt that you want to add a custom domain. If you’re connecting a subdomain, continue on to verify ownership. Then point your domain to your Bolt site through the provider where the domain is registered.
Verify domain ownership
This step applies when you connect an external subdomain, like
app.exampleco.com, not a root domain, like exampleco.com. You need to verify domain ownership before Bolt can attach a subdomain to your project.You only have to complete domain verification the first time you connect a subdomain. Unless you delete the DNS record, you won’t see this step again when connecting additional subdomains.
-
When you add your domain, Bolt displays the TXT record you need for verification.
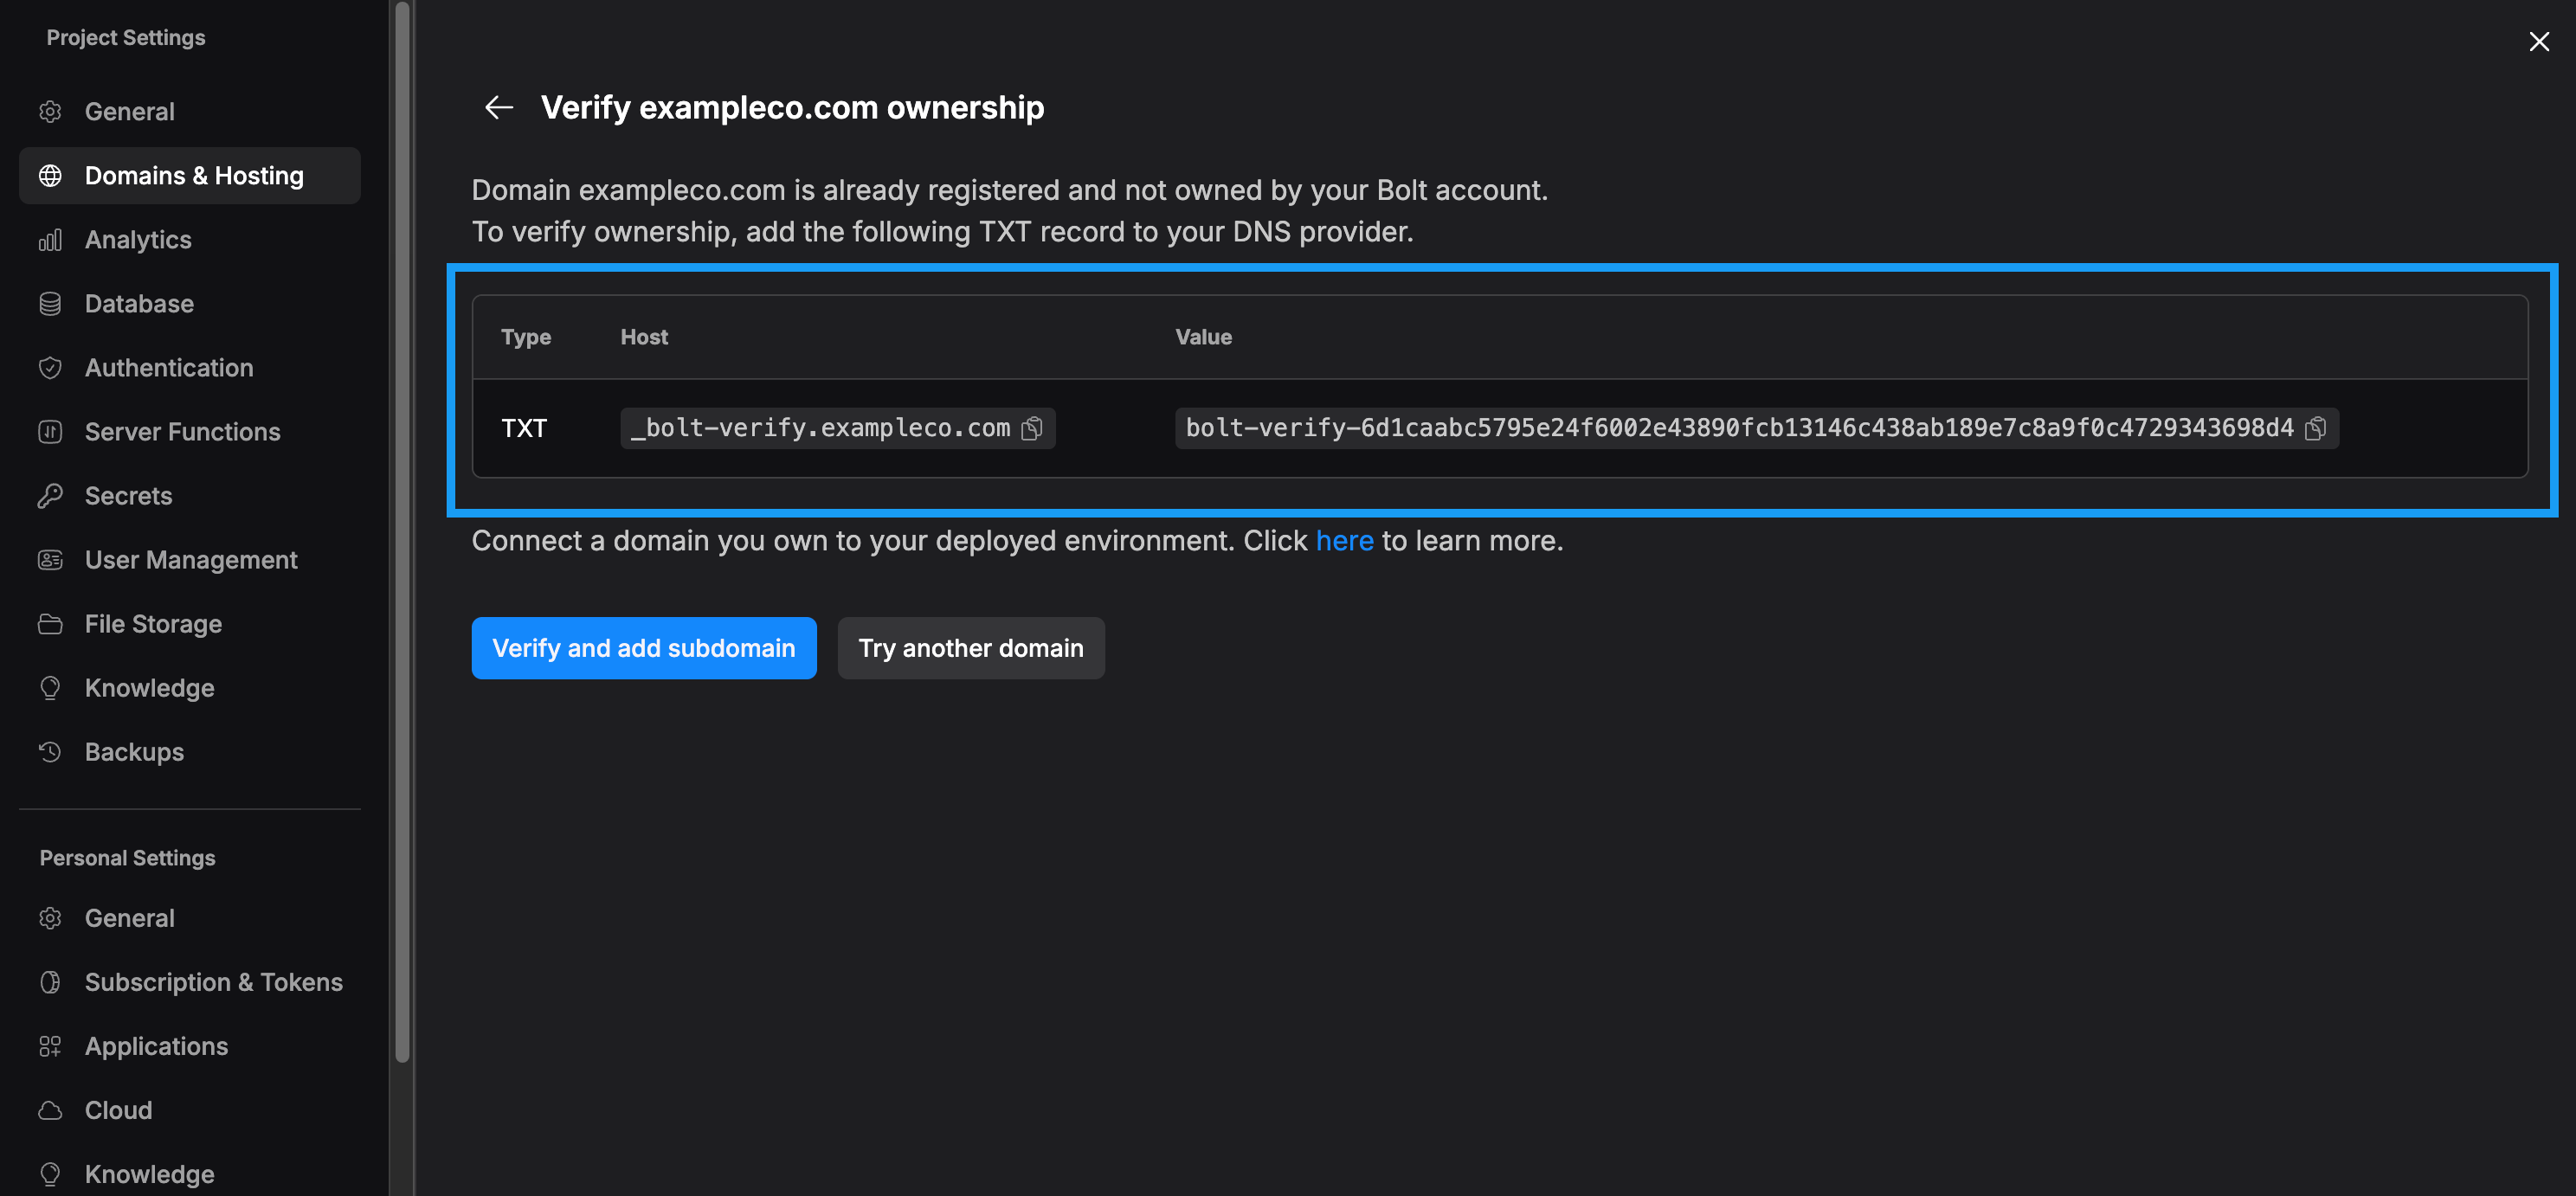
- Log in to your domain registrar account. (This is the company you registered your domain with.)
- Find the area in your domain registrar’s dashboard where you manage your DNS settings.
- Add a new TXT record to your DNS settings using the host name and value Bolt provides.
- Return to Bolt and click Verify and add subdomain to confirm the record has been added. After you add the TXT record, it may take a few minutes for the change to become publicly available. This usually takes 3 to 5 minutes, but it could take a little longer, depending on your DNS provider.
Continue on to add the DNS records for your root domain through the provider where the domain is registered.
Update your DNS settings
- Return to your domain registrar account. (This is the company you registered your domain with.)
- Find the area in your domain registrar’s dashboard where you manage your DNS settings.
-
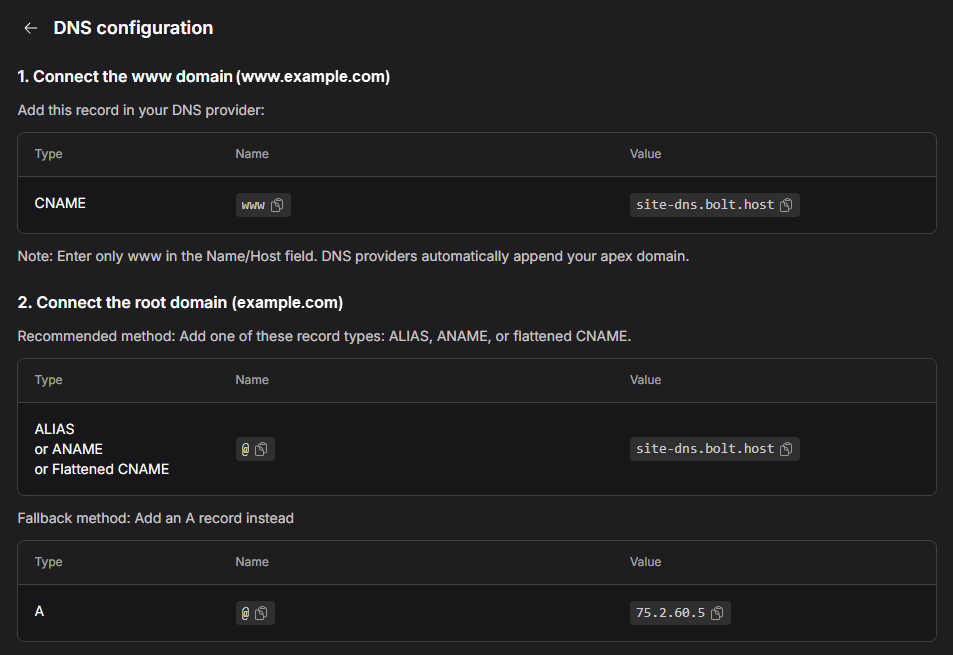
Follow the steps outlined in the DNS configuration page that appeared after you added your domain to Bolt. This includes:
- Connecting the
wwwdomain using a CNAME with the valuesite-dns.bolt.host - Connecting the
rootdomain using an ALIAS, ANAME, or Flattened CNAME with the valuesite-dns.bolt.host
- Connecting the
4
Wait for the changes to take effect
It takes time for your DNS changes to update across the internet. Most domains connect within a few hours, but in some cases, it can take up to 24 hours before your site is fully accessible on the new domain.
Incorrectly pointed domains
If you’re connecting a domain you purchased outside of Bolt, make sure to complete all of the DNS configuration steps Bolt shows you. If you skip these steps or only complete some of them, you may experience problems with your site’s security certificate. In turn, your site could become unreachable or behave inconsistently for visitors.Learn more about your site’s security certificate in SSL certificates.
Subdomains as primary domains
You can use a subdomain as the primary domain on a published project only if you purchased your domain through Bolt. If you bought your domain through another registrar, you can set the main domain as primary, but not any of its subdomains. There are two ways to set a subdomain as your primary domain:- Add it as an alias, then set it as primary on the Domains & Hosting page.
- Connect the subdomain directly when creating a new project.
How to connect a domain previously purchased through Bolt
If you purchased a domain through Bolt but haven’t yet connected it to your account, follow these steps:Add your domain name in Bolt
- Click the gear icon in the top center of your screen, then click All project settings.
- Click Domains & Hosting.
- Click Connect a domain you own.
- In the Add your custom domain dialog, under Your available domains, find your domain and click Add this domain.
Verify status
Because your domain is already associated with your Bolt account, it typically connects within 5–10 minutes, which is faster than an externally registered domain. After waiting, verify its status on the Domains & Hosting page.
- Click the gear icon in the top center of your screen, then click All project settings.
- Click Domains & Hosting.
- Check the Status column.
- Click Verify domain status to refresh if needed.
Disconnect a domain
To remove a domain from one of your projects, follow these steps:- Click the gear icon in the top center of your screen, then click All project settings.
- Click Domains & Hosting.
- Click the three dots on the right side of the domain name row.
- Click Remove.